Free Pattern
Step-by-Step
Crochet
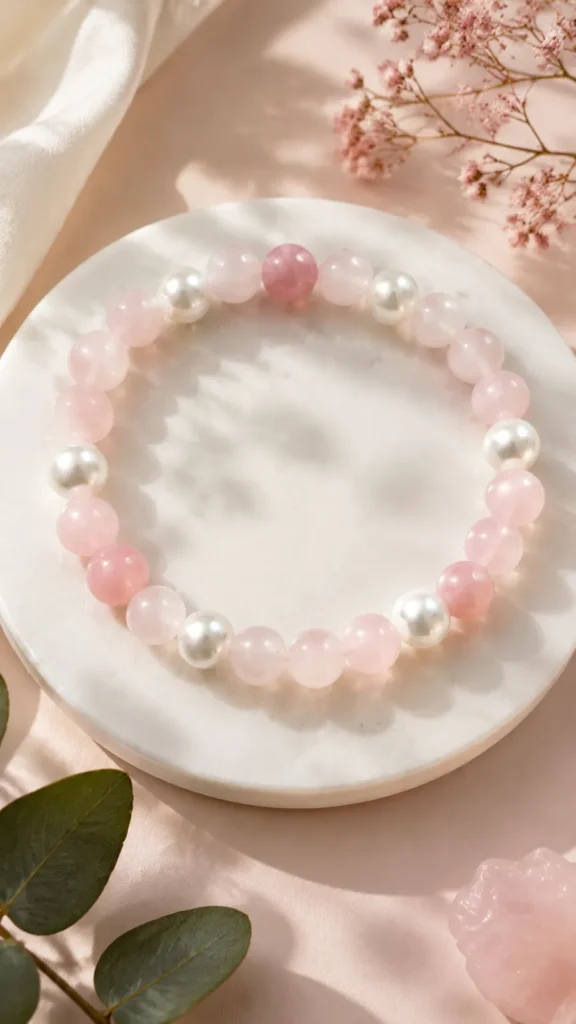
JewelryPink beaded crochet bracelet with pearl accents
A narrow single crochet band finished with pearl-style beads for a soft bracelet.
- Level
- Intermediate
- Time
- 4-6 hours
- Hook
- 2.5 mm
- Yarn
- Sport
Pattern highlights
- Chain a short foundation and work single crochet across to establish the band's width.
- Repeat single crochet rows until the strip reaches a comfortable wrist length.
- Fasten off the final row, leaving a tail long enough for sewing.
- Join the short ends of the band into a closed loop to form the bracelet.
- Thread a sewing needle and space beads evenly along the band's center line.
- Stitch each bead in place with multiple passes, then weave in every end.
About This Pattern
I keep a small drawer for jewelry patterns, separate from the amigurumi and the blankets. This bracelet belongs there, next to anything small enough to finish in one sitting. It is not trying to be a statement piece. It is trying to be worn often, which is a different kind of ambition entirely.
The technique here is plain single crochet, worked flat in rows rather than in the round. That flatness is the whole point. A band worked flat lies smooth against the wrist, and the fine cotton yarn with a small 2.5 mm hook keeps the fabric dense enough to carry beads without sagging.
What comes off the hook is a narrow strip, closed into a loop and dressed with 8 to 12 beads down its center line. It reads as delicate. It is actually sturdy, cotton fabric under a scattering of faux pearls.
Worth knowing
There is something satisfying about a project where the stitch count never changes. Sixteen single crochet stitches, row after row, until the band is long enough. No shaping to track, no chart to check against. The real decisions come later, when I am spacing beads by eye along the center line and deciding how many pearls feel right. Sewing them on with a separate needle and thread, rather than stringing them into the chain, gives the piece a fabric softness that threaded bead jewelry never has. It is a quick make with a slow, careful finish, and that contrast is the appeal.
Common mistakes
- Uneven tension across rows Keep loops consistent through every single crochet row, since loose stitches show immediately on a narrow band.
- Beads spaced unevenly Measure roughly every 4 to 5 stitches before stitching anything down, so the spacing reads as balanced.
- Beads attached with too few stitches Pass the needle through each bead several times; a single stitch will work loose with wear.
- Steaming too close to the beads Keep the iron or steam on the crochet fabric only, since direct heat can dull or warp faux pearls.
- Skipping the gauge check on row Confirm the first row sits at 16 sc before continuing, so the band doesn't drift wider or narrower.
- Band stretches too much Try a smaller hook size or a slightly thicker cotton yarn to create more structure, since crochet jewelry benefits from a firm foundation.

Intermediate
Progress Tracker
0 of 0 rounds
Tap a round to tick it off — your place is saved on this device.
The kit
- The visible style is best recreated with compact stitches that form a smooth surface. Single crochet is recommended because it creates a firm fabric that supports beads without stretching too much. A cotton or cotton-blend yarn is suggested because it provides structure, softness, and easy care.
Construction
- Narrow rows joined into a bracelet band
Main stitch
- Single crochet with decorative bead accents
Suggested yarn
- Lightweight cotton yarn
Skill level
- Beginner to advanced beginner
Finished size
- Approx. 7 inches / 18 cm circumference
Gauge
- Approx. 24 single crochet stitches x 26 rows = 4 inches / 10 cm
- Sport weight cotton yarn in a soft pink, cream, or pastel shade, approximately 20 yards / 18 meters
- 2.5 mm crochet hook (US B-1)
- Approximately 8 to 12 small decorative beads or faux pearl beads
- Fine sewing needle suitable for yarn and beads
- Thread or matching thin yarn for bead attachment
- Scissors
- Tape measure
- Stitch marker
Main Pattern
This bracelet is worked flat in rows to create a narrow band. The ends are joined after the desired length is reached. Beads are attached afterward so placement can be customized.
Single Crochet: Insert hook into stitch, yarn over, pull up a loop, yarn over again, and pull through both loops on hook.
Foundation RowChain 17.
Row 1Starting in the second chain from hook, work 16 sc across. Ch 1, turn. (16 sts)
Row 2Sc in each stitch across. Ch 1, turn. (16 sts)
Rows 3–40Repeat Row 2 until the band measures approximately 7 inches / 18 cm or fits comfortably around the wrist. Each row should contain 16 sc.
Final RowWork one row of sc across. Fasten off, leaving a yarn tail for sewing.
Adding the Beads
Arrange beads evenly along the center line of the bracelet.
Use a sewing needle and matching thread or yarn to stitch each bead securely in place.
Place beads approximately every 4 to 5 stitches for balanced spacing.
Secure each bead with multiple stitches and weave in the ends.
Assembly
Step 1After completing the bracelet, gently reshape the band with your fingers. If needed, place it flat under a towel and lightly steam block the crochet portion while avoiding direct heat on decorative beads.
Step 2Hand wash gently when necessary.
Step 3Allow the bracelet to air dry flat.
Step 4Store away from moisture to protect beads and yarn fibers.
Finishing
- Fold the bracelet band so the short ends meet, then use a slip stitch seam or whip stitch to join the ends.
- Weave in all remaining yarn tails.
- Lightly block the bracelet flat if needed.
Why it works
The band is worked flat in rows rather than joined in the round, because a flat strip is easier to join to an exact wrist size later.
The stitch count holds steady at 16 sc per row throughout the body, so the band's width never varies from end to end.
Beads are added after the crochet is finished, not worked into the stitches, which lets placement shift without unraveling anything.
Use pastel beads for a soft, feminine style or wooden beads for a more natural look; cotton thread can stand in for yarn for an even more delicate jewelry finish.
To adjust the fit, measure the wrist and add about 0.25 to 0.5 inches (0.6 to 1.3 cm) of ease, then add rows for a larger bracelet or remove rows for a smaller one before joining the ends.
What it becomes
- A bridesmaid gift that pairs well with simple cotton or linen dresses.
- A friendship bracelet made in a shared evening, swapping bead colors between pieces.
- An everyday accessory for spring and summer, worn alongside plain stud earrings.
Original pattern: https://duniarecipe.com/elegant-pink-beaded-bracelet-with-pearl-accents-for-a-soft-feminine-look/
FAQ
Can I use a different yarn weight than sport weight cotton?
A thicker yarn will make the band bulkier and change the bead spacing. The pattern is written for sport weight cotton with a 2.5 mm hook, so I'd stay close to that for a predictable result.
How do I know when the band is long enough?
Measure it against your wrist as you go, aiming for about 7 inches or 18 cm, or whatever fits comfortably. Every row should still hold 16 sc when you stop.
Do the beads get crocheted in or sewn on afterward?
Sewn on afterward, with a separate needle and thread or matching yarn. That's what lets you adjust spacing before committing to a stitch.
What if my bracelet comes out wider or narrower than expected?
Check your tension first, since this band relies on a firm, even single crochet fabric. A looser hook or heavier yarn will shift the width from the intended 16 sc.