
Free Pattern
Step-by-Step
Crochet
JewelryEmerald botanical bracelet with rose and leaves
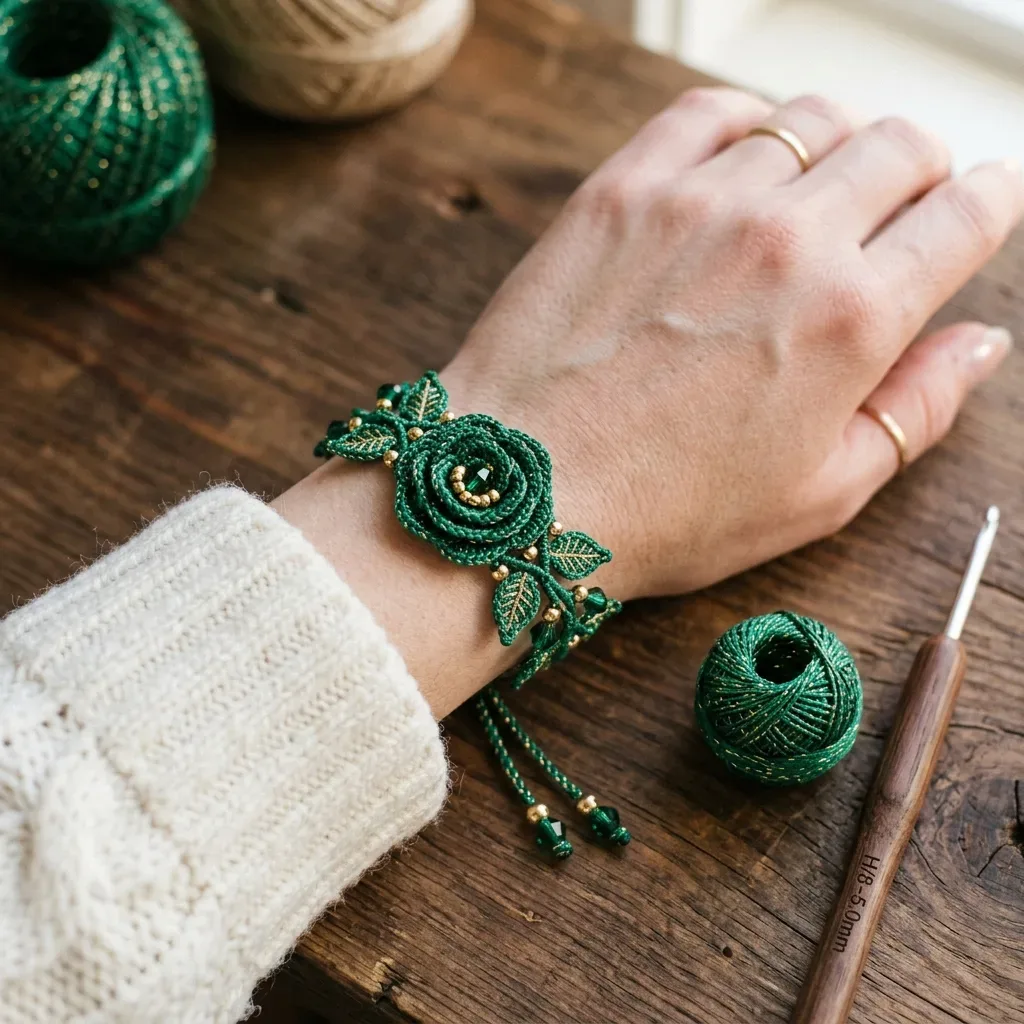
A thread-crochet bracelet with a rose centerpiece, leaves, and a sliding cord closure.
- Level
- Intermediate
- Time
- 6-10 hours
- Hook
- 1.65 mm
- Yarn
- Lace
Pattern highlights
- Start with the adjustable band, worked as a tight cord using the slip stitch technique throughout.
- Crochet four large leaves and four small leaves separately, then attach them to the band.
- Add the vein detail to each leaf after the main shape is complete.
- Build the rose centerpiece in spiral rounds, working the center first and petals after.
- Mount the finished rose onto the band to form the focal panel.
- Sew gold and green seed beads into the rose center and secure all loose ends.
- Assemble the sliding closure by threading the cord tails through the center channel.
About This Pattern
This one lives in the small-scale drawer of my collection, next to the other thread pieces that take longer than their size suggests. A bracelet, not a motif for a blanket, which changes how I think about every stitch. Size 10 cotton held with gold metallic thread is fussy work, and I like that it says so upfront.
The technique list here is short but specific: a cord slip stitch for the band, a twisted cord bind for the closure, and a spiral rose built in rounds. None of these show up in a typical afghan square. I appreciate a pattern that names its own tricks instead of assuming I already know them.
What comes off the hook is a band that adjusts from 6 to 8 inches, no clasp hardware needed, with a focal panel under 3 inches wide. The rose alone is about 1.25 inches across. It reads as jewelry, not as a crochet swatch wearing a disguise.
Worth knowing
I like projects that teach me a new way to hold a hook, and the Cord Slip Stitch does that. Working into the back bump only, with tension held tight, turns a plain chain into something that feels like cord, not lace. The Twisted Cord Bind closure is its own small puzzle, a sliding barrel knot built from two tails threaded through a channel. Then there's the rose, worked in continuous spiral rounds, which is a different rhythm from the turned rows of the band and leaves. Four leaves, two sizes, each with a vein detail added after the fact. Beading the rose center at the end gives the piece its glint. It is a bracelet that uses four distinct techniques and never repeats itself.
Common mistakes
- Working into both loops on the cord The Cord Slip Stitch calls for the back bump only on the foundation row. Working into both loops flattens the cord instead of rounding it.
- Loose tension on the band rows Keep slip stitches tight and even on every row, not just the foundation. A loose cord won't hold the gauge the band length depends on.
- Losing the marked stitch on the leaf Place the stitch marker in the first sc before starting the spiral edging round. Without it, it's easy to misjudge where the round begins.
- Pinning the rose flat to block Leave the rose unpinned and three-dimensional during blocking. Only the leaf motifs get pinned flat.
- Tugging cord ends before gluing Trim ends close to the fabric and glue them before the closure sees any real tension. Untreated ends can slip back through the channel.


Intermediate
Progress Tracker
0 of 0 rounds
Tap a round to tick it off — your place is saved on this device.
The kit
Yarn
- Size 10 crochet cotton thread in deep emerald green. You need one ball of approximately 300 yards. The thread should have a tight, smooth twist. You also need one spool of fine gold metallic thread at size 10 equivalent, approximately 50 yards. Hold both threads together throughout the entire project.
Recommended yarn options
- Option 1: Lizbeth Size 10 Crochet Cotton in Emerald Green (shade 685) held with Kreinik Fine Braid 008 (Gold). This gives the most accurate color match and the metallic braid behaves beautifully at this gauge.
- Option 2: DMC Petra Size 10 in color 5909 (Dark Green) held with DMC Light Effects thread E3821 (Gold). Widely available and produces excellent stitch definition with a slightly softer hand.
- Option 3: Aunt Lydia’s Classic Crochet Thread Size 10 in Myrtle Green held with any fine gold metallic embroidery thread at 40-weight equivalent. This is the most budget-friendly option.
Hook
- Steel crochet hook size 7 (1.65 mm). A steel hook with an inline head gives the cleanest results for tight-tension cord work.
Notions
- Gold metallic seed beads, size 8/0, approximately 40 beads
- Green metallic seed beads, size 8/0, approximately 12 beads
- Beading needle, fine
- Tapestry needle
- Sharp scissors
- Stitch markers, at least 4
- Blocking board and rust-proof pins
- Fine mist spray bottle for blocking
Band Strip A
Foundation: Chain 110 tightly. (110 ch)
Round 1CSS Row Working into back bumps only, sl st in second ch from hook and in each ch across. Turn. (109 sl st)(109)
Round 2Chain 1 (does not count as a stitch here or anywhere in the band), working into back loop only of each sl st, sl st in each st across. Turn. (109 sl st)(109)
Round 3Repeat Row 2. (109 sl st) Fasten off, leaving a 12-inch tail for seaming.
Large Leaf (Make 4)
Foundation: Chain 14. (14 ch)
Round 1(RS): Sc in second ch from hook, sc in next 4 ch, hdc in next 2 ch, dc in next 2 ch, hdc in next 2 ch, sc in next ch, work 3 sc in the last ch (this turns the corner at the leaf tip). Now rotate work and work back along the opposite side of the foundation chain: sc in next ch, hdc in next 2 ch, dc in next 2 ch, hdc in next 2 ch, sc in next 4 ch. Do not join. Place marker in first sc of row. (29 sts total around the leaf)
Round 2Working in continuous spiral, sl st in the first marked st, ch 1, sc in each st around the outer edge, working 3 sc into the center st of the 3-sc tip group. Join with sl st to first sc. (31 sc)Fasten off, leaving a 10-inch tail for sewing.
Small Leaf (Make 4)
Foundation: Chain 10. (10 ch)
Round 1(RS): Sc in second ch from hook, sc in next 2 ch, hdc in next 2 ch, sc in next 2 ch, work 3 sc in the last ch. Rotate work and work back along the opposite side: sc in next 2 ch, hdc in next 2 ch, sc in next 2 ch. Do not join. (21 sts total around the leaf)
Round 2Sl st in the first st at base, ch 1, sc in each st around, working 3 sc into the center st of the 3-sc tip group. Join with sl st to first sc. (23 sc)Fasten off, leaving a 10-inch tail for sewing.
Section 1: The Band
The band is a two-layer cord structure. You will make two identical cord strips, then layer and join them to form a smooth, slightly padded band.
Band Strip B
Repeat Band Strip A exactly. Do not fasten off the second strip yet.
Checkpoint: Each strip should measure approximately 5.5 inches (14 cm) long and be very firm. If your strips are longer than 6 inches, your tension is too loose. If shorter than 5 inches, your tension is too tight. Adjust and redo before continuing.
Closure Channel
At the center of the band, place a stitch marker on each side to mark the center 1.5-inch segment. This is where the rose will attach. Set the band aside.
Section 2: The Leaves
You will make 4 large leaves and 4 small leaves, totaling 8 leaves. The 4 large leaves flank the rose directly. The 4 small leaves extend outward along the band in pairs.
Vein Detail for Large Leaf
Reattach yarn at the base of the leaf on the RS. Using Surface Slip Stitch, work a center vein line from base to tip: SSS in every other stitch along the center column of the leaf all the way to the tip. Fasten off and weave in ends. (approximately 7 SSS along the center vein)
Reattach yarn at one side of the center vein midpoint and work 3 SSS diagonally toward the leaf edge to create a side branch vein. Fasten off. Repeat on the other side to create a matching branch. Repeat for the lower portion of the leaf, making 2 more branch veins on each side closer to the base. You will have 1 center vein and 4 side branch veins per large leaf.
Vein Detail for Small Leaf
Reattach yarn at the base on the RS. Work SSS center vein from base to tip (approximately 5 SSS). Work 2 side branch veins on each side using 2 stitches per branch instead of 3. Fasten off and weave in ends.
Checkpoint: Before moving to the rose, you should have 4 large leaves measuring approximately 1 inch long by 0.5 inch wide, and 4 small leaves measuring approximately 0.75 inch long by 0.4 inch wide. All should have completed vein detail. Pin them to a blocking board and mist lightly. Allow to dry fully before assembly.
Section 3: The Rose
The rose is built from a center spiral worked outward in increasing rounds. It naturally coils up to create the bloom. Work in a continuous spiral without joining rounds.
Rose Center
Step 1: Using the PSS technique, make a magic ring. Ch 1, work 6 sc into the ring. Place stitch marker in first sc. Do not join. (6 sc)
Step 2 (Rnd 1 of spiral): Working in continuous spiral, inc in each of the 6 sc around. (12 sc)
Step 3 (Rnd 2): (Sc in next st, inc in next st) 6 times. (18 sc)
Step 4 (Rnd 3): (Sc in next 2 sts, inc in next st) 6 times. (24 sc)
Step 5 (Rnd 4): (Sc in next 3 sts, inc in next st) 6 times. (30 sc)
The disc should measure approximately 0.75 inch in diameter. It will have begun to cup upward at the edges naturally.
Petal Layer 1 (Inner Petals)
Step 6 (Rnd 5): Working now in the front loop only, (ch 3, sc in blo of next 2 sts) 10 times. (10 petal loops created, 30 sts consumed)
Step 7 (Rnd 6): Still in flo, (ch 4, sc in blo of next 3 sts) 8 times, ch 4, sc in blo of next 2 sts. (9 petal loops created)
Petal Layer 2 (Outer Petals)
Round 1Step 8 (Rnd 7): Working into the back loop only of the sts from Rnd 4 that were skipped by the flo working in Rnds 5 and 6, join yarn if necessary to the first unworked blo st from Rnd 4. Work (ch 5, sc in next 4 blo sts) 5 times, then ch 5, sc in next 2 blo sts to close the round. (6 large outer petal loops created)
Round 2Working along the outer edge, sl st into each ch-5 loop around once more to reinforce and stiffen the outer petals. (6 reinforced petal loops)
Rose Center Beading
Thread a beading needle with a 20-inch length of thread (single strand of crochet cotton, no metallic). Knot the end. Bring the needle up through the center of the rose from the wrong side. Thread on one gold seed bead and take the needle back down adjacent to where it came up. Repeat until the rose center is densely filled with approximately 8 to 10 gold seed beads arranged in the central spiral area. Knot securely on the WS.
Checkpoint: The finished rose should measure approximately 1.25 inches in diameter, be distinctly three-dimensional with layered petal loops rising from center outward, and have a densely beaded center. The two tendril stems should extend from the base.
Assembling the Sliding Closure
At the point where the two band ends cross, make a small sliding barrel knot using the working tails. With one tail, chain 6, then wrap this chain tightly twice around both overlapping band strands, then sl st into the first ch. This creates a barrel that can slide along both strands simultaneously. Trim excess tail to 0.25 inch and secure with a small drop of clear nail polish for cotton thread. Repeat with the other tail to create a second barrel knot 0.25 inch away from the first.
Tassel Ends
Each of the four free cord ends now extends beyond the barrel knots. Cut each to 2.5 inches beyond the outermost barrel. Thread 2 gold seed beads and 1 green metallic bead onto each end. Tie an overhand knot after the last bead to secure. Apply a small drop of clear-drying craft glue behind each knot. Allow to dry fully.
Attaching the Leaves
Arrange the leaves on the band with the rose still set aside. Working outward from where the rose will sit, place one large leaf on each side angling upward and outward at approximately 30 degrees from horizontal. Place a second large leaf on each side angling slightly downward at 15 degrees. Place 2 small leaves on each side further along the band, one above and one below the band line.
Using the tapestry needle and sewing tails, stitch each leaf to the band with 6 to 8 small, tight whip stitches around each leaf base. Pull firmly. The leaf bases should overlap the band by approximately 0.25 inch. Weave all ends into the back of the band.
Attaching the Rose
Center the rose over the band overlap point, covering it completely. Position the two tendril stems so they extend below and to either side of the rose base. Using the 12-inch tail and a tapestry needle, stitch the rose base firmly to the band using a tight circular whip stitch around the entire base perimeter, going through the band fabric at least 8 times. The rose should feel completely immobile when tugged gently. Weave the end through the band layers and trim.
The tendril stems can be tacked to the band surface at their ends with 2 to 3 stitches to prevent them lifting away.
Assembly
Step 1Mist the entire finished bracelet lightly with water. Pin the leaf motifs flat on a blocking board, spreading the vein lines gently with fingertips. Allow the rose to remain three-dimensional and unpin. Allow to dry completely, at least 4 hours.
Step 2Once dry, check all bead attachments by gently tugging each bead. If any moves more than minimally, reinforce with the beading needle.
Step 3Trim all ends to within 0.125 inch of the fabric and apply clear-drying fabric glue to each trimmed end using a toothpick. Allow to cure for 1 hour.
Finishing
- Weave in and trim every tail left from the band, leaves, and rose, then glue each cut end.
- Sew the gold and green seed beads into the rose center once the rose is mounted.
- Mist and pin the leaves flat for blocking while leaving the rose unpinned to keep its shape.
Why it works
The band is worked as rows of slip stitches into the back loop only, which keeps the cord round rather than flat.
Each leaf starts flat as a single chain, then the edging row goes around in a continuous spiral, placing 3 stitches at the tip to turn the corner without a seam.
The rose is built in spiral rounds rather than turned rows, which is why the center and both petal layers can be worked without joining seams between rounds.
What it becomes
- A finished piece for a jewelry box alongside other handmade thread accessories, not everyday costume jewelry.
- A gift for someone who already owns crochet thread and would recognize the technique.
- A display piece on a pin cushion or jewelry stand when not being worn, since the rose holds its shape.
Original pattern: https://crochr.com/emerald-botanical-bracelet-free-crochet-pattern/
FAQ
Can I skip the metallic thread and use plain cotton?
The pattern holds the cotton and gold metallic thread together throughout, which affects both the gauge and the sheen. Dropping the metallic thread would change the stitch definition the gauge swatch is based on.
Why does the band use slip stitches instead of single crochet?
The Cord Slip Stitch is what gives the band its firm, rounded cord texture. A regular chain or single crochet row would come out flat instead.
Do the large and small leaves use the same stitch pattern?
Both leaves follow the same shaping logic, sc and hdc and dc sections building toward a 3-sc tip, just at different chain lengths. The small leaf skips the dc stitches the large leaf uses at its widest point.
How tight should the closure knot end up?
The Twisted Cord Bind should slide smoothly when you pull the individual ends, loosening or tightening as needed. If it binds up instead of sliding, the slip stitches gathering the loop may be too tight.