
Free Pattern
Step-by-Step
Crochet
GarmentsSunflower granny square maxi dress crochet pattern
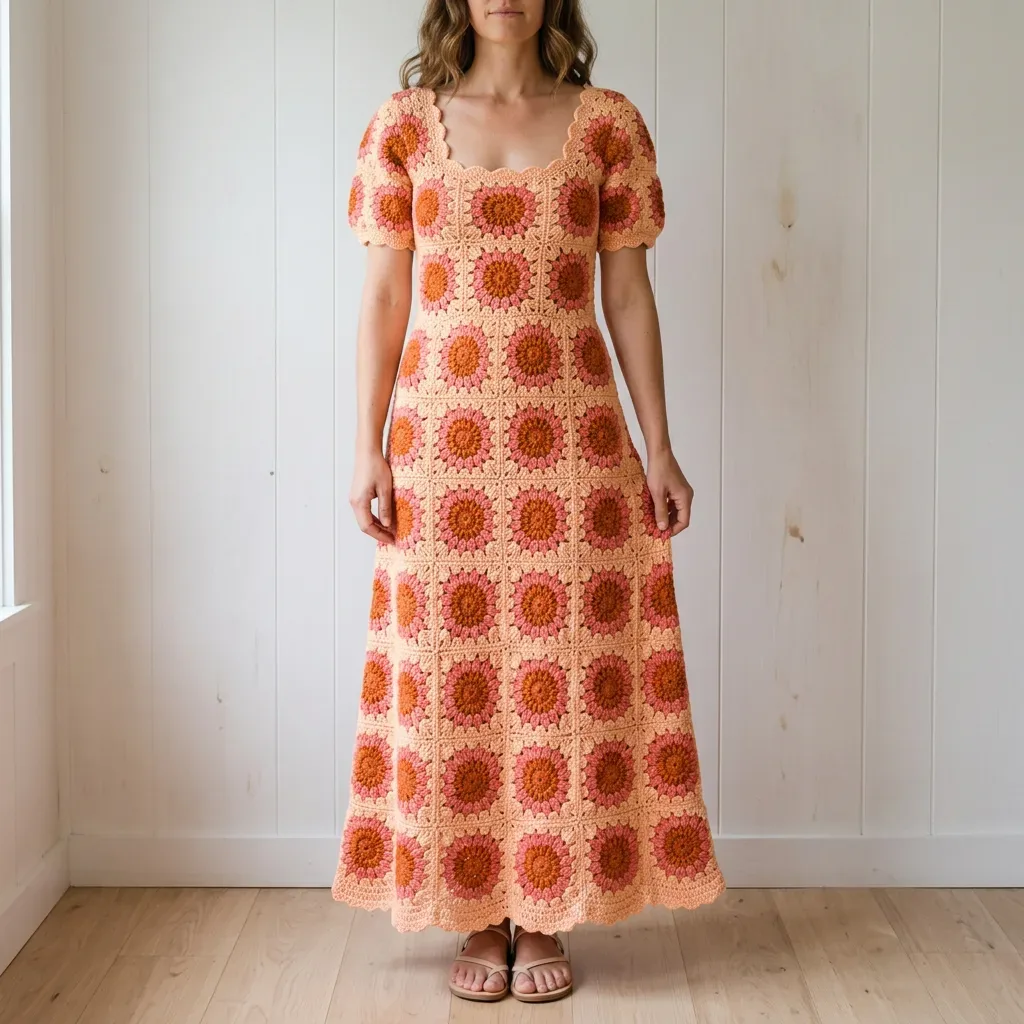
A join-as-you-go granny square maxi dress with sunflower motifs and scalloped borders.
- Level
- Intermediate
- Time
- 4-6 hours
- Hook
- 0.25 mm
- Yarn
- DK
Pattern highlights
- Make a handful of test squares first and block them to confirm your gauge matches the pattern.
- Work starter squares for each panel, then build outward using the join-as-you-go method.
- Fill diagonal gaps at the waist and underarm with half granny square triangles as you go.
- Complete the front bodice, two back bodice panels, two sleeve panels, and the skirt sections separately.
- Seam the finished panels together to form the fitted bodice and flared skirt silhouette.
- Add the scalloped borders at the neckline, sleeve cuffs, and hem to finish the edges.
- Block the whole dress by soaking, squeezing, and pinning flat before wearing it.
About This Pattern
Granny squares usually stay flat. They become blankets, bag panels, maybe a coaster. This dress asks the motif to do something harder: fit a body. I keep a shelf for projects that push a familiar shape past its comfort zone, and this one earns its spot. Four rounds, three colors, and suddenly a square has a job description.
The techniques stack up fast. Join as you go instead of seaming later. Half granny square triangles to fill the gaps a straight grid leaves at the waist and underarm. Multi-round color changes inside each sunflower motif. None of it is new to a granny-square veteran, but asking it all to cooperate at once is the real test.
What comes out the other end is a fitted bodice that flares into a full skirt, bordered in scallops at the neckline, cuffs, and hem. Burnt orange centers, coral petals, peach ground. It reads like a quilt that decided to become a dress, and honestly, that is the best compliment I can give it.
Worth knowing
The satisfaction here is structural, not decorative. Watching a half granny square triangle slot into a diagonal gap and suddenly square off a waistline is a small, specific joy. The join-as-you-go method means no mountain of squares waiting to be seamed later, which changes how the project feels at the halfway point. Each sunflower motif is its own tiny color-change exercise, working front loops for petals and back loops for the surrounding round, so the same four rounds never feel repetitive. By the time the scalloped borders go on at the neckline and hem, the piece has already proven it can hold its shape. That is a good feeling for a granny square project to earn.
Common mistakes
- Skipping the front-loop petal round Round 2 works only in front loops, leaving the back loops free for round 3. Working into both loops merges the petals into the base and loses the sunflower effect.
- Guessing at square size Make and block the test squares before committing to a panel. A square that is off from 4 inches will throw off every seam that follows.
- Seaming squares after the fact This pattern joins as you go on round 4, not afterward. Trying to seam finished squares together separately adds bulk and skips the built-in join.
- Treating the half granny triangle as a full square It is worked flat in rows, not in the round, and only fills half the space of a standard square. Check which edge is the long side before seaming it into a gap.
- Blocking too quickly The pattern allows 3 to 5 hours to dry flat. Rushing this step risks the dress drying unevenly or out of its pinned measurements.

Intermediate
Progress Tracker
0 of 0 rounds
Tap a round to tick it off — your place is saved on this device.
The kit
- Color A (Burnt Orange): approximately 400 (440, 480, 520, 560, 640) yards / 366 (402, 439, 476, 512, 585) meters
- Color B (Coral Pink): approximately 600 (660, 720, 780, 840, 960) yards / 549 (604, 659, 714, 769, 878) meters
- Color C (Warm Peach): approximately 900 (990, 1080, 1170, 1260, 1440) yards / 823 (906, 988, 1070, 1152, 1317) meters
- Lion Brand 24/7 Cotton in Terracotta (Color A), Salmon (Color B), and Peach (Color C). This 100 percent mercerized cotton DK yarn has excellent stitch definition, washes beautifully, and comes in a wide range of warm tones. It is widely available and budget friendly. 186 yards per 3.5 oz skein.
- Paintbox Yarns Cotton DK in Mustard Yellow (Color A), Melon Sorbet (Color B), and Blush Pink adjusted to Peach (Color C). This affordable 100 percent cotton DK has a smooth, matte finish that suits granny square work well. 273 yards per 3.5 oz skein.
- Rowan Cotton Glace in Burnt Orange (Color A), Coral (Color B), and Ecru/Peach blend (Color C). A slightly lighter DK/sport weight option that produces excellent drape in a maxi length garment. Note: if substituting with Cotton Glace, swatch carefully and adjust hook size up by 0.25 mm if needed to achieve the 4 inch square gauge. 126 yards per 1.75 oz skein.
- US size G-6 / 4.0 mm for squares and body
- US size F-5 / 3.75 mm for neckline and cuff borders
- Yarn needle for weaving ends
- Stitch markers, at least 12
- Rust-proof blocking pins and blocking mats
- Measuring tape
- 3 to 5 small buttons, approximately 0.5 in / 12 mm diameter (for back closure loops), optional
- Lining fabric, optional, for opacity
Sunflower Granny Square (SGS)
This is the signature motif for the entire dress. It is worked in 4 rounds using 3 colors. The square measures 4 in x 4 in / 10 cm x 10 cm after blocking.
Round 1Color A, Burnt Orange Make a MR. Ch 3 (counts as first dc). Work 11 dc into the MR. Pull ring closed snugly. Sl st to top of beg ch-3 to join. (12 dc)
Round 2Color A continuing Ch 1. Working in front loops only, work 1 sc in same st, then work (ch 3, sl st in same st) to form a small petal loop, then sl st into next st. Rep (1 sc, ch 3, sl st in same st, sl st to next st) around until 12 petal loops have been formed. Fasten off Color A. (12 petal loops)Detailed petal instruction: Insert hook into FLO of next dc from Round 1. Pull up a loop. Ch 3. Sl st back into same front loop. Sl st into FLO of next dc. Rep 11 more times, working one petal per dc from Round 1. Do not join. Fasten off. (12 petals total)(12)
Round 3Color B, Coral Pink Join Color B with sl st into any BLO of a dc from Round 1 that you have not used yet (the back loops are still free behind the petals). Ch 3 (counts as first dc). Work 1 dc in same BLO. Work 2 dc in BLO of each remaining dc from Round 1 around. Sl st to top of beg ch-3 to join. (24 dc)Now work the outer petal ring: Ch 1. Working in FLO of each dc just made in Round 3, work (sc, ch 4, sc) in same FLO, sl st in FLO of next dc. Rep around to create 24 larger petal loops. Fasten off Color B. (24 petals)
Round 4Color C, Warm Peach, the square body Join Color C with sl st into any BLO of a dc from Round 3. Ch 3 (counts as first dc).At each of 4 equally spaced corners, work (2 dc, ch 2, 2 dc) into the BLO cluster.
Working into BLOs of Round 3 only (petals sit to the front and are not engaged in this round): Work 6 dc into BLOs of 6 consecutive Round 3 stitches, ending at a natural corner point, then work (2 dc, ch 2, 2 dc) in the BLO of the next stitch to form the corner. Continue working 6 dc across the side, then corner. Repeat for all 4 sides. Sl st to top of beg ch-3 to join. Fasten off Color C.
Stitch count verification for Round 4: Each side has 6 dc between corners plus 4 dc that are part of the corner cluster (2 dc before ch-2 sp plus 2 dc after), giving (6 + 4) x 4 = 40 dc plus 4 ch-2 corner spaces. Total: 40 dc, 4 ch-2 sps.
Half Granny Square (HGS) Fill-In Triangle
Used at waist shaping wedges and underarm curves. These are worked back and forth in rows, not rounds, and create a right triangle shape half the size of a full square.
Round 1RS, Color C Ch 4. Work 3 dc in 4th ch from hook. Turn. (3 dc + foundation ch counts as first cluster)
Round 2Color C Ch 3 (counts as dc). Work 2 dc in same st, ch 1. In turning ch-sp, work (3 dc, ch 2, 3 dc). Ch 1. Work 3 dc in top of beg ch-3 of previous row. Turn.
Round 3Color C Ch 3. Work 2 dc in same st. Ch 1. Work 3 dc in next ch-1 sp. Ch 1. In corner ch-2 sp, work (3 dc, ch 2, 3 dc). Ch 1. Work 3 dc in next ch-1 sp. Ch 1. Work 3 dc in turning ch. Fasten off, leaving tail for seaming.
The long straight edge of the HGS equals one full side of a SGS (4 in / 10 cm). The two short sides each equal half a square side (2 in / 5 cm). Use HGS pieces to fill diagonal openings at the underarm and waist step shaping.
Section 1: Standard Square Construction
Before assembling panels, make 4 test squares and block them. Confirm each measures exactly 4 in x 4 in / 10 cm x 10 cm.
Work all squares following the SGS instructions. For JAYG squares, work Round 4 while joining to adjacent squares.
Make starter squares for each panel: Front Bodice: 1 starter square Back Bodice (each panel): 1 starter square Front Skirt: 1 starter square
Back Skirt (each panel): 1 starter square Sleeves: 1 starter square per sleeve
Section 2: Front Bodice Panel
The front bodice panel is built from bottom to top (waist to shoulder). Add squares left to right, then begin a new row above. Use JAYG for all squares after the first in each row.
Row 1 of Front Bodice (bottom row, waist level): Place starter square at left position. JAYG squares 2 through 5 (size M) to the right of the first, joining along the right side of each preceding square. (5 squares in Row 1 for size M)
XS and S: 4 squares. L and XL: 5 squares. 2XL: 6 squares.
Row 2 of Front Bodice: JAYG new square at left above Row 1 square 1, joining new square’s bottom edge to top edge of Row 1 square 1. Continue JAYG across to the right, joining each square’s left side to the previous square and bottom to the corresponding Row 1 square below. (Same width as Row 1)
Rows 3 through 6 of Front Bodice: Rep Row 2 for each subsequent row. Work straight, no shaping, for rows 3 through 4. (Same width throughout)
Neckline Shaping (Rows 5 and 6):
In Row 5, work the full width of the panel. In Row 6, leave the center 1 (1, 1, 1, 1, 2) square(s) unworked at top center to create the neckline opening.
Work the left side: make squares for positions 1 and 2 from the left, JAYG to Row 5 below. Work the right side: make squares for positions 4 and 5 from the left (size M), JAYG to Row 5 below. Leave position 3 (center) open.
For XS and S (4-wide): leave center 2 squares of Row 6 open (positions 2 and 3), work 1 square on each shoulder.
For L, XL: leave center 1 square open, work 2 squares on each shoulder.
For 2XL (6-wide): leave center 2 squares open, work 2 squares on each shoulder.
Checkpoint: The Front Bodice Panel should measure approximately 20 in / 51 cm wide and 24 in / 61 cm tall for size M. The neckline opening is approximately 4 in / 10 cm wide and 4 in / 10 cm deep.
Section 3: Back Bodice Panels (Make 2, Mirror Image)
Each back bodice panel is 2 (2, 3, 3, 3, 3) squares wide x 6 squares tall. The center back edge remains as a finished straight edge.
For size M: Each panel is 3 squares wide x 6 squares tall.
Row 1 (bottom of each back panel): Make starter square. JAYG 2 additional squares to the right. (3 squares for size M)
Rows 2 through 5: Work straight, 3 squares wide. JAYG each square to the one below and to the left-neighbor square.
Row 6 (shoulder row): Work full width. For size M, work all 3 squares. Checkpoint: Each back bodice panel should measure 12 in / 30 cm wide and 24 in / 61 cm tall for size M.
Section 4: Sleeve Panels (Make 2)
Each sleeve is a 2 square wide x 2 square tall panel (all sizes). This creates a cuff-to-shoulder span of approximately 8 in x 8 in / 20 cm x 20 cm.
Make 1 starter square. JAYG 1 square to its right. JAYG 1 square below the starter square. JAYG 1 square to the right of the third square, completing the 2×2 grid. (4 squares total per sleeve)
Sleeve puff gathering row:
Join Color C at top left corner of sleeve panel. Work sc evenly across the top 2 square edge: approximately 18 to 20 sc across 8 in / 20 cm. At the halfway point, work a gentle decrease by skipping 1 st once on each side of center. This pulls the sleeve top inward very slightly for the puff effect. (16 to 18 sc across gathering row)
Set sleeve aside.
Section 5: Skirt Panels
The skirt is wider than the bodice at the hip and flares further to the hem.
Front Skirt Panel:
Begin at the waist edge with the same width as the bottom of the front bodice, then increase by 1 square per side every 2 rows.
Size M front skirt starts 5 squares wide at the top and expands to 8 squares wide at the hem over 7 rows.
Row 1 of Front Skirt (waist row, attached to front bodice): JAYG 5 squares (size M) across, joining the top edge of each square to the bottom edge of the corresponding front bodice Row 1 square. (5 sq for size M; XS: 4 sq, S: 4 sq, L: 5 sq, XL: 5 sq, 2XL: 6 sq)
Row 2 of Front Skirt: JAYG same width as Row 1. (5 sq)
Row 3 of Front Skirt (first expansion row): Add 1 HGS at each end of the row before adding the full square at the outer edge. This expands the panel by 1 full square per side. (7 sq for size M)
Row 4 of Front Skirt: Work straight, same width as Row 3. (7 sq)
Row 5 of Front Skirt (second expansion row): Add 1 sq per side again. (8 sq for size M)
Rows 6 and 7 of Front Skirt: Work straight at full hem width. (8 sq for size M) Front Skirt width progression by row (size M):
Row 1: 5 sq, Row 2: 5 sq, Row 3: 7 sq, Row 4: 7 sq, Row 5: 8 sq, Row 6: 8 sq, Row 7: 8 sq Total height: 7 rows x 4 in = 28 in / 71 cm skirt length
Back Skirt Panels (Make 2):
Each back skirt panel begins at the same width as the corresponding back bodice panel and expands similarly. For size M, each back skirt panel begins at 3 sq wide and expands to 4 sq wide by the hem.
Row progression for each back skirt panel (size M): Row 1: 3 sq (attached to back bodice bottom)
Rows 2-4: 3 sq Rows 5-7: 4 sq (expand by 1 sq on outer edge only; inner edge remains at center back straight edge)
Checkpoint: The combined front skirt panel should measure 32 in / 81 cm wide and 28 in / 71 cm tall for size M. Each back skirt panel should measure 16 in / 41 cm wide and 28 in / 71 cm tall for size M.
Section 7: Neckline Border
Round 1With RS facing, join Color C to any stitch along the neckline edge using a US F-5 / 3.75 mm hook. Work 1 round of sc evenly around the entire neckline opening, working approximately 1 sc per dc and 1 sc per ch-sp around. Count total sc after this round.(1)
Round 2Ensure the total sc count is divisible by 6 for the scallop shell border. Adjust by adding or subtracting 1 to 3 sc evenly spaced as needed.(3)
Round 3Next round: Work the Scallop Shell Border around the neckline. Sl st to first sl st. Fasten off.
Section 8: Sleeve Cuff Borders
For each sleeve, with RS facing, join Color C to the lower edge of the sleeve panel using a US F-5 / 3.75 mm hook. Work 1 round of sc evenly around the cuff edge. Ensure count is divisible by 6. Work the Scallop Shell Border. Fasten off.
Section 9: Hem Border
With RS facing, join Color C to the bottom edge of the skirt. Work 1 round of sc evenly around the entire hem. Ensure count is divisible by 6. Work the Scallop Shell Border. Fasten off.
Section 10: Back Closure
Reinforce both center back edges with a row of sc worked evenly from neckline to the point where the back seam begins (approximately 10 in / 25 cm down from neckline).
On the right back edge, work button loops: at evenly spaced intervals (approximately 3 to 5 loops), ch 6, sl st back into the edge to create a loop. Sew buttons to the left back edge to correspond with loops.
Assembly
Step 1Weave in all ends securely. Block the entire dress by soaking in lukewarm water, gently squeezing out excess, and laying flat on blocking mats. Pin to measurements. Allow 3 to 5 hours to dry completely.
Step 2Optional: Add a slip lining for opacity if desired.
Finishing
- Weave in every end as you finish each motif, before panels get joined together.
- Seam the completed bodice, sleeve, and skirt panels into the final garment shape.
- Soak the whole dress, squeeze out excess water, and pin flat on blocking mats to dry.
Why it works
Each sunflower square works front loops only for the petal round and back loops only for the surrounding color-B round, which lets both layers sit on the same base without competing for the same stitches.
The half granny square triangle is worked flat in rows rather than in the round, because a triangle has no center to turn around; its straight edge matches a full square's side exactly.
The join-as-you-go step happens on round 4 of the sunflower square, meaning the first three color rounds are always worked solo before any seam is formed.
What it becomes
- A statement piece for an outdoor gathering, paired with simple sandals and minimal jewelry so the squares stay the focus.
- A warm-weather layering piece over a slip, worn open or closed depending on the back closure buttons.
- A conversation piece for a fiber arts meetup, where the join-as-you-go construction is as interesting as the finished look.
Original pattern: https://bunnypatterns.com/coral-sunset-granny-square-maxi-dress-free-crochet-pattern/
FAQ
Can I use a heavier or lighter yarn than DK?
The pattern is written for DK weight cotton, and the gauge depends on it. Swapping weights will change your square size and the yardage estimates, so swatch and recalculate before starting.
Do I need to make all the fill-in triangles in Color C?
The half granny square triangle is written in Color C for the sample, but the color choice there is about matching the background peach, not a structural requirement. Any consistent color choice should work as long as it fits your palette.
Is the join-as-you-go method hard to learn mid-project?
It is easier to learn on a swatch than on the actual dress. Practice round 4 of a couple of test squares joined to each other before starting the real panels.
How many squares will I actually need?
The pattern does not give a single total since it varies by size and panel, but it does specify one starter square per panel: front bodice, each back bodice piece, front skirt, each back skirt piece, and each sleeve. Build outward from there and count as you go.