
Free Pattern
Step-by-Step
Crochet
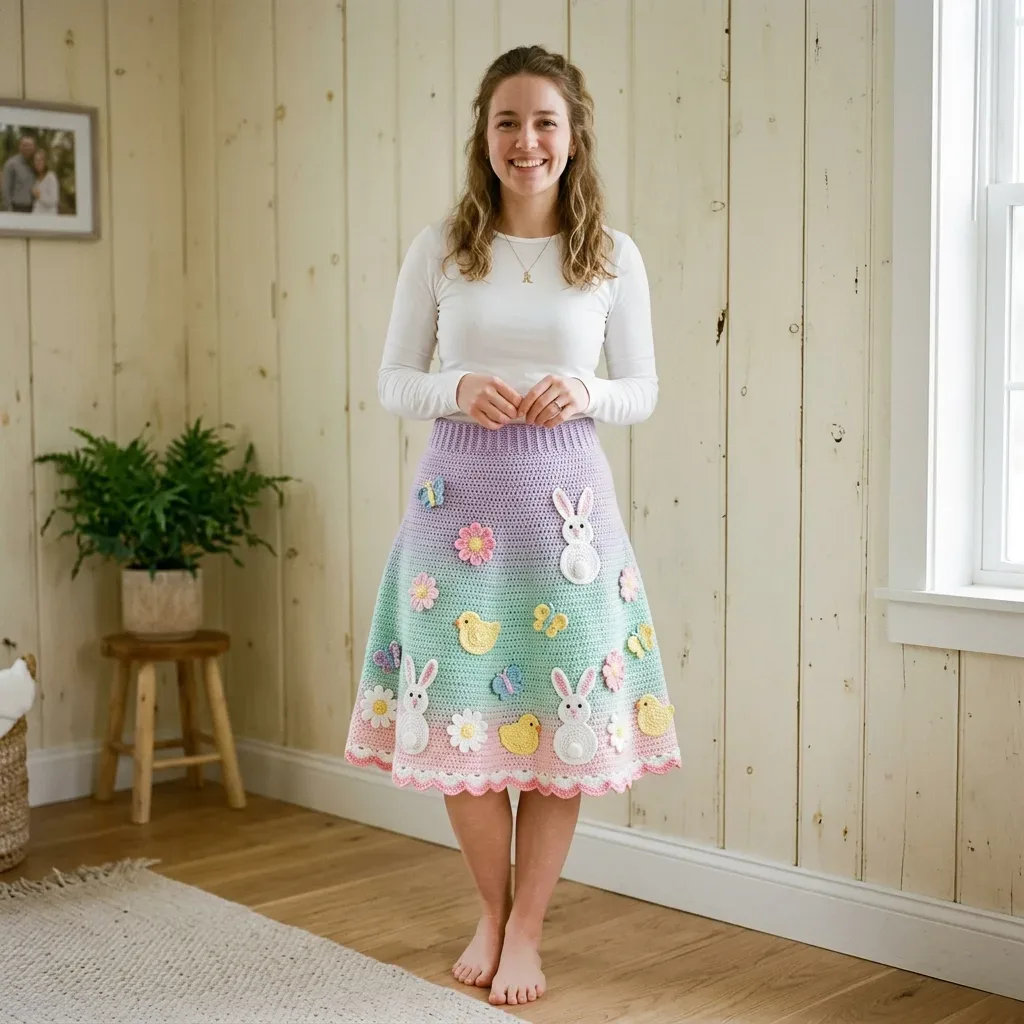
GarmentsA ribbed-waist crochet skirt with bunny and daisy appliques
A ribbed waistband flares into a pastel crochet skirt with bunny, chick, and daisy appliques.
- Level
- Intermediate
- Time
- 10-15 hours
- Hook
- 3.5 mm
- Yarn
- DK
Pattern highlights
- Crochet a long ribbed strip in back loop only single crochet, then seam the short ends into a tube.
- Work several rounds of plain single crochet to set the fabric before shaping begins.
- Increase at even intervals across multiple rounds so the skirt flares smoothly from waist to hem.
- Continue the increase pattern through the additional hip shaping rounds for more flare.
- Crochet the bunny, chick, butterfly, and daisy appliques separately in the contrast colors.
- Block the skirt, then sew the appliques on wherever you like before wearing.
About This Pattern
This skirt sits in my spring garments file, next to other ribbed-waist shapes I keep coming back to. Most of my notebook is small motifs and amigurumi. A full wearable piece is a different kind of project. It asks for patience at the waistband, then rewards you with long stretches of continuous single crochet. Two hook sizes keep the ribbing snug and the body relaxed.
The waistband is worked flat in back-loop-only single crochet, which pulls the fabric into stretchy ribs. Once seamed into a tube, the skirt body picks up stitches around its open edge. From there it works in continuous rounds, no joining slip stitch, no hip seam. Increases land in evenly spaced rounds, so the flare builds in stages. An invisible join hides the color-change jog where colors shift.
The finished skirt pairs a close, ribbed waist with a softly flared body in three pastel colors. Small bunny, chick, butterfly, and daisy appliques go on after blocking, wherever you like. Optional elastic threaded through the waistband keeps the fit secure without changing the ribbing. It reads as a spring piece, but the shaping works for any lightweight DK skirt.
Common mistakes
- Skipping the back loop Working into both loops flattens the ribbing. Insert the hook under the back loop only, every row, for real stretch.
- Losing the round marker Continuous rounds have no join, so it is easy to lose track of the start. Keep the marker in the first stitch and move it up each round.
- Increasing in the wrong spot Each increase round has its own stitch count between increases, and they shift as the skirt widens. Count stitches before each increase round rather than guessing from memory.
- Botching the invisible join A sloppy invisible join leaves a visible step where colors change. Pull the tail snug and check the stitch matches its neighbors before weaving it in.


Intermediate
Progress Tracker
0 of 0 rounds
Tap a round to tick it off — your place is saved on this device.
The kit
- Yarn A, Soft Lavender: approximately 280 (320, 360, 400) yards / 256 (293, 329, 366) meters of DK weight yarn
- Yarn B, Mint Green: approximately 350 (400, 450, 500) yards / 320 (366, 411, 457) meters of DK weight yarn
- Yarn C, Blush Pink: approximately 180 (200, 230, 260) yards / 165 (183, 210, 238) meters of DK weight yarn
- Yarn D, White: approximately 120 yards / 110 meters for appliques and hem border
- Yarn E, Yellow: approximately 60 yards / 55 meters for chick and daisy center appliques
- Yarn F, Pale Blue: approximately 40 yards / 37 meters for butterfly appliques
- Paintbox Yarns Simply DK (100% acrylic, 137 yards / 125 m per 50 g ball) comes in accurate pastel shades and washes beautifully for a frequently worn seasonal garment.
- Lion Brand Feels Like Butta DK (100% polyester microfiber, 230 yards / 210 m per 100 g skein) offers ultra-soft drape that suits the A-line silhouette.
- Scheepjes Catona DK weight (mercerized cotton, 125 yards / 115 m per 50 g ball) gives excellent stitch definition for those who prefer natural fiber.
Hook
- US size E-4 / 3.5 mm for waistband ribbing
Hook
- US size F-5 / 3.75 mm for skirt body and appliques (main hook)
Tools
- 4 to 6 locking stitch markers
- Tapestry needle for seaming appliques and weaving ends
- Scissors
- Blocking mats and pins
Waistband
Fold the ribbing so the two short ends meet with right sides together. Seam the short ends together with a slip stitch seam or whipstitch. This forms your waistband tube.
Do not fasten off. Rotate the tube so the long unworked edge faces up.
Back-loop-only single crochet (blo sc): insert hook into just the back loop of the stitch (the loop farthest from you when the right side faces up), yarn over, pull up a loop, yarn over and pull through both loops on hook. This creates the stretchy ribbing texture for the waistband.
Checkpoint: The completed waistband tube should measure your waist circumference in length and approximately 3 inches / 7.5 cm wide.
Foundation Chain: Size Small: Chain 16. Size Medium: Chain 18. Size Large: Chain 20. Size XL: Chain 22.
Round 1(WS): Sc in second ch from hook and in each ch across. Turn. Small: (15 sc). Medium: (17 sc). Large: (19 sc). XL: (21 sc).(21)
Round 2(RS): Ch 1. Blo sc in each st across. Turn. (same count as row 1)Repeat Row 2 only until ribbing measures: Size Small: 26 inches / 66 cm (approximately 117 rows); Size Medium: 30 inches / 76 cm (approximately 135 rows); Size Large: 34 inches / 86.5 cm (approximately 153 rows); Size XL: 38 inches / 96.5 cm (approximately 171 rows).
Skirt Body
Checkpoint: After Round 20, the skirt should measure approximately 4 inches / 10 cm from the base of the waistband.
Additional Hip Shaping (Rounds 21 to 36): Continue the same increase pattern.
Invisible Join: After the last stitch of a round, cut yarn leaving a 6-inch tail, thread the tail on a tapestry needle, insert the needle under both loops of the first stitch of that same round from front to back, insert the needle down through the center of the last stitch of the round, and pull snug to form a stitch that matches the others. This hides the color-change jog in gradient rounds.
Picot-Scallop Border Stitch (worked over 3 stitches): slip stitch into next stitch, chain 3, slip stitch into first chain of that chain-3 (picot formed), chain 2, work 4 dc into next stitch (fan made), chain 2, slip stitch into following stitch.
Setup Round: Switch to F-5 / 3.75 mm hook. Working along the long open edge of the waistband, join Yarn A with a standing sc. Work evenly along the row-end edges: Size Small: 117 sc evenly around. (117 sc) Size Medium: 135 sc evenly around. (135 sc) Size Large: 153 sc evenly around. (153 sc) Size XL: 171 sc evenly around. (171 sc) Work 1 sc into each row-end around the top of the waistband tube. Place a stitch marker in the first stitch. Do not join. Work in continuous rounds.
Round 1to 3: Sc in each st around. (117 sc) [Medium: 135 sc] [Large: 153 sc] [XL: 171 sc]
Round 4[Sc in next 28 sts, inc in next st] 4 times, sc in rem 5 sts. (121 sc) [Medium: Sc in next 32 sts, inc in next st, rep 4 times, sc in rem 7 sts. (139 sc)] [Large: Sc in next 37 sts, inc in next st, rep 4 times, sc in rem 5 sts. (157 sc)] [XL: Sc in next 41 sts, inc in next st, rep 4 times, sc in rem 7 sts. (175 sc)]
Round 5to 7: Sc in each st around.
Round 8[Sc in next 29 sts, inc in next st] 4 times, sc in rem 5 sts. (125 sc) [Medium: (143 sc)] [Large: (161 sc)] [XL: (179 sc)]
Round 9to 11: Sc in each st around.
Round 12[Sc in next 30 sts, inc in next st] 4 times, sc in rem 5 sts. (129 sc) [Medium: (147 sc)] [Large: (165 sc)] [XL: (183 sc)]
Round 13to 15: Sc in each st around.
Round 16[Sc in next 31 sts, inc in next st] 4 times, sc in rem 5 sts. (133 sc) [Medium: (151 sc)] [Large: (169 sc)] [XL: (187 sc)]
Round 17to 19: Sc in each st around.
Round 20[Sc in next 32 sts, inc in next st] 4 times, sc in rem 5 sts. (137 sc) [Medium: (155 sc)] [Large: (173 sc)] [XL: (191 sc)]
Round 21to 23: Sc in each st around.
Round 24[Sc in next 33 sts, inc in next st] 4 times, sc in rem 5 sts. (141 sc) [Medium: (159 sc)] [Large: (177 sc)] [XL: (195 sc)]
Round 25to 27: Sc in each st around.
Round 28[Sc in next 34 sts, inc in next st] 4 times, sc in rem 5 sts. (145 sc) [Medium: (163 sc)] [Large: (181 sc)] [XL: (199 sc)]
Round 29to 31: Sc in each st around.
Round 32[Sc in next 35 sts, inc in next st]
Assembly
Step 1Each bunny, chick, butterfly, and daisy applique is crocheted separately, then sewn on after blocking; customize placement and add more or fewer motifs based on preference.
Finishing
- Weave in all yarn tails from color changes and the waistband seam with a tapestry needle.
- Block the skirt flat or on mats and pins so the increase rounds relax into an even flare.
- Sew the blocked bunny, chick, butterfly, and daisy appliques onto the skirt body by hand.
Why it works
The waistband is worked flat in rows, then its short ends are seamed into a tube.
Increase rounds happen every fourth round, spacing the hip shaping evenly through the skirt body.
The skirt body works in continuous rounds with a stitch marker, not joined rounds. This avoids a seam line climbing up the hip.
What it becomes
- Wear it over a plain leotard for a dance class or rehearsal.
- Layer it over leggings and a long-sleeve top for a cool spring morning.
- Pair it with a simple white tee and canvas shoes for everyday play.
FAQ
Can I skip the elastic in the waistband?
Yes, the back-loop-only ribbing already gives a snug, stretchy fit. Add the optional elastic only if you want extra hold through wash and wear.
Why does the pattern use two different hook sizes?
The smaller E-4 hook keeps the waistband ribbing tight and stretchy. The larger F-5 hook relaxes the gauge for the flared skirt body.
What yarn weight does this pattern need?
Every color is DK weight, from the lavender and mint green to the small amounts for appliques. Keeping all six yarns at the same weight keeps the fabric consistent.
Do I need to make all four appliques?
No, the bunny, chick, butterfly, and daisy motifs are optional and separate from the skirt body. Add as many or as few as you like, and place them anywhere after blocking.