
Free Pattern
Step-by-Step
Crochet
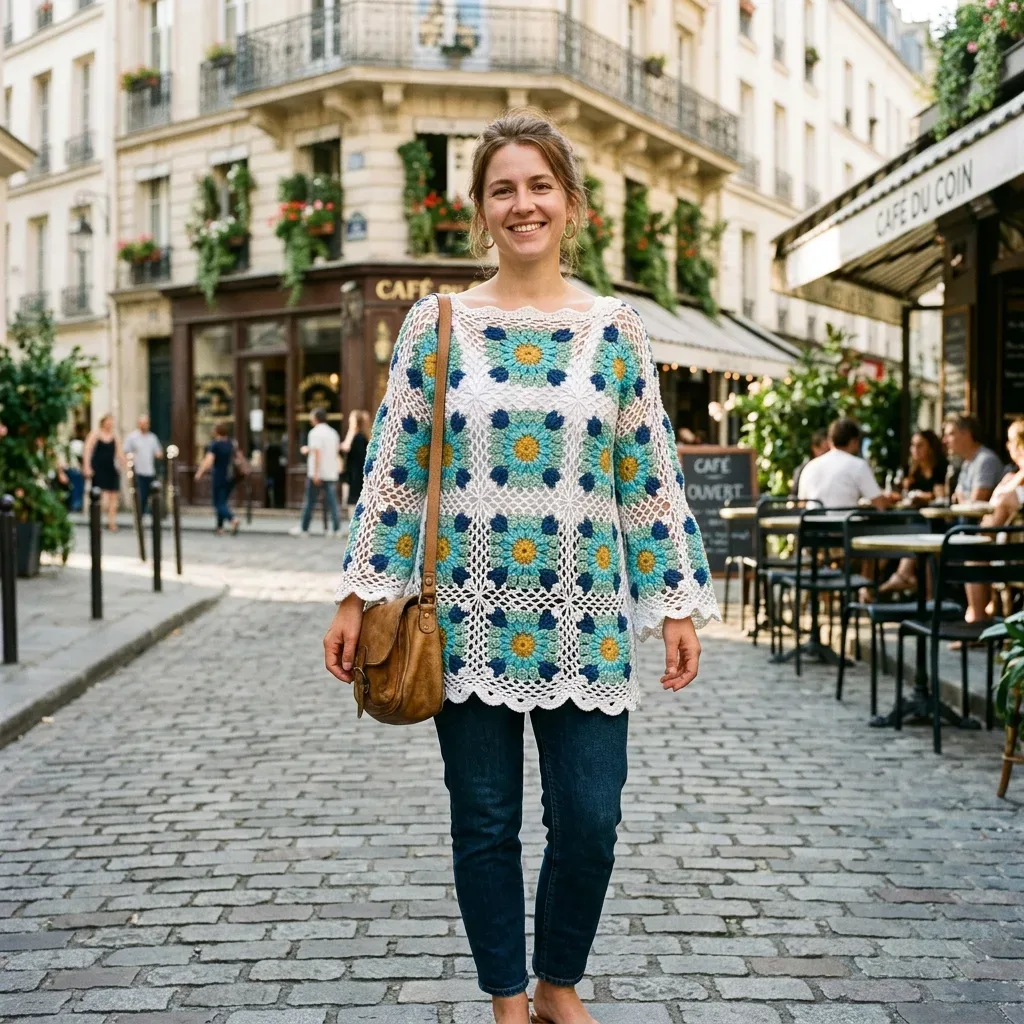
GarmentsA granny square poncho built from forty ocean-colored squares
A join-as-you-go granny square poncho in ocean colors, pieced from forty textured flower squares.
- Level
- Intermediate
- Time
- 40-60 hours
- Hook
- 6.0 mm
- Yarn
- Worsted
Pattern highlights
- Work forty identical granny squares, each with a textured puff-stitch flower center, in four colors.
- Join squares as you go, swapping each corner's chain-2 for a chain-1, slip stitch, chain-1 link to the neighbor.
- Arrange twenty squares into a four-wide, five-tall grid to build each of the two panels.
- Seam the front and back panels together at the shoulders and down the sides.
- Work a single crochet preparatory round around the bottom hem to even out the edge.
- Finish with a scallop shell border worked into that prepared base round.
- Weave in ends and wet block both panels before and after seaming for clean lines.
About This Pattern
I have a soft spot for projects built from one small, repeatable block. This poncho sits right in that corner of my notebook, next to afghans and shawls made from granny squares. Forty identical squares, joined into two panels, then seamed at the shoulders and sides. It is the kind of project that rewards patience more than skill, since every square teaches you the last trick a little better. By square ten, your hands know the rhythm.
The technique that sets this piece apart is the textured flower center, built from a repeated loop of yarn-overs that leaves little bumps instead of flat stitches. Each square also uses a join-as-you-go corner, trading the usual chain-2 corner for a chain-1, slip stitch, chain-1 join to the neighboring square. Color changes happen color by color, carried through the final two loops before the old yarn is cut. None of it is hard. It just asks you to pay attention at the right moments.
Finished, this poncho hits at the mid-hip and drapes loose and oversized, the kind of shape that forgives a lot. Each panel runs about 20 inches wide and 25 inches long, built from a 4-by-5 grid of 5-inch squares. A scallop shell border finishes the bottom hem, worked over a plain single crochet base round first. It wears more like a wrap than a sweater, and it travels well folded flat.
Worth knowing
What I like best here is the flower center worked with that odd little loop step, yarn over twice, pull up a loop, stop short, and repeat it three times before closing. It makes each square feel sculptural instead of flat. The join-as-you-go corner is the other quiet pleasure: slip stitching into a finished neighbor's ch-sp mid-round means you skip a whole seaming session later, trading it for small decisions made square by square. Color changes across four colors keep your hands moving between Color A, B, C, and D without ever feeling repetitive. By the time you reach square forty, the construction has taught itself to you. That is the real payoff of a project built from one unit, repeated with intention.
Common mistakes
- Rushing the puff stitch loops Stopping each yarn-over pull-through too early leaves extra loops on the hook and a lopsided center. Count to four loops before you close, every time.
- Dropping the join-as-you-go corner It's easy to default to a plain chain-2 corner out of habit. Check you're inserting into the neighbor square's ch-sp before you slip stitch and chain 1.
- Skipping the sc prep round Starting the scallop border straight into the ch-3 arches without the preparatory single crochet round throws off the count. Work the full prep round first.
- Carrying colors when you shouldn't Fastening off is the default unless the pattern says to carry a color. Check before you cut, not after.
- Blocking panels before checking size Blocking a square that's off gauge locks in the wrong measurement for all forty. Check one square against the 5-inch target before you make the rest.

Intermediate
Progress Tracker
0 of 0 rounds
Tap a round to tick it off — your place is saved on this device.
The kit
- Lion Brand Pound of Love works beautifully for this project. It’s 100% acrylic with excellent drape, and it’s machine washable. One skein of White, a partial skein of Golden Yellow, and about half a skein each of teal and navy will cover you.
- Cascade 220 Superwash is my pick if you want that gorgeous wool stitch definition. It blocks like a dream. You’ll need 4 skeins White, 1 skein Golden Yellow, 2 skeins Teal, and 2 skeins Navy.
- Any smooth worsted weight yarn that matches gauge will work. Avoid fuzzy or heavily textured yarns since they’ll hide your beautiful flower details.
Yarn
- Worsted weight yarn (CYCA weight 4) in four colors
- Color A (White): 800 yards / 732 m
- Color B (Golden Yellow): 150 yards / 137 m
- Color C (Aqua Teal): 400 yards / 366 m
- Color D (Navy Blue): 300 yards / 274 m
Hook
- US size J-10 / 6.0 mm crochet hook, or size needed to obtain gauge
Notions
- Yarn needle with blunt tip
- Scissors
- Blocking mats and rust-proof pins
- Spray bottle or basin for wet blocking
- 6 to 8 stitch markers
- Small binder clips for holding panels during seaming (optional but helpful)
2. Insert hook into the corresponding ch-sp on the finished neighbor square
3. Sl st through that space 4. Ch 1 5. Continue the current round as written This replaces a standard ch-2 corner with a ch-1, sl st, ch-1 join.
Pattern Notes Before You Begin
1. Each panel requires 20 granny squares (4 squares wide by 5 squares tall). The entire poncho requires 40 squares total.
2. All squares are worked in continuous rounds with a slip stitch join at the start of each new round. Do not turn.
3. Change colors by drawing the new color through the final two loops of the last stitch of the old color before pulling through. Fasten off old colors unless instructed to carry.
4. Weave in all ends as you complete each square. Trust me on this one. Trying to weave in 160+ ends at the assembly stage is no fun.
5. Block every square before assembly. Pin to measurements (5 inches by 5 inches) and spritz with water or wet block. Allow to dry completely.
6. The garment has no shaping rows. Fit is achieved entirely through square dimensions, panel layout, and seaming.
7. Read all instructions for a section before beginning that section.
Granny Square Instructions (Make 40)
The square is worked in 5 rounds. Rounds 1 and 2 use Color B (Golden Yellow). Round 3 uses Color C (Aqua Teal). Round 4 uses Color D (Navy Blue). Round 5 uses Color A (White). All rounds are worked on the right side.
Make a magic ring (adjustable loop) with Color B. If you prefer, ch 4 and sl st to form a ring instead.
Round 1Color B Ch 3 (counts as first dc throughout). Work 11 more dc into the ring. Sl st to top of beg ch-3 to join round.(12)
Round 2Color B Ch 1. Work 1 Sunflower Center Cluster into the same stitch as the ch-1.Ch 2.[Work 1 Sunflower Center Cluster into the next st, ch 2] 11 times.Sl st to top of first cluster to join.Fasten off Color B.(12 clusters, 12 ch-2 spaces)
Round 3Color C Join Color C with a standing sc (or sl st and ch 1) into any ch-2 space.Work 1 more sc into the same ch-2 space.Work 1 Petal Cluster into the same ch-2 space.Work 2 more sc into the same ch-2 space.
You now have a 5-stitch petal group in this space: sc, sc, Petal Cluster, sc, sc.
Sl st into the next ch-2 space to move between petals.
[Work sc, sc, Petal Cluster, sc, sc all into the next ch-2 space. Sl st into the following ch-2 space.] 11 times.
Sl st to first sc of round to join.
Fasten off Color C.
(12 petals, each consisting of 2 sc, 1 Petal Cluster, 2 sc)
After Round 3, your square looks like a round flower with 12 petals radiating from the yellow center. The navy border in Round 4 will pull this into a square shape.
Round 4 (Color D) This round is worked into the sl-st spaces between petals. There are 12 total. Designate 4 of these as corners (every 3rd sl-st space) and treat the remaining 8 as side positions (2 per side).
Preparation: Count the 12 sl-st spaces between petals. Place a stitch marker in every 3rd space: spaces 1, 4, 7, and 10 are corners.
Join Color D into corner space 1 with a standing dc.
Step A (Corner): Work 3 dc into corner space, ch 2, work 3 more dc into same corner space. Corner group complete.
Step B (Side bar 1 of 2): Sl st into the next sl-st space (space 2). Work 3 dc into this space.
Step C (Side bar 2 of 2): Sl st into the next sl-st space (space 3). Work 3 dc into this space.
Step D: Work into corner space 4: 3 dc, ch 2, 3 dc.
Repeat Steps B, C, D three more times, working corners at spaces 7 and 10 respectively, and the two side-bar groups in the spaces between corners.
After the 4th corner and its two side bars are complete, sl st to join to the first dc.
Fasten off Color D.
Stitch count check: 4 corners (6 dc each) + 8 side groups (3 dc each) = 24 corner dc + 24 side dc = 48 dc total, plus 4 ch-2 corner spaces.
(48 dc, 4 ch-2 corner spaces)
Round 5 (Color A) This round creates the open lattice mesh that unifies the squares and forms the joining framework.
Join Color A with sl st into any ch-2 corner space.
Ch 3, dc 1 in same space, ch 1, dc 2 in same space. First corner worked.
[Ch 3, sk 3 dc, sc into the sl-st bar between the two 3-dc side groups on this side, ch 3, sk 3 dc, work (2 dc, ch 2, 2 dc) into the ch-2 corner space.] 3 times.
Ch 3, sk 3 dc, sc into the sl-st bar on the final side, ch 3, sk 3 dc.
Sl st to top of beg ch-3 to join.
Fasten off Color A.
(8 dc, 4 sc, 8 ch-3 arches, 4 ch-2 corner spaces)
The finished unblocked square should measure approximately 4.5 to 4.75 inches. After blocking it should reach exactly 5 inches.
Block all 40 squares before proceeding.
Checkpoint 1
At this point you have 40 blocked granny squares, each measuring 5 inches by 5 inches. Lay them out in two groups of 20, arranging 4 squares across by 5 squares tall for each panel. Verify your color placement is consistent. All squares should look identical. Take a moment to admire your work. You’ve earned it.
Panel Assembly (Make 2)
Each panel is assembled using the JAYG method or flat slip stitch seaming.
Layout Grid (each panel, 4 squares wide by 5 squares tall):
Row 1 (Bottom)
1st Round. Squares 1, 2, 3, 4 (left to right)
Row 2: Squares 5, 6, 7, 8 Row 3: Squares 9, 10, 11, 12 Row 4: Squares 13, 14, 15, 16
Round 5Top Squares 17, 18, 19, 20 Flat Slip Stitch Seam Method If you prefer slip stitch seaming over JAYG, hold two adjacent squares with right sides facing each other. Using Color A and a tapestry needle or crochet hook, sl st through both corresponding ch-3 arches and corner ch-2 spaces across the shared edge.When joining 4 squares into a row, join Square 1 to Square 2 along their right edges, then join Square 2 to Square 3, then Square 3 to Square 4. Repeat for each row of 4.Then join Row 1 to Row 2 along their shared top/bottom edges, joining all 4 squares across simultaneously and matching seams at intersections. Continue joining rows until all 5 rows form one panel.
The panel should measure 20 inches wide by 25 inches tall (51 cm by 63.5 cm).
Checkpoint 2
Hold the completed panel up. It should measure 20 inches wide by 25 inches tall. The seams should lie flat and the squares should be even. Repeat assembly for the second panel. When both panels are complete, move on to garment construction.
Garment Construction Identifying Sections of Each Panel Top edge: the 4-square-wide edge that will rest on the shoulders and form the neckline
Notions
Yarn needle with blunt tip Scissors Blocking mats and rust-proof pins Spray bottle or basin for wet blocking 6 to 8 stitch markers
Small binder clips for holding panels during seaming (optional but helpful)
Yarn Suggestions
Lion Brand Pound of Love works beautifully for this project. It’s 100% acrylic with excellent drape, and it’s machine washable. One skein of White, a partial skein of Golden Yellow, and about half a skein each of teal and navy will cover you.
Cascade 220 Superwash is my pick if you want that gorgeous wool stitch definition. It blocks like a dream. You’ll need 4 skeins White, 1 skein Golden Yellow, 2 skeins Teal, and 2 skeins Navy.
Any smooth worsted weight yarn that matches gauge will work. Avoid fuzzy or heavily textured yarns since they’ll hide your beautiful flower details.
Gauge 1 finished, blocked granny square = 5 inches by 5 inches (12.5 cm by 12.5 cm)
Round 1Alternatively: 14 double crochet (dc) and 8 rows = 4 inches (10 cm) in standard double crochet fabric worked in rows with Color A.Gauge matters here because it determines your final garment size. A larger hook produces larger squares and a larger poncho. A smaller hook produces smaller squares and a smaller poncho. Swatch and adjust as needed.(14)
Round 2Abbreviations and Stitch Definitions ch: chain. Wrap yarn over hook and pull through the loop on your hook.
Round 3sl st: slip stitch. Insert hook, yarn over, pull through both the stitch and the loop on your hook in one motion.
Round 4sc: single crochet. Insert hook, yarn over and pull up a loop (2 loops on hook), yarn over and pull through both loops.
Round 5dc: double crochet. Yarn over, insert hook, yarn over and pull up a loop (3 loops on hook), yarn over and pull through 2 loops, yarn over and pull through remaining 2 loops.
Round 6tr: treble crochet. Yarn over twice, insert hook, yarn over and pull up a loop (4 loops on hook), then yarn over and pull through 2 loops three times. sp: space ch-sp: chain space. The gap created by a chain or chains in the previous row or round. sk: skip st/sts: stitch/stitches rep: repeat pm: place marker
Bottom Edge
1st Round. the 4-square-wide hem edge Side edges: the 5-square-tall edges that will be partly seamed to create the arm openings
Shoulder Seam
Place the two panels with right sides together. The two top edges (each 20 inches wide) face each other.
The top edge spans 4 squares (20 inches). Leave the center 2 squares (10 inches) open for the neck. Join only the left 1 square (5 inches) and the right 1 square (5 inches) on each side.
Round 1To join: Using Color A, sl st through the corresponding ch-3 arches and corner ch-2 spaces of the first (leftmost) square on the top edge of both panels, working across only that 1 square width. Fasten off. Repeat on the right shoulder (rightmost square). The center 2 squares remain open. This creates the neck opening.
Side Seams
The sides of the poncho run 25 inches tall (5 squares). You will seam only the lower portion of each side, leaving the upper portion open as the sleeve opening.
Seam the bottom 2 squares (10 inches) of each side together on both the left and right sides. Leave the top 3 squares (15 inches) on each side open as the sleeve openings.
Round 2To join a side seam: Hold front and back panels right sides together along one side edge. Using Color A, sl st through corresponding arches and corners of the bottom 2 squares only. Fasten off. Repeat on the other side.
The garment is now fully assembled. Turn right side out.
Checkpoint 3
Try on the poncho. The neck opening should sit comfortably around the head (approximately 10 inches wide and 5 inches deep when worn). The sleeve openings (15 inches per side) should allow your arms to move freely. The hem falls at approximately mid-hip. The body of the garment should sit smoothly around the torso.
Finishing Border
Round 3The scallop shell border is worked around the bottom hem edge, both sleeve cuff edges, and optionally around the neck opening. All borders are worked with Color A.
Round 4Bottom Hem Border Before working the scallop border, work 1 preparatory round of sc to create an even base.
Round 5Preparatory Round (sc base): Join Color A with sl st to the bottom right corner ch-2 space of the hem edge.Ch 1.
Round 6Work 2 sc into the corner ch-2 space.(2)
Round 7[Work 3 sc into the ch-3 arch, 1 sc into the sc, 3 sc into the ch-3 arch, 2 sc into the corner ch-2 space of the next square’s corner] across the bottom edge.(3)
Round 8Sl st to join round.
Round 9(80 sc around hem preparatory round)(80)
Round 10Scallop Shell Border Round: Ch 1.
Round 11Sk 1 sc.(1)
Round 12Work Scallop Shell (5 dc) into the next sc.(5)
Round 13Sk 1 sc.(1)
Round 14Sc into the next sc.
Round 15[Sk 1 sc, work Scallop Shell into the next sc, sk 1 sc, sc into the next sc.] repeat around.(1)
Round 16(20 Scallop Shells, 20 sc)(20)
Round 17Sl st to first sc to join. Fasten off. Weave in ends.
Sleeve Cuff Border
Each sleeve opening spans 3 squares on the front and 3 squares on the back, making a loop of 6 squares total around each cuff.
Round 18Preparatory Round (sc base) for each cuff: Join Color A to any corner ch-2 space along the sleeve opening edge.
Round 19Work sc into each arch, sc, and corner space around the full sleeve opening as described above for the hem.
Round 20(60 sc around each cuff preparatory round)(60)
Round 21Scallop Shell Border Round for cuffs: work as hem border.
Round 22(15 Scallop Shells, 15 sc per cuff)(15)
Round 23Neck Opening Border Join Color A with sl st to any point along the neck opening.
Round 24Work 1 round of sc evenly around the opening, working approximately 2 sc per ch-3 arch and 1 sc per visible dc.(2)
Round 25Target approximately 44 sc to 48 sc total around the neck.(48)
Round 26Sl st to join. Do not work a scallop border here. The neck opening benefits from a simpler, flatter finish.
Round 27If desired, work a second round of sl st or reverse sc (crab stitch) for a neater edge.Fasten off and weave in ends.
Size Customization Tips
Round 28To make the poncho wider: Increase from 4 squares wide to 5 squares wide per panel. Each additional square adds 5 inches to the width and requires 10 additional squares total (5 per panel).
Round 29To make the poncho longer: Increase from 5 squares tall to 6 squares tall per panel. Each additional row adds 5 inches to the length and requires 8 additional squares total.
To adjust sleeve length: The sleeve opening length is determined by how many squares are left unseamed at the side. Seaming more squares creates a shorter sleeve drop. Seaming fewer creates a longer, more cape-like sleeve.
To adjust neck opening width: Leaving 1 square open at the center of each shoulder seam (instead of 2) creates a smaller 5 inch neck opening. Leaving 3 squares open creates a wider 15 inch opening.
Final Blocking and Care
After all borders are complete, weave in any remaining ends securely, working in opposite directions for at least 1 inch to prevent unraveling.
Wet block the finished garment by submerging in cool water. Gently press out excess water without wringing. Lay flat on blocking mats, shaping to the finished dimensions. Pin corners and borders into position. Allow to dry completely, which may take 24 to 48 hours.
For acrylic yarn, steam blocking works beautifully. Hold a steam iron 1 to 2 inches above the surface without touching. Do not press the iron directly onto acrylic.
Pin your scallop borders open and fan them into shape during blocking to showcase those gorgeous shells.
Care Instructions
Machine washable acrylic: Wash on a gentle cycle in cool or lukewarm water. Lay flat to dry. Do not tumble dry on high heat.
Superwash or natural fiber: Hand wash in cool water with gentle wool wash. Do not wring or twist. Press gently in a towel, then lay flat to dry. Store folded, not hung, to prevent stretching.
Thank you so much for choosing this Ocean Breeze Coastal Square Poncho crochet pattern. I genuinely hope you love making it as much as I loved designing it. When you finish yours, I would absolutely love to see it. Tag me on Instagram or share in my Facebook group. Your creations always make my day.
If this pattern caught your eye, go ahead and pin it to your crochet board on Pinterest so you can find it when you’re ready to cast on. And if you make one, please drop a comment below. I read every single one, and hearing about your projects brings me so much joy.
Assembly
Step 1Bottom Hem Border: Before working the scallop border, work 1 preparatory round of sc to create an even base. Preparatory Round (sc base): Join Color A with sl st to the bottom right corner ch-2 space of the hem edge. Ch 1. Work 2 sc into the corner ch-2 space. [Work 3 sc into the ch-3 arch, 1 sc into the sc, 3 sc into the ch-3 arch, 2 sc into the corner ch-2 space of the next square’s corner] across the bottom edge. Sl st to join round. (80 sc around hem preparatory round) Scallop Shell Border Round: Ch 1. Sk 1 sc. Work Scallop Shell (5 dc) into the next sc. Sk 1 sc. Sc into the next sc. [Sk 1 sc, work Scallop Shell into the next sc, sk 1 sc, sc into the next sc.] repeat around. (20 Scallop Shells, 20 sc) Sl st to first sc to join. Fasten off. Weave in ends.
Step 2Sleeve Cuff Border: Each sleeve opening spans 3 squares on the front and 3 squares on the back, making a loop of 6 squares total around each cuff. Preparatory Round (sc base) for each cuff: Join Color A to any corner ch-2 space along the sleeve opening edge. Work sc into each arch, sc, and corner space around the full sleeve opening as described above for the hem. (60 sc around each cuff preparatory round) Scallop Shell Border Round for cuffs: work as hem border. (15 Scallop Shells, 15 sc per cuff)
Step 3Neck Opening Border: Join Color A with sl st to any point along the neck opening. Work 1 round of sc evenly around the opening, working approximately 2 sc per ch-3 arch and 1 sc per visible dc. Target approximately 44 sc to 48 sc total around the neck. Sl st to join. Do not work a scallop border here. The neck opening benefits from a simpler, flatter finish. If desired, work a second round of sl st or reverse sc (crab stitch) for a neater edge. Fasten off and weave in ends.
Finishing
- Weave in every color change end before blocking, since four colors per square leaves a lot of tails.
- Wet block each finished square to the full 5-inch measurement before joining, so seams line up square to square.
- Block the whole poncho again once both panels are seamed, to even out the shoulder and side joins.
Why it works
Each square's corner carries a chain-1, slip stitch, chain-1 join instead of the usual chain-2, so the join happens inside the final round, not after it.
The flower center's repeated yarn-over loop step builds height before closing, which is what gives the center its raised bump instead of a flat stitch.
The bottom hem gets a plain single crochet round before the scallop border, because the border's shell repeats need an even base to sit square across the ch-3 arches and corner spaces.
What it becomes
- Throw it over a tank top on a cool evening walk along the water.
- Wear it as a loose layer over jeans and a plain tee for errands.
- Pack it flat for travel, since it folds down small and layers over almost anything.
FAQ
Can I use a different yarn weight?
Stick with worsted weight (CYCA 4) to match gauge, since the finished size depends on it. Any smooth worsted yarn works, but avoid fuzzy or textured yarn that hides the flower centers.
Do I have to use join-as-you-go?
No. The pattern also gives a flat slip stitch seam method for joining squares into rows and then panels. Pick whichever you find faster or neater.
How long will this really take me?
Plan on 40 to 60 hours total, less if you batch your squares and get into a rhythm. Some crocheters finish closer to 35 hours that way.
Why four colors instead of two?
Color A, B, C, and D each play a different role, from the flower centers to the panel body. It's what gives the finished poncho its layered, coastal look.