Free Pattern
Step-by-Step
Crochet
Baby & KidsLavender butterfly baby dress crochet pattern
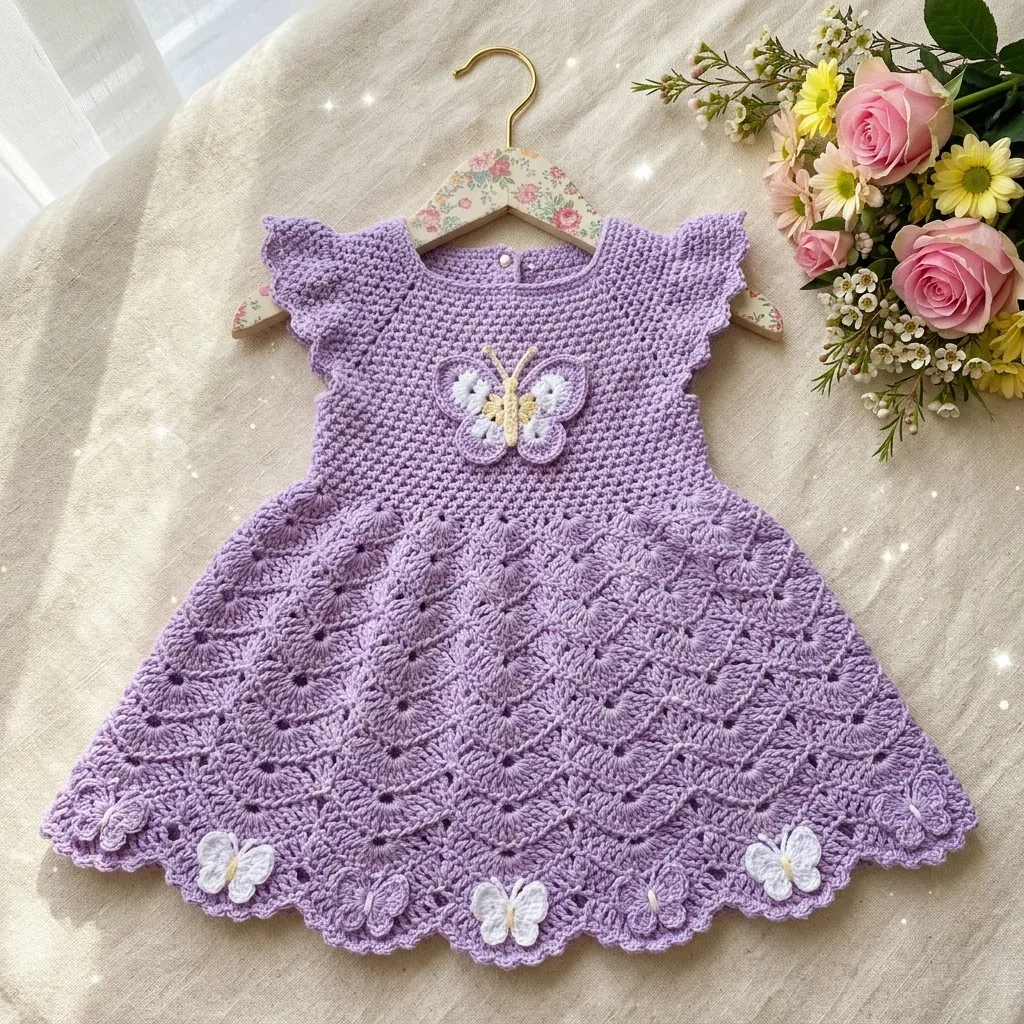
A lavender baby dress with fan-shell skirt and crocheted butterfly appliques.
- Level
- Intermediate
- Time
- 8-12 hours
- Hook
- 3.5 mm
- Yarn
- DK
Pattern highlights
- Start at the neckline and work the bodice in continuous rounds downward toward the waist.
- the division row, place markers to separate the back, sleeves, and front sections.
- Increase at each marked section over several rounds to shape the yoke.
- Join the skirt at the bodice waist and work it downward in turned rows.
- Build the fan shell texture across the skirt, offsetting fan centers row by row for the diagonal effect.
- Pick up and work the flutter sleeves from the armhole openings once the bodice is done.
About This Pattern
Every collector of baby patterns ends up with a drawer of yokes and a drawer of skirts. This dress is the rare piece that earns both drawers at once. The bodice is a quiet, almost plain seamless rise, and then the skirt arrives and does all the talking. I keep it filed under 'patterns that change character halfway through.'
The technique worth noting here is the fan shell stitch, built from skipped stitches and a cluster of double crochets fanning out of one center. It is not a stitch I see used for garment skirts often. The sleeves are picked up rather than seamed, and the butterflies are a separate white applique worked on their own.
The finished object is a little lavender dress with flutter sleeves, a button back, and two white butterflies pinned to the bodice. It wants a quiet photo, not a loud one. Small, specific, a little precious — the kind of thing you make once and then think about for years.
Common mistakes
- Losing track of the four markers Check after every increase round that all markers are still in place before continuing. Moving a marker mid-round throws off every section after it.
- Miscounting the fan shell skip pattern Remember each fan shell repeat is skip 2, 5 dc, skip 2, sc — six stitches total. Count in sixes across the row before starting a new one.
- Confusing fan shell with expanded fan shell The expanded version uses 7 dc instead of 5 in the center stitch. Mark your increase rows ahead of time so you don't default to the standard fan shell out of habit.
- Seaming the sleeves instead of picking them up These flutter sleeves are not a separate seamed piece. Pick up stitches directly from the armhole opening after the bodice is finished.
Intermediate
Progress Tracker
0 of 0 rounds
Tap a round to tick it off — your place is saved on this device.
The kit
- Option 1: Lion Brand Pound of Love (100 percent acrylic, DK weight, 1020 yards per 16 oz skein) in Pastel Purple. Machine washable, widely available, and excellent stitch definition for lace patterns.
- Option 2: Paintbox Yarns Cotton DK (100 percent cotton, 137 yards per 50 g skein) in Wisteria Purple. Cotton gives extra drape and breathability, ideal for warmer climates and sensitive skin.
- Option 3: Scheepjes Softfun (60 percent cotton, 40 percent acrylic, 153 yards per 50 g skein) in a lilac shade. The cotton-acrylic blend balances structure and softness and holds stitch definition well in lace repeats.
Substitution note
- Choose any DK weight yarn with good stitch definition. Avoid loosely spun or fluffy yarns as the fan-shell lace pattern and butterfly details will not read clearly. Always crochet a gauge swatch before beginning.
Yarn
- Approximately 280 (320, 380) yards or 256 (293, 347) meters of DK weight yarn in main color lavender (MC). Approximately 25 yards or 23 meters of white (CC) for butterfly appliques.
Hooks
- US size E-4 (3.5 mm) crochet hook for bodice and sleeves. US size F-5 (3.75 mm) crochet hook for skirt.
Notions
- Yarn needle for weaving ends
- Stitch markers (at least 6)
- 3 pearl buttons approximately 8 mm diameter
- Sewing needle and thread to match yarn
- Scissors
- Blocking mats and rust-proof pins
- Spray bottle for blocking
Bodice and Yoke
The bodice is worked in continuous rounds from the top neckline downward, with a back opening worked as flat rows to accommodate the button closure.
The flutter sleeves are not separate seamed pieces. They are picked up and worked from the armhole opening after the bodice is complete.
The skirt is joined at the bodice waist and worked downward in turned rows to create the diagonal fan-shell texture.
The back opening runs from the neckline down approximately 3 inches (7.5 cm) and is finished with a simple sc edging with button loops.
All rounds are joined rounds unless otherwise stated. All rows use a turning chain.
The dress is designed to be worn with approximately 0.5 inches (1.25 cm) ease at the chest.
When working the fan-shell skirt, the diagonal effect is achieved by placing the connector sc of each new row directly above the center dc of the fan from the previous row. The pattern specifies exactly where to place each stitch.
Place stitch markers at the start of each round and at each underarm division point.
The skirt fan repeat is based on a multiple of 6 stitches plus 3 for balance. The bodice waist stitch count is adjusted to meet this requirement.
Pattern is written for size 3 to 6 months throughout; newborn and 6-12 months figures appear in parentheses as newborn (3-6 months, 6-12 months).
Step by step Using MC and E-4 hook, begin at the neckline. Chain 66 (60, 72). Because this dress has a back opening, the first portion of the yoke is worked flat; do not join into a ring yet.
Row 1(RS): Ch 1, sc in each ch across. (66, 60, 72 sc)
Row 2(WS): Ch 1, turn. Sc in each st across. (66, 60, 72 sc)
Row 3(RS): Ch 1, turn. Sc across all sts. (66, 60, 72 sc)Now begin working in joined rounds, with the back opening maintained by working back and forth in rows that simulate rounds.Raglan Yoke Setup: place markers to divide the yoke into 4 sections: 2 fronts/back and 2 sleeves.Treat the two end stitches as the back center opening edges throughout.
Row 4(RS) Division Row: Ch 1, turn. Sc 9 (8, 10) [right back], pm, sc 12 (11, 13) [right sleeve], pm, sc 24 (22, 26) [front], pm, sc 12 (11, 13) [left sleeve], pm, sc 9 (8, 10) [left back]. (66, 60, 72 sc)
Row 5(WS): Ch 1, turn. Sc to 1 st before first marker, 2 sc in next st, sm, 2 sc in next st, sc to 1 st before next marker, 2 sc in next st, sm, 2 sc in next st, sc to 1 st before next marker, 2 sc in next st, sm, 2 sc in next st, sc to 1 st before next marker, 2 sc in next st, sm, 2 sc in next st, sc to end. 8 sts increased. (74, 68, 80 sc)
Row 6(RS): Ch 1, turn. Sc to 1 st before first marker, 2 sc in next st, sm, 2 sc in next st, sc to 1 st before next marker, 2 sc in next st, sm, 2 sc in next st, sc to 1 st before next marker, 2 sc in next st, sm, 2 sc in next st, sc to 1 st before next marker, 2 sc in next st, sm, 2 sc in next st, sc to end. 8 sts increased. (82, 76, 88 sc)
Row 7(WS): Rep Row 5 increase pattern. 8 sts increased. (90, 84, 96 sc)
Row 8(RS): Rep Row 6 increase pattern. 8 sts increased. (98, 92, 104 sc)
Row 9(WS): Rep Row 5 increase pattern. 8 sts increased. (106, 100, 112 sc)
Row 10(RS): Rep Row 6 increase pattern. 8 sts increased. (114, 108, 120 sc)
Assembly
Step 1Weave in all yarn ends securely using a yarn needle, working ends through at least 1 inch (2.5 cm) of stitches in multiple directions.
Step 2Wet blocking is strongly recommended for this dress to open the fan-shell lace pattern and allow the skirt to drape correctly.
Step 3Fill a clean basin with cool water and a drop of gentle wool wash (even for acrylic, this helps the fibers relax). Submerge the dress and gently press out air. Soak for 15 minutes. Do not wring. Gently squeeze excess water, then roll the dress in a clean towel and press firmly.
Step 4Lay flat on blocking mats. Shape the neckline into a smooth circle, gently stretch and pin the skirt hem to open the scallops, and pin the flutter sleeves to show the ruffle shape. Allow to dry completely, at least 24 hours, before unpinning.
Step 5Attach butterfly appliques after blocking and drying, as the appliques may distort if wet-blocked in place.
Finishing
- Weave in all ends from the bodice, skirt, sleeves, and both butterfly appliques separately.
- Block the finished dress with pins on a mat, misting with the spray bottle to even out the fan shell texture.
- Sew the three pearl buttons to the back opening and stitch the white butterflies onto the bodice front.
Why it works
The increases in the bodice happen at four marked points on either side of each section, which is what shapes the yoke without seams.
The back is worked flat in rows rather than in the round so the button opening has a straight edge to close against.
The skirt joins at the bodice waist and reverses direction, worked downward in turned rows instead of continuing the bodice's rounds.
What it becomes
- A photo-session dress for a baby, paired with plain white socks so the fan shell skirt stays the focus.
- A gift for a new parent who already has a drawer of plain onesies and wants one special piece.
- A keepsake dress passed down, stored flat with the butterflies as the detail that gets remembered.
FAQ
Can I make the butterflies in a different color than white?
Yes, the CC is just whatever contrast color you choose. White is the version given here, but any contrast yarn in the same approximate yardage will work.
Do I seam the sleeves onto the dress afterward?
No. The flutter sleeves are picked up and worked directly from the armhole opening once the bodice is complete, so there is no separate seaming step for them.
What is the difference between the two fan shell stitches?
The standard fan shell centers 5 dc in one stitch between skipped stitches and a connector sc. The expanded version swaps in 7 dc at designated rows to widen the skirt's circumference.