
Free Pattern
Step-by-Step
Crochet
Baby & KidsCable and basket-weave baby pinafore dress pattern
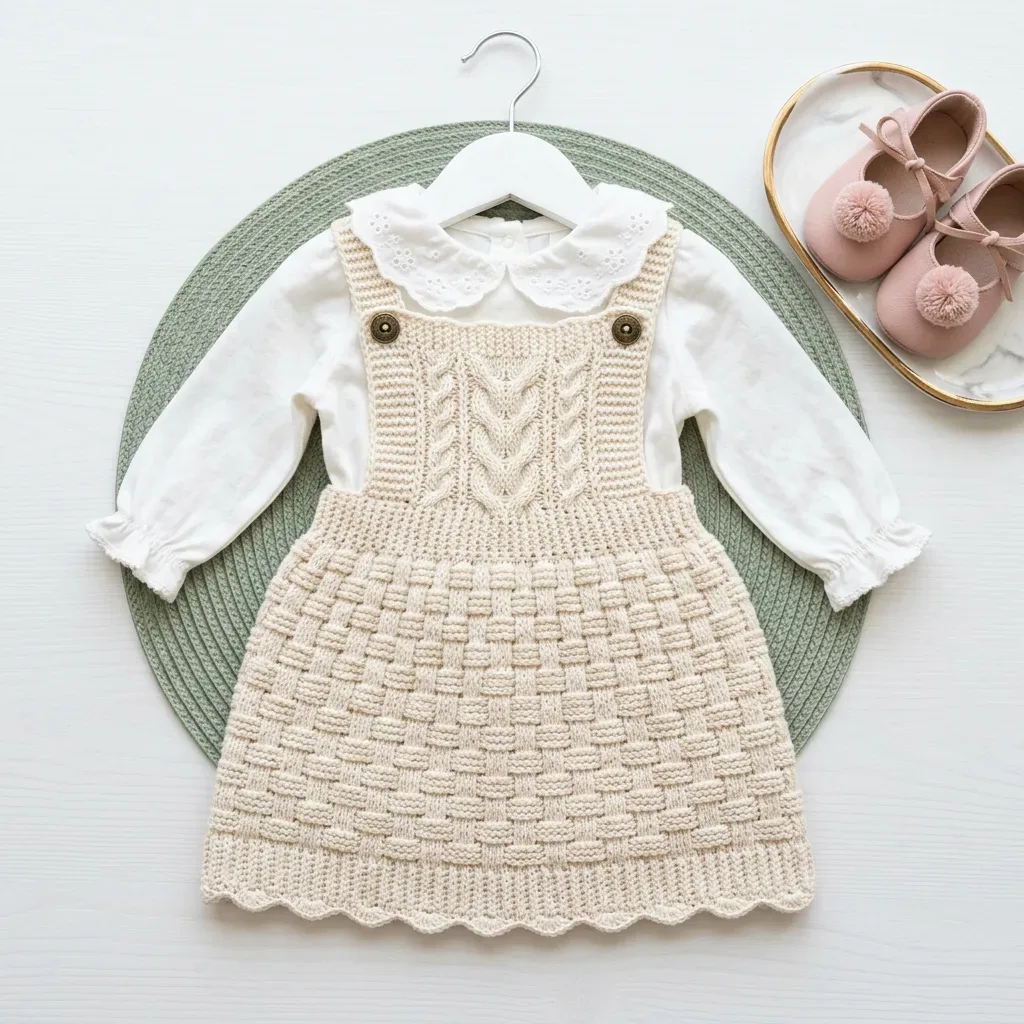
A cream crochet pinafore for babies with cabled bodice, basket-weave back, and a scalloped hem.
- Level
- Intermediate
- Time
- 8-12 hours
- Hook
- 4.0 mm
- Yarn
- Worsted
Pattern highlights
- Chain and work the front bodice panel flat, building the cable column between two basket-weave side panels.
- Work the back bodice panel flat in basket-weave stitch alone, with no cable column to track.
- Make two straps separately to connect the front and back bodice at the shoulders.
- Work the skirt front panel starting from the bottom edge of the front bodice, increasing as the pattern directs.
- Repeat the same shaping logic for the skirt back panel.
- Seam the bodice panels, straps, and skirt panels together into the finished pinafore shape.
- Join yarn at the hem and work the scallop border in one final round.
About This Pattern
This is the kind of piece that makes a baby garment folder feel grown up. Most newborn crochet leans simple: single crochet, maybe a shell edge. A pinafore with a cabled front panel and a basket-weave back belongs in a different drawer, next to things you'd make for yourself.
The techniques here are the real draw. Front post and back post double crochet pairs build the basket-weave texture, while a four-step FPdc sequence creates a genuine cable cross on the bodice. Nothing about either stitch is invented on the fly; both are worked consistently across their panels.
What comes off the hook is a fitted bodice with two straps, an A-line skirt that increases as it grows, and a scalloped hem to finish it off. Layered over a collared blouse, it reads like something from a department store, not a hook.
Worth knowing
I like projects that teach my hands something while I make them, and this one does. The cable cross asks you to skip two posts, work two FPdc ahead, then circle back for the skipped stitch — a small trick of sequence, not difficulty. The basket-weave panels on the back and skirt train your eye to read FPdc and BPdc blocks at a glance. By the time you reach the scallop border, the shaping feels earned. There's real satisfaction in seaming four flat panels into one fitted garment and watching a cable column line up exactly where the basket-weave stops. It's a baby-sized project with adult-sized technique.
Common mistakes
- Losing track of the cable's live loop Keep that first FPdc loop on the hook deliberately as you work the second one ahead of it. If you drop it, you'll have to unpick back to the skipped stitch.
- Mixing up FPdc and BPdc blocks Check your work every row against the pattern's block count rather than trusting memory. The raised and recessed blocks look similar until you've worked a few repeats.
- Misplacing the cable column on the front bodice Count out stitches 15 through 22 before you start the cable setup row. Mark the boundary stitches so the side basket-weave panels stay even on both edges.
- Skipping gauge swatch in basket-weave stitch Swatch and block before starting, since this is a fitted garment built on exact stitch counts. A loose gauge will throw off the chest measurement.
- Seaming panels before weaving in ends Weave in ends on each flat panel first, then seam. Trying to hide ends after seaming means digging through finished seams.
Intermediate
Progress Tracker
0 of 0 rounds
Tap a round to tick it off — your place is saved on this device.
The kit
Yarn
- Worsted weight yarn (CYCA 4), approximately 350 to 400 yards total, in cream or natural ecru.
Some excellent yarn choices include
- Lion Brand Yarn Pound of Love in color Fisherman. Soft, machine-washable acrylic with excellent stitch definition.
- Paintbox Yarns Simply DK worked at a slightly tighter gauge with a 4.0 mm hook. A cotton-blend option with beautiful drape.
- Cascade 220 Superwash in 100% superwash wool. Creates crisp stitch definition and wonderful warmth.
- Choose a smooth yarn without too much fuzz or texture. You want those basket-weave blocks and cable crosses to really pop.
Hook
- US size G-6 / 4.0 mm crochet hook. Adjust as needed to meet gauge.
Notions
- At least 6 stitch markers
- Yarn needle for seaming and weaving ends
- 2 antique brass or bronze shank buttons, 3/4 inch / 19 mm diameter
- Scissors
- Rust-proof pins for blocking
- Measuring tape
Skirt Front Panel
With RS facing, join yarn at the right-hand bottom edge of the front bodice panel.
Skirt Row 1 (RS): Ch 2. Work 36 dc evenly across the bottom edge of the front bodice. Turn. (36 dc)
Skirt Row 2 (WS): Ch 2, turn. Work BW pattern Row 2 logic across. (36 sts)
Skirt Row 3 (RS, Increase Row): Ch 2, turn. Work 2 dc in first st, continue in BW pattern to last st, work 2 dc in last st. (38 sts)
Continue working in BW pattern with increases every 3 rows:
Round 6Increase at each edge. (40 sts)
Round 9Increase at each edge. (42 sts)
Round 12Increase at each edge. (44 sts)
Round 15Increase at each edge. (46 sts)
Round 18Increase at each edge. (48 sts)
Round 19Work 1 increase at center to reach 49 stitches. Checkpoint: After Row 19, skirt front should measure approximately 7 inches long and 12.25 inches wide at the hem.
Front Bodice Panel
The front bodice is worked flat, bottom-up starting at the waist edge. It’s 36 stitches wide and 12 rows tall.
Foundation Chain: Ch 38.
Foundation Row (WS): Dc in the 4th ch from hook and in each ch across. Turn. (36 dc)
The center 8 stitches (stitches 15 through 22) form the cable column. Stitches 1-14 on the right and stitches 23-36 on the left form the basket-weave panels.
Bodice Row 1 (RS, Basket-Weave Setup + Cable Setup): Ch 2, turn. This ch-2 counts as first dc throughout bodice rows.
Work as follows:
Sts 1-2: FPdc around post of 2nd dc from hook, FPdc around post of next dc. (2 FPdc, 1 raised BW block)
Sts 3-4: BPdc, BPdc. (1 recessed BW block)
Sts 5-6: FPdc, FPdc.
Sts 7-8: BPdc, BPdc.
Sts 9-10: FPdc, FPdc.
Sts 11-12: BPdc, BPdc.
Sts 13-14: FPdc, FPdc.
Begin Cable Panel (sts 15-22): St 15-16: BPdc, BPdc. (left rib edge of cable)
Sts 17-20: Work FPdc-cross-R over posts of sts 17, 18, 19, 20.
Sts 21-22: BPdc, BPdc. (right rib edge of cable)
End Cable Panel: Sts 23-24: FPdc, FPdc.
Sts 25-26: BPdc, BPdc.
Sts 27-28: FPdc, FPdc.
Sts 29-30: BPdc, BPdc.
Sts 31-32: FPdc, FPdc.
Sts 33-34: BPdc, BPdc.
Sts 35-36: FPdc, FPdc.
(36 sts)
Bodice Row 2 (WS):
Ch 2, turn. Mirror the post stitches. Where you see a raised FPdc from the RS, work BPdc on the WS. Where you see a recessed BPdc from the RS, work FPdc on the WS.
Sts 1-2: BPdc, BPdc.
Sts 3-4: FPdc, FPdc.
Sts 5-6: BPdc, BPdc.
Sts 7-8: FPdc, FPdc.
Sts 9-10: BPdc, BPdc.
Sts 11-12: FPdc, FPdc.
Sts 13-14: BPdc, BPdc.
Sts 15-16: FPdc, FPdc.
Sts 17-20: BPdc, BPdc, BPdc, BPdc.
Sts 21-22: FPdc, FPdc.
Sts 23-36: Continue in BW pattern as established.
(36 sts)
Bodice Row 3 (RS, Basket-Weave Shift + Cable Row): Ch 2, turn. BW blocks swap every 2 rows.
Sts 1-2: BPdc, BPdc.
Sts 3-4: FPdc, FPdc.
Continue alternating pairs through st 14.
Sts 15-16: BPdc, BPdc. (cable outline grooves)
Sts 17-20: FPdc, FPdc, FPdc, FPdc. (plain FPdc cable column, no cross)
Sts 21-22: BPdc, BPdc.
Sts 23-36: Continue BW pattern.
(36 sts)
Bodice Row 4 (WS): Mirror Row 3 logic. (36 sts)
Bodice Row 5 (RS, Cable Cross Row):
Work BW pattern on side panels. On RS rows that are multiples of 4 plus 1, the BW blocks are in the same orientation as Row 1.
Sts 1-14: Continue BW pattern starting with FPdc, FPdc.
Sts 15-16: BPdc, BPdc. (cable groove)
Sts 17-20: FPdc-cross-L over sts 17-20. (left-leaning cross)
Sts 21-22: BPdc, BPdc.
Sts 23-36: Continue BW pattern.
(36 sts)
Bodice Rows 6-12: Continue the established pattern. Work cable crosses on Rows 9 (FPdc-cross-R) with plain FPdc cable columns on non-cross rows. Maintain BW pattern on sides, mirroring on WS rows.
Checkpoint: After Row 12, the front bodice panel should measure approximately 4.5 inches tall and 9 inches wide. Fasten off and set aside.
Back Bodice Panel
The back bodice is simpler, worked entirely in basket-weave stitch with no cable panel.
Foundation Chain: Ch 38.
Foundation Row (WS): Dc in 4th ch from hook and in each ch across. Turn. (36 dc)
Back Bodice Row 1 (RS):
Ch 2, turn. Work in BW pattern: 2 FPdc, then alternate pairs of 2 BPdc and 2 FPdc across. End with 2 FPdc. (36 sts)
Back Bodice Rows 2 through 12: Continue in BW pattern, mirroring post stitches on WS rows, swapping block orientation every 2 RS rows. (36 sts each row)
Checkpoint: Back bodice panel should measure 4.5 inches tall and 9 inches wide.
Straps (Make 2)
Each strap is 6 stitches wide and approximately 7 inches long.
Foundation Chain: Ch 8.
Strap Row 1: Sc in 2nd ch from hook, sc in each ch across. Turn. (6 sc)
Strap Rows 2 through 19: Ch 1, turn. Sc in each st across. Turn. (6 sc)
Strap Row 20 (Buttonhole Row): Ch 1, turn. Sc in first 2 sts, ch 1, skip 1 st, sc in next st, ch 1, skip 1 st, sc in last st. Turn. (4 sc + 2 ch-1 sp)
Strap Row 21: Ch 1, turn. Sc in first 2 sc, sc in ch-1 sp, sc in next sc, sc in ch-1 sp, sc in last sc. Turn. (6 sc)
Strap Rows 22-24: Continue in sc. (6 sc)
Fasten off, leaving a 12-inch tail for seaming. Make a second strap the same way.
Skirt Back Panel
Work identically to the skirt front panel, working into the bottom edge of the back bodice. (49 sts at end of Row 19)
Assembly
Step 1Scallop Hem Border: With RS facing, join yarn at the side seam of the hem. Round 1: Sl st into first hem stitch. (Skip 1, 5 dc in next, skip 1, sl st in next) repeat around. Join to first sl st. Fasten off. You’ll create 25 beautiful scallops around the entire hem.
Finishing
- Weave in every yarn end from the bodice panels, straps, and skirt panels before seaming anything.
- Seam the front and back bodice panels to the straps, then attach the skirt panels along the bodice bottom edges.
- Join yarn at the hem side seam and work the scallop border round, then block the whole dress to open up the basket-weave and cable texture.
Why it works
The front bodice places its cable column at stitches 15 through 22, centered between two 14-stitch basket-weave panels, so the crossed cable sits at chest center once seamed.
Both bodice panels are worked flat from a foundation chain rather than in the round, which keeps the FPdc and BPdc posts accessible from the right side on every row.
The skirt front panel starts by working directly into the bottom edge of the already-finished bodice, which is what lets the A-line shaping begin exactly where the fitted top ends.
What it becomes
- A photograph-worthy outfit for a baby's first portrait session, layered over a long-sleeve collared blouse.
- A handmade baby shower gift that pairs well with simple cream or white tights and soft shoes.
- An heirloom-style piece to pass between siblings or cousins, given the durable worsted weight construction.
Original pattern: https://crochetwithmia.com/cream-cable-knit-baby-pinafore-dress-free-crochet-pattern/
FAQ
Can I substitute a different yarn for the cream acrylic?
Yes, any smooth worsted weight yarn works as long as it shows stitch definition clearly. The pattern notes a cotton-blend and a superwash wool option, both at the same G-6 hook size.
Do I need to know how to cable to attempt this?
No prior cable experience is needed since the four-step FPdc sequence is spelled out fully. It's a sequencing trick more than a difficult stitch.
Why does the back bodice skip the cable panel?
The back is worked entirely in basket-weave stitch to keep the design simpler where it won't be the visual focus. The cable stays reserved for the front bodice center.
How many scallops will the finished hem have?
The pattern produces 25 scallops around the entire hem in that single border round. The count comes directly from the stitch repeat worked around the hem edge.