
Free Pattern
Step-by-Step
Crochet
Baby & KidsCrochet baby shoes with a shaped toe cap
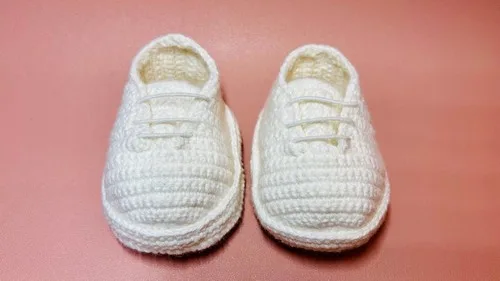
A two-color crochet baby shoe pattern with a sole, shaped toe cap, and elastic lacing.
- Level
- Intermediate
- Time
- 4-6 hours
- Yarn
- Worsted
Pattern highlights
- Start the sole with a magic ring and build it outward in rounds, shaping as you go.
- Set the sole aside once its rounds are complete and turn to the toe cap.
- Chain to start the toe cap and work it flat in rows, turning at the end of each one.
- Mark the eighth row of the sole on both sides before you try to join anything.
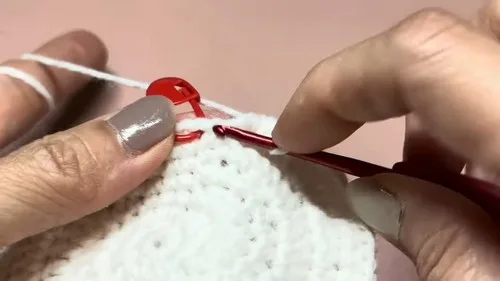
- Work around the marked toe cap area in a mix of stitches to shape the opening.
- Complete the round to bring the stitch count up before weaving in the yarn end.
- Flip the midsole up, align it with the toe cap, and sew the two layers together loosely.
About This Pattern
I keep a shelf for the small useful things: coasters, phone cases, baby shoes. This pattern belongs there. It is not a toy, it is a wearable, and that changes how I read every round. Someone will actually put a foot in this, so shape matters more than it does on a stuffed animal. I like patterns that admit that up front.
The techniques here are ordinary on their own — magic ring, increases, a flat panel worked in rows — but the order they arrive in is the interesting part. The sole grows in rounds like most amigurumi bases. The toe cap breaks off into flat rows instead, which is a different rhythm entirely, and then the two get sewn back together like nothing happened.
What comes out the other end is a small, structured shoe with a defined toe and a lacing point for elastic. It looks storebought because it is built like one: sole, cap, seam, closure. Nothing about the finished object apologizes for being handmade. That is rarer than it should be.
Worth knowing
I like a pattern that changes technique halfway through instead of running the same eight rounds forever. Here the sole builds outward from a magic ring, the increases doing quiet, predictable work at set points. Then the toe cap drops into flat rows worked back and forth, chain thirteen at the start, and the whole feel of the piece shifts. Marking the eighth row on both sides before joining is the kind of small instruction that saves you from unpicking a seam later. Sewing the two pieces together with fine thread, not pulled tight, is its own quiet skill — loose enough to keep the shoe soft, tight enough to hold its shape. It is a short make with two distinct rhythms in it, and I never get bored halfway through.
Common mistakes
- Losing track of the marked row Mark the eighth row of the sole on both sides before you start joining. A stitch marker left in place is easier to trust than a memory of counting rows.
- Working the toe cap in the round The toe cap is a flat panel worked in turned rows, starting from a chain of thirteen. Turning at the end of each row keeps the curve correct.
- Sewing the seam too tight Fine thread pulled taut will pucker the join and stiffen the shoe. Sew with enough slack that the two layers sit flat against each other.
- Misplacing the increase stitches The 9 SC, INC, 10 SC, INC, 9 SC sequence only lands at 32 stitches if the increases fall exactly where marked. Count the plain stitches on either side before placing each increase.
- Skipping the direction check on the toe cap Work right to left with the toe cap facing you, as stated, or the increase placement will end up mirrored. Check orientation before the first stitch of that round.
Intermediate
Progress Tracker
0 of 0 rounds
Tap a round to tick it off — your place is saved on this device.
The kit
- Yarn in two contrasting colors
- Crochet hook (size suitable for yarn weight)
- Stitch markers
- Yarn needle
- Scissors
- Elastic band for shoelace
- Fine thread for sewing
Sole
Round 1Make a magic ring. Into the ring, crochet 2 SC, 2 HDC — repeat twice (8 stitches).(8)
Round 22 INC, 1 HDC, 1 DC — repeat twice (16 stitches).(16)
Round 34 SC, (HDC, DC), DC2 x 2, (HDC, DC) — repeat sequence twice (24 stitches).(24)
Round 44 SC, (HDC, DC), (DC2, DC) x2, 4 SC, (HDC, HDC2) x4 (34 stitches).(34)
Round 54 SC, (HDC, DC), (DC, DC2) x2, 6 SC, (HDC, HDC2) x6, 2 SC (52 stitches).(52)
Round 64 SC, 5 HDC, (DC2, DC) x7, 5 HDC (64 stitches).(64)
Round 716 HDC, (DC2, 2DC) x3, 2 DC, (HDC2, 6HDC) x2, 2 SC (70 stitches). Weave in yarn end and place stitch marker on the first stitch.Mark stitches 12 through 35 (24 stitches total) for toe cap.
Toe Cap
Round 1Chain 13, skip 1, SC across (12 stitches).(12)
Round 2Ch 1, turn. (INC, 3 SC) x3 (15 stitches).(15)
Round 3Ch 1, turn. (INC, 4 SC) x3 (18 stitches).(18)
Round 4Ch 1, turn. INC, 16 SC, INC (20 stitches).(20)
Round 5Ch 1, turn. INC, 18 SC, INC (22 stitches).(22)
Round 6Ch 1, turn. INC, 20 SC, INC (24 stitches).(24)
Round 7Ch 1, turn. INC, 22 SC, INC (26 stitches).(26)
Round 8Ch 1, turn. INC, 24 SC, INC (28 stitches).(28)
Round 9Ch 1, turn. INC, 26 SC, INC (30 stitches).(30)
Round 10Ch 1, turn. INC, 28 SC, INC (32 stitches).(32)
Rounds 11–12Ch 1, turn. 32 SC. Mark 15th and 18th back loops of Row 14.
Round 13Ch 1, turn. 10 SC in back loops, 4 SC (14 stitches).(14)
Round 14Ch 1, turn. Skip 1, 13 SC (13 stitches).(13)
Round 15Ch 1, turn. Skip 1, 12 SC (12 stitches).(12)
Rounds 16–21Ch 1, turn. 12 SC.
Round 22Ch 1, turn. Skip 1, 11 SC (11 stitches).(11)
Round 23Ch 1, turn. Skip 1, 10 SC (10 stitches).(10)
Rounds 24–29Ch 1, turn. 10 SC.
Round 30Ch 1, turn. INC, 9 SC, INC (11 stitches).(11)
Round 31INC, 10 SC (12 stitches).(12)
Round 32Ch 1, turn. 12 SC. Leave a long tail for sewing. Identify the side with 8 front loops (wrong side), flip to correct side.Sew toe cap ends together from wrong side.Weave in yarn end.
From the collection
Finishing
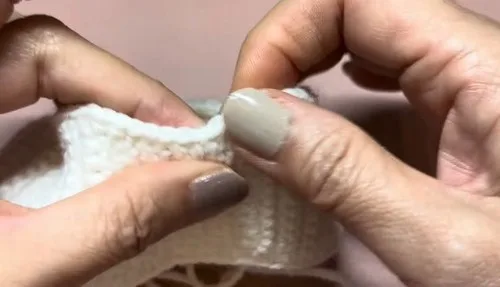
- Weave in the yarn end after completing the final round around the marked area.
- Flip the midsole up so it faces the toe cap the right way before aligning the two.
- Sew the sole and toe cap together with fine thread, keeping the tension loose rather than tight.
Why it works
The sole's early rounds use paired increases at regular intervals, which is how a flat circular base keeps its shape instead of buckling into a bowl or a cone.
The toe cap is worked flat in rows, not in the round, because it needs to sit as a single curved panel over the foot rather than close up on itself like the sole does.
The final round around the marked area mixes SC, HDC, and DC in short runs, which lets the toe cap edge curve tightly in some spots and ease out in others.
What it becomes
- A first pair of soft shoes for a baby who is not yet walking, worn indoors with socks.
- A handmade baby-shower gift that pairs well with a matching hat or a small blanket.
- A keepsake pair kept aside rather than worn, stored with other early-milestone knits and crochets.
Original pattern: https://crocheteverything.com/stylish-crochet-baby-shoes-pattern-that-look-like-store-bought/
FAQ
What is the marked row on the sole actually for?
Marking the eighth row on both sides gives you a fixed reference point for aligning the toe cap later. Without it, matching the two pieces up symmetrically is much harder to eyeball.
Why use fine thread instead of yarn to join the pieces?
Fine thread lets you sew a neater, less bulky seam between the sole and toe cap. Keeping the tension loose, as noted, avoids puckering the join.
Can I use a single yarn color instead of two contrasting ones?
The pattern calls for two contrasting colors, likely to make the toe cap read as a distinct piece against the sole. A single color will still work structurally, it just won't show off the two-part construction the same way.