
Free Pattern
Step-by-Step
Crochet
AmigurumiAmigurumi Bunny Crochet Pattern – Soft Chenille Plushie (20 cm)
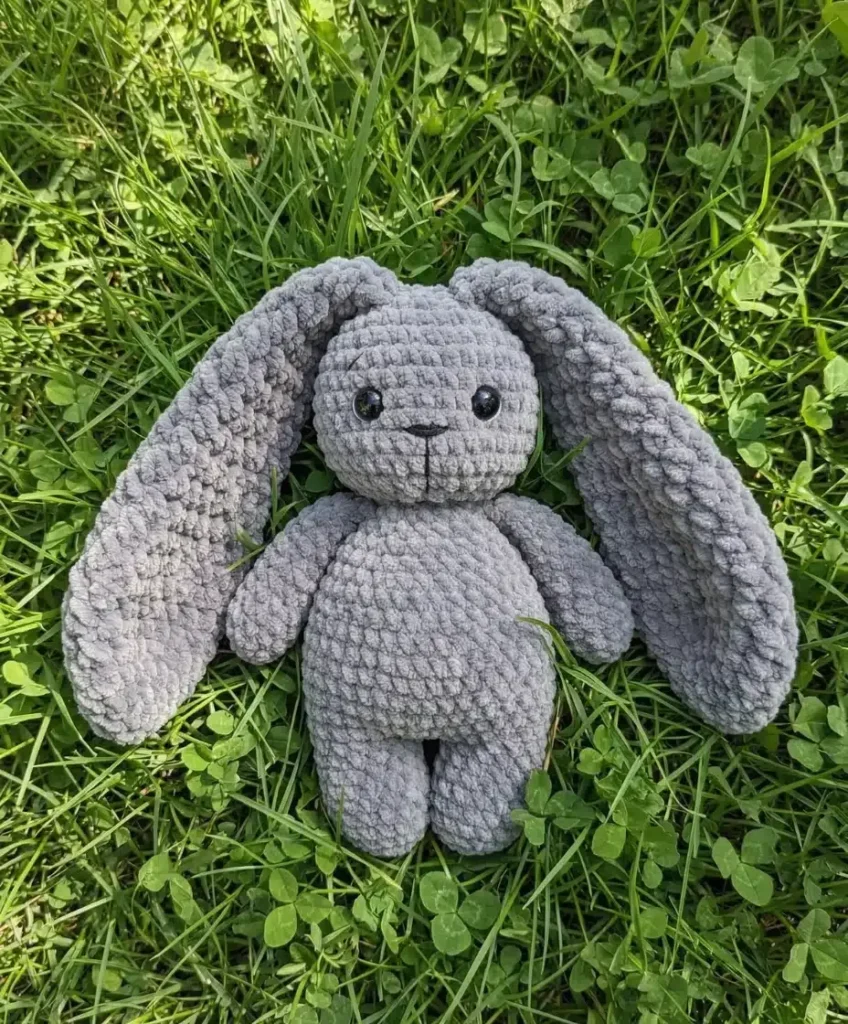
Make an adorable 20 cm amigurumi bunny with soft chenille yarn! This crochet pattern covers ears, arms, legs, and a squishy sculpted face.
Level IntermediateTime 4-6 HoursHook 10 mmYarn Bulky
Pattern highlights
- Crochet both arms first, working them in continuous spiral rounds and setting them aside once stuffed lightly.
- Work the legs and continue directly into the body, shaping the increases and decreases as you stuff along the way.
- Crochet the head separately, building it up round by round before inserting the safety eyes at the right spot.
- Add the small tail piece, which works up quickly in just a few rounds of single crochet.
- Embroider the facial details with black yarn and cotton thread to sculpt a soft, expressive bunny face.
- Stuff every piece firmly, paying extra attention to the head and body so the plushie holds its shape.
- Sew all the pieces together in the final assembly steps to bring your soft chenille bunny to life.
About This Pattern
This amigurumi bunny is a irresistibly soft chenille plushie that stands about 20 cm tall once stuffed and assembled. What makes it special is the yarn choice — bulky chenille gives the finished bunny a velvety, huggable texture you just don't get from standard worsted cotton. It's the perfect project for anyone who wants to make a nursery-ready keepsake, a baby shower gift, or simply a cuddly companion that feels as good as it looks.
You'll work through arms, ears, legs, body, head, and a tiny tail, all built in continuous spiral rounds with a stitch marker to track your place. The ears break from tradition and use half double crochet for a slightly denser, faster-growing texture, while the rest of the bunny relies on standard single crochet increases and decreases. This is an intermediate-friendly pattern — comfortable for confident beginners who've made at least one amigurumi before — and takes roughly 4 to 6 hours from first magic ring to final stitch.
The finished bunny is soft, dense, and satisfyingly weighty in the hand thanks to the chenille yarn and polyfill stuffing, with a sculpted face built from safety eyes and hand-embroidered details. At 20 cm tall, it's the ideal size for shelf display, a crib companion, or a wrapped gift that will outlast trendier toys. Whether you keep it or give it away, this bunny has that irresistible plush-toy-store look made entirely by hand.
Variations
This bunny is begging for a color makeover! Try a soft blush pink or buttery yellow chenille (Bernat Baby Blanket or Chenille both work beautifully) for a gender-neutral nursery gift, or go bold with a deep charcoal grey body and white chenille tail and ear insets for extra contrast. For a seasonal twist, swap the grey for a heathered oatmeal tone and add a tiny fabric bandana around the neck for a farmhouse-style bunny. If you want a mini version, drop down to a 3.5mm hook and use worsted weight yarn instead of bulky chenille — expect the finished size to shrink to roughly 14-15 cm, and simply scale your stuffing amount down to match. For a larger huggable bunny, size up to a 5.0mm hook with super bulky chenille, which will push the finished height closer to 25-28 cm; just remember your increase rounds will need slightly more stitches to keep the proportions balanced. Not into chenille? A soft velvet-style yarn or even a smooth acrylic like Soft will give a different but equally cuddly finish — just swatch first since drape and stitch definition vary a lot between yarn types. You can also personalize the face: try a longer, curved mouth for a sleepier expression, or embroider tiny freckles with DK weight thread for extra charm. Adding a small crocheted flower or bow to one ear is an easy way to make this pattern feel entirely your own without changing a single round.
There's something so satisfying about watching a pile of chenille yarn turn into a squishy little bunny! I love how the hdc ears work up quickly and give such a nice contrast in texture against the single crochet body — you can literally feel the difference between the parts as you stitch. Working everything in continuous spirals keeps the momentum going, and honestly, chenille yarn is so soft to work with that it almost feels like a treat rather than a task. My favorite part is sculpting the face with embroidery floss after the safety eyes go in — that's the moment this little guy really comes to life. The arms, legs, and tail are small enough to finish in one sitting, which makes this a great project to pick up during a busy week without feeling overwhelmed. If you've been wanting to try chenille yarn for the first time, this bunny is the perfect low-pressure way to fall in love with it. It's cozy, quick-ish, and endlessly giftable.
Common mistakes
- Losing track of rounds in the continuous spiral sections
- Always keep a stitch marker in the first stitch of each new round and move it up every time you complete a round — this is non-negotiable for spiral amigurumi and will save you from unraveling confusion.
- Mixing up hdc and sc stitch heights between the ears and the rest of the bunny
- Double-check your stitch guide before starting the ears — the half double crochet rounds should feel noticeably taller and denser than the single crochet body, so if it looks too similar, recount your stitches.
- Understuffing the head and body, leading to a lumpy or floppy finished bunny
- Stuff firmly and in small pinches rather than one big handful, working the polyfill into the curves of the head and haunches with your fingers or a chopstick before closing up each section.
- Placing safety eyes without checking spacing first
- Insert the eyes but don't lock the washers on yet — try the head on the body, look at it from multiple angles, and adjust spacing before securing permanently, since safety eyes cannot be moved once locked.
- Rushing the invisible decrease at the top of the head or body closures
- Slow down on your final decrease rounds and use an invisible decrease (inserting through the front loops of the next two stitches) rather than a standard decrease to avoid visible gaps at the very top of rounded parts.
- Sewing limbs on without matching orientation
- Lay all pieces out next to the body before attaching anything, and use stitch markers to pin the arms, ears, and legs in place first so you can confirm symmetry before committing with your tapestry needle.


Intermediate
Progress Tracker
0 of 0 rounds
Tap a round to tick it off — your place is saved on this device.
Materials
- Bulky (or Super Bulky) chenille yarn, grey – approximately 1-1.5 skeins
- DK weight black yarn for facial embroidery
- Strong cotton thread or embroidery floss for facial sculpting
- 8-10mm safety eyes
- 4.0mm crochet hook
- Polyfill stuffing
- Tapestry needle
- Scissors
- Stitch markers
Arms (Make 2)
- Round 16 sc in MR (6)
- Round 26 inc (12)Step by step: (1 sc, inc) x 6 (18); (2 sc, inc) x 6 (24); (3 sc, inc) x 6 (30); (4 sc, inc) x 6 (36).Step by step: (1 sc, inc) x 6 (18).Step by step: (1 sc, inc) x 6 (18).
- Round 3-412 sc (12)
- Round 5(4 sc, sc2tog) x 2 (10)
- Round 6-710 sc (10)
- Round 8(3 sc, sc2tog) x 2 (8)
- Round 9-118 sc (8)Lightly stuff the arm, mostly in the bottom half. Flatten the opening and work 3 sc through both layers to close. Fasten off and leave a long tail for sewing.
Your bunny’s little arms are already taking shape – aren’t they just precious?
Ears (Make 2)
- Round 16 hdc in MR (6)
- Round 26 hdc inc (12)
- Round 3(1 hdc, hdc inc) x 6 (18)
- Round 4(2 hdc, hdc inc) x 6 (24)
- Round 5-824 hdc (24)
- Round 9(10 hdc, hdc2tog) x 2 (22)
- Round 1022 hdc (22)
- Round 11(9 hdc, hdc2tog) x 2 (20)
- Round 12-1320 hdc (20)
- Round 14(8 hdc, hdc2tog) x 2 (18)
- Round 15-1618 hdc (18)
- Round 17(7 hdc, hdc2tog) x 2 (16)
- Round 18(6 hdc, hdc2tog) x 2 (14)
- Round 19(5 hdc, hdc2tog) x 2 (12)
- Round 20-2212 hdc (12)Fasten off and leave a long tail for sewing. Do not stuff the ears.
This is a wonderful spot to place the safety eyes! Count up from the MR to find the space between Rnd 9 and Rnd 10. Insert the first safety eye, then count 3-4 stitches across and insert the second eye. Make sure they look even and secure the washers.
These lovely long ears are going to give your bunny so much character!
Tail
- Round 18 sc in MR (8)
- Round 28 inc (16)
- Round 3-416 sc (16)
- Round 58 sc2tog (8)Fasten off, leave a long tail for sewing. Lightly stuff the tail.Score: 0 Can you guess this Pattern?
What a cute little pom-pom tail!
Body
- Round 11Continuing from the second leg, work 18 sc around the first leg, then 18 sc around the second leg. This joins your legs together into one continuous body round. (36)
- Round 12(5 sc, inc) x 6 (42)
- Round 13-1842 sc (42)
- Round 19(5 sc, sc2tog) x 6 (36)
- Round 2036 sc (36)
- Round 21(4 sc, sc2tog) x 6 (30)
- Round 2230 sc (30)
- Round 23(3 sc, sc2tog) x 6 (24)
- Round 24Weave in the arms in this round! Place the arms symmetrically on the sides of the body, just above where the legs meet. Work 6 sc, then work 4 sc through both layers of the first arm and the body, 8 sc, then work 4 sc through both layers of the second arm and the body, 2 sc. (24)
- Round 25(2 sc, sc2tog) x 6 (18)Step by step: Now is the time to start stuffing your head firmly, shaping it as you go!; (1 sc, sc2tog) x 6 (12); 6 sc2tog (6).Cut the yarn, leaving a tail. Thread this tail onto your tapestry needle and weave it through the front loop of each of the remaining 6 stitches. Pull tight to close the opening. Weave in the yarn end securely.
Step by step: Your bunny’s adorable face is ready to meet the world!.
- Round 2618 sc (18)Step by step: Fasten off and cut the yarn. Lightly stuff this leg.Fasten off and leave a long tail for sewing the head to the body. Start stuffing the body firmly as you go, especially after Rnd 23.
Lightly stuff this leg. Do not cut the yarn. We’re going to join it directly to the first leg!
Your bunny’s body is complete with those sweet little arms! Isn’t it wonderful to see it all come together?
Assembly
- Step 1Now for the magical part, bringing all your beautiful pieces together to create your full Amigurumi Bunny Crochet!
- Step 2First, let's attach the head to the body. Using the long yarn tail from the body, carefully center the head on top of the body. Take your time and use a mattress stitch or whip stitch to securely sew the head to the body, making sure it sits straight and firm. You want your bunny to have a nice, strong neck!
- Step 3Next, let's give your bunny its wonderful ears. Flatten each ear and position them on top of the head. I like to place mine slightly to the sides of the very top center, so they have a gentle curve. Pin them in place to check the symmetry, then sew them securely using the yarn tails you left.
- Step 4Now for the sweet facial details! Take your black DK weight yarn and your tapestry needle. For the nose, embroider a small upside-down triangle or a "Y" shape directly below the center of the eyes. You can also add a tiny line for a mouth if you like! For a bit of extra charm and character, you can use your strong cotton thread to create some gentle facial sculpting. By inserting your needle near the eye, coming out a little below, and pulling gently, you can create slight indentations that make the eyes pop and give the face more depth. Just be sure to hide your knots securely inside the head.
- Step 5Finally, let's add the fluffy tail! Position the tail on the back of the body, slightly above the bottom. Sew it firmly in place using the yarn tail, making sure it's centered and secure. Give your bunny a good squeeze and gentle pat down to make sure the stuffing is evenly distributed.
Important notes
💡 Chenille yarn is stretchy and can split easily, so work with a slightly firmer tension than usual and consider a 4.0mm hook as specified to keep your stitches tight enough to hide stuffing.
💡 Keep a stitch marker not just for tracking rounds but also for marking the start of increase sections on the body and head, since chenille's texture makes stitches harder to count visually.
💡 Because the ears use hdc instead of sc, count your rows carefully — it's easy to accidentally slip into single crochet out of habit partway through.
💡 Stuff as you go rather than waiting until the piece is closed, especially on the body and head, so you can shape the stuffing evenly before it's too late to adjust.
💡 When embroidering the face, use strong cotton thread or embroidery floss doubled up for durability, since chenille's fuzzy texture can hide thinner embroidery threads.
💡 Trim any long chenille fibers poking out from your seams with small scissors for a cleaner, more polished finished look.
Original pattern: https://amigurumiarts.com/amigurumi-bunny-crochet-pattern-free-chenille/
FAQ
How much chenille yarn do I actually need?
Plan on 1 to 1.5 skeins of bulky or super bulky chenille in grey, which comfortably covers the arms, ears, legs, body, head, and tail. Buying the extra half skein is a good safety net if your tension runs looser.
Why are the ears worked differently from the rest of the bunny?
The ears use half double crochet instead of single crochet, which grows faster and gives a slightly more open, textured look compared to the dense single crochet body. This contrast is intentional and helps the ears stand out visually.
Is this pattern beginner-friendly?
It's best suited for confident beginners or intermediate crocheters who've already made at least one amigurumi, since it involves continuous spirals, safety eye placement, and facial embroidery. If you're brand new to amigurumi, practicing magic rings and invisible decreases first will help a lot.
What size safety eyes should I use for this bunny?
The pattern calls for 8-10mm safety eyes, which suit the 20 cm finished size nicely. If you prefer a more cartoonish look, sizing up slightly to 10mm gives a wider-eyed, more youthful expression.