
Free Pattern
Step-by-Step
Crochet
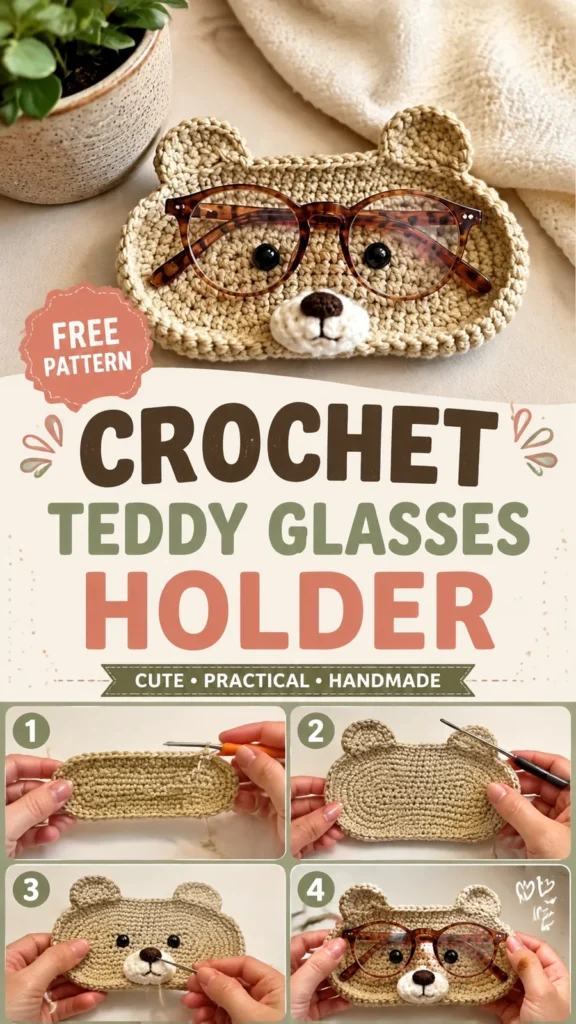
AmigurumiTeddy bear glasses holder crochet pattern with ears
A single crochet glasses pouch with a teddy bear face, worked flat in two panels.
- Level
- Intermediate
- Time
- 4-6 hours
- Hook
- 3.75 mm
- Yarn
- Worsted
Pattern highlights
- Chain and work two identical flat panels in single crochet, repeating the same row until both match.
- Set the panels aside and turn to the ears, starting each one from a magic ring.
- Increase once around the ear, work a plain round, then decrease with sc2tog to shape the top.
- Fasten off the ears, leaving long tails for sewing them onto the finished pouch.
- Join the two body panels around the sides and bottom, leaving the top edge open.
- Position and attach the ears to the front panel before adding facial details.
- Embroider the eyes, nose, and muzzle using the black and white yarn or thread.
About This Pattern
Every notebook needs a small, practical entry between the show pieces. This glasses holder is that entry: a case that earns its shelf space by doing a job. I like pouches like this because they teach assembly without asking for anything fancy stitch-wise.
The technique list is short and that's the point. Single crochet worked through both loops for two flat panels, a magic ring start for the ears, sc2tog to close them down. Nothing here is decorative for its own sake; every stitch is building fabric meant to hold firm.
What comes out the other end is a compact oval pouch with a teddy face stitched on top. Rounded ears, a beige body, room inside for glasses or a stray crochet hook. Small, useful, slightly bear-shaped.
Finished size is approximately 7 x 3.5 inches (18 x 9 cm). Gauge is approximately 18 single crochet stitches by 20 rows = 4 inches (10 cm); since handmade tension varies, check your measurements as you go.
Want to play with the look? Use pastel yarn for a soft spring accessory, swap in a different animal face such as a cat, bunny, or fox, try striped yarn colors for a playful style, or add a simple crochet button closure.
Worth knowing
I like projects where the stitch count stays honest the whole way through. Here, 27 single crochet stitches hold steady for 28 rows on each panel, so there's no mystery about whether you're on track. The ears are a nice contrast: four quick rounds, an increase, then sc2tog pulling them back down to size. Joining two flat panels into a pouch is a satisfying bit of assembly, the kind of skill that transfers to bigger bags later. And because it's single crochet throughout, the fabric comes out dense enough to actually protect a lens. This isn't a showpiece. It's the kind of small, well-built thing I reach for when I want proof that a stitch is working.
Common mistakes
- Losing count across 28 rows Count stitches at the end of every row. Missing the first or last stitch is the most common reason crochet rectangles become uneven; use a stitch marker on every tenth row so you're not recounting the whole panel each time.
- Working into one loop by habit Single crochet here goes through both loops for a firmer fabric, so check your hook placement each row.
- Skipping the marker on ear round 1 Place a marker at the start of the magic ring round since the ears aren't joined and it's easy to lose your place.
- Sc2tog pulled too tight Keep tension even on the decrease round or the ear tip will pucker instead of rounding off.
- Loose facial embroidery Secure embroidery firmly on the inside of the pouch. Avoid leaving long loose strands that could catch on glasses or other items.
- Unsafe details for young kids If making this for a child under three, stick to embroidered features only. Plastic safety eyes and small detachable decorations may not be appropriate for babies or young children because they can create a choking hazard.
- Loose, floppy fabric Keep the fabric firm by maintaining even tension. A loose gauge may create a floppy pouch that does not protect glasses as effectively.

Intermediate
Progress Tracker
0 of 0 rounds
Tap a round to tick it off — your place is saved on this device.
The kit
- Worsted weight yarn (cotton or cotton blend) in beige or desired main color, about 80 yards (73 meters)
- Small amount of black yarn or embroidery thread for eyes and nose
- Small amount of white yarn for muzzle details
- 3.75 mm crochet hook (US F-5)
- Yarn needle
- Scissors
- Stitch markers
Main Body Panels
Make 2 panels. The holder is made from two matching rectangular panels, joined around the sides and bottom and left open at the top.
Chain 28.
Row 1Sc in second ch from hook and across. Turn. (27 sc)
Row 2Ch 1, sc across. Turn. (27 sc) Repeat Row 2 until you have completed 28 rows. Fasten off.
Ear Pieces
Make 2 ears.
Round 1Make a magic ring. Work 6 sc into ring. Do not join. Place marker. (6 sc)
Round 2Inc around. (12 sc)
Round 3Sc around. (12 sc)
Round 4Sc2tog around. (6 sc) Fasten off, leaving a long tail for sewing.
Special Stitch Explanation
Single Crochet Two Together (sc2tog): Insert hook into next stitch, yarn over and pull up a loop, insert hook into following stitch, yarn over and pull up a loop, yarn over and pull through all three loops on hook.
Assembly
Step 1Place the two main panels together with wrong sides facing inward.
Step 2Using matching yarn, join the side edges and bottom edge with slip stitches or whip stitch. Leave the top edge open for inserting glasses.
Step 3Flatten each ear slightly and sew one ear near each top corner.
Step 4Embroider two small eyes using black yarn. Add a small oval nose and muzzle detail with white and black yarn.
Finishing
- Weave in all yarn ends securely on the inside of the holder.
- Lightly steam block the panels if needed, keeping the crochet fabric flat and avoiding excessive heat. Allow the piece to dry completely before use.
- best results, hand wash the finished holder gently with mild soap and reshape it while damp, then lay it flat to dry completely. Cotton yarn may soften after washing while maintaining its durable structure.
- Regularly check the seams and embroidered details to help keep the holder looking neat; proper finishing makes a small crochet accessory feel polished and long-lasting.
Why it works
The body panels are worked flat in rows rather than in the round, which keeps the two sides identical and easy to match before seaming.
The ear's single increase round at Round 2 doubles the stitch count from the magic ring, giving just enough width before the decrease round brings it back down.
Leaving the top edge open while joining the sides and bottom is what turns two flat panels into a pouch with an entry point.
What it becomes
- A soft case for glasses or sunglasses that rides in a bag without scratching the lenses.
- A small pouch for a crochet hook set or a spare set of stitch markers.
- A padded holder for earbuds or a few pieces of jewelry on a travel day.
Original pattern: https://duniarecipe.com/cute-crochet-accessories-ideas-handmade-patterns-diy-projects/
FAQ
Can I make the holder a different size?
Yes. Add stitches to the starting chain in multiples of two for a wider case, or add rows before finishing for a taller one.
Why single crochet instead of a looser stitch?
Single crochet through both loops makes a dense, firm fabric. That structure is what keeps glasses from scratching against the inside.
Do the two panels need to match exactly?
Yes, since they're joined around the sides and bottom. Keep row counts identical so the seam lines up evenly.
How do I attach the ears neatly?
Leave a long tail when you fasten off each ear and use it directly for sewing. That avoids a separate length of yarn and extra ends to weave in.