
Free Pattern
Step-by-Step
Crochet
AmigurumiA gradient jellyfish amigurumi with spiral tentacles
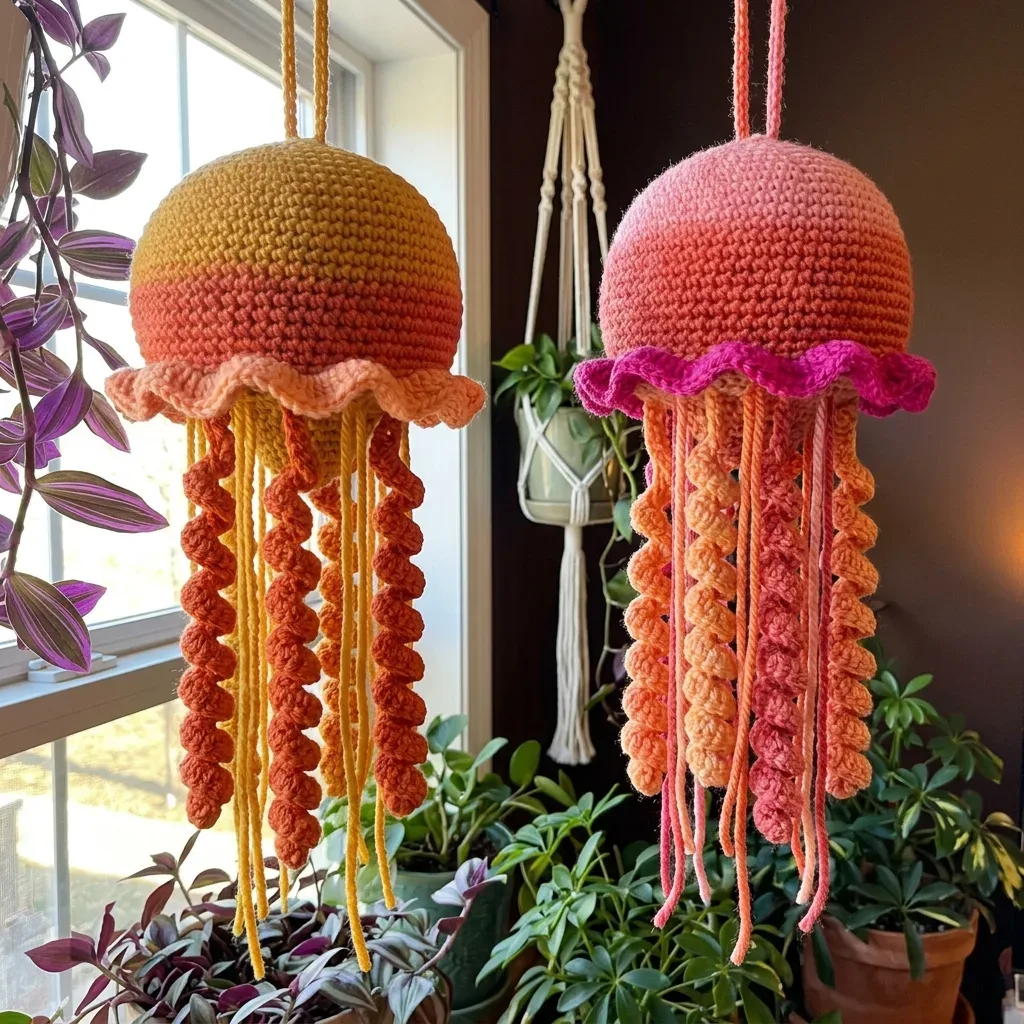
A gradient bell, a ruffled collar, and spiral tentacles made from one curling technique.
- Level
- Intermediate
- Time
- 12-18 hours
- Hook
- 4.0 mm
- Yarn
- Worsted
Pattern highlights
- Start the bell at the crown and work downward in continuous rounds, changing colors as the gradient dictates.
- Return to the back loops of that same round to close the base with a sequence of decreases.
- Stuff the bell before you finish closing it, then set it aside for the tentacles.
- Chain a foundation for each spiral tentacle and work into the back bump to create the curl.
- Attach the eight finished spiral tentacles around the closed base, then add trailing yarn strands for movement.
- Weave in every end and reinforce the hanging loop so the whole piece can hang and sway.
About This Pattern
This jellyfish earns a spot in my amigurumi shelf next to anything with moving parts. It's not a single stuffed shape. It's a bell, a ruffle, and eight separate tentacles, assembled afterward. I like patterns that make me build pieces before I understand how they'll fit together. The gradient coloring across three yarns gives it a reason to exist beyond cuteness. It reads as a study piece as much as a toy.
The bell works top-down with standard increases, then a smooth invisible decrease that hides where rounds taper. The ruffle splits off from the front loops of the last bell round. That leaves the back loops free to close the base later. Tentacles are the real trick. Chain a foundation, work into the back bump of each stitch, then add three single crochets. That ratio forces a spiral — you don't steer it, you just let it happen.
What comes off the hook is a dome with a drape of movement under it. The gradient runs gold to peach to burnt orange. The bell shifts color as your eye travels down it. Eight spiral tentacles curl and bounce, and trailing yarn strands add length without more stitching. Hung from a hook, it sways. It's less a toy to hold and more an object to watch.
Worth knowing
The satisfaction here is in the contrast between parts. The bell is calm, methodical rounds with a clean invisible decrease that keeps the surface smooth. Then the tentacles arrive. Working three single crochets into the back bump of a chain forces an automatic spiral. I like that the pattern doesn't fight the curl. It just tells you to let it happen. The ruffle collar is a small bit of engineering too. It works into the front loops only, while the back loops wait untouched for the closing round. Eight tentacles later, you're not just finished. You understand a technique you can reuse.
Common mistakes
- Fighting the tentacle curl Let the spiral happen as the three-stitch increase pulls the chain into a coil. Pulling it flat just stresses the yarn and the shape resists anyway.
- Losing track of round starts Place a locking stitch marker at the start of every round on the bell. Without it, the gradual color changes make it easy to lose your place.
- Working the ruffle into both loops Keep the ruffle strictly in the front loops only of round 20. If you grab both loops, the back loops won't be free for the closing round.
- Rushing the invisible decrease Insert into front loops only on both stitches before pulling through. Skipping a loop leaves a visible bump instead of a smooth decrease line.
- Underestimating stuffing before closing Add polyfill before the final decrease rounds close the base. Once those last stitches are worked, there's barely room to add more.

Intermediate
Progress Tracker
0 of 0 rounds
Tap a round to tick it off — your place is saved on this device.
The kit
All yarn is worsted weight
- Color A (Gold/Mustard Yellow): approximately 80 yards / 73 meters
- Color B (Peach/Salmon): approximately 50 yards / 46 meters
- Color C (Burnt Orange/Terracotta): approximately 120 yards / 110 meters
- Color D (Light Peach/Blush): approximately 30 yards / 27 meters (ruffle only)
- Color A = Coral Pink
- Color B = Salmon
- Color C = Peach Orange
- Color D = Hot Magenta / Fuchsia
- Paintbox Yarns Simply Worsted offers exceptional color range with shades like Mustard Yellow, Peach Orange, Blush Pink, and Burnt Orange that match this gradient almost perfectly.
- WeCrochet Wool of the Andes Worsted is another great option. The slight wool halo softens the gradient transitions beautifully. Just note that wool requires hand washing.
- Any smooth worsted weight yarn around 200 yards per 100g skein will work. Avoid fluffy or bouclé yarns since they’ll hide the stitch definition that makes amigurumi look crisp.
- Lion Brand Pound of Love works beautifully here. It's affordable, widely available, and has excellent stitch definition for amigurumi. Look for Camel, Pumpkin, and Terracotta shades.
- US size G-6 / 4.0 mm for the bell and tentacles
- US size H-8 / 5.0 mm optional for the ruffle if you crochet tightly
- Polyfill stuffing, approximately 2 to 3 oz / 56 to 85 g
- Locking stitch markers, at least 4
- Yarn needle / tapestry needle
- Scissors
- Ceiling hook or plant hook for hanging
Optional
- 1.5 inch / 3.8 cm plastic ring to reinforce the hanging loop
Section 1: The Bell
The bell begins at the crown (top) and works downward. Use a locking stitch marker to track the beginning of each round.
Begin with Color A (Gold).
Round 1MR, work 6 sc into ring, pull ring closed. (6 sc)
Round 2Inc in each st around. (12 sc)
Round 3(Sc in next st, inc in next st) rep 6 times. (18 sc)
Round 4(Sc in next 2 sts, inc in next st) rep 6 times. (24 sc)
Round 5(Sc in next 3 sts, inc in next st) rep 6 times. (30 sc)
Round 6(Sc in next 4 sts, inc in next st) rep 6 times. (36 sc)
Round 7(Sc in next 5 sts, inc in next st) rep 6 times. (42 sc)
Round 8(Sc in next 6 sts, inc in next st) rep 6 times. (48 sc) Change to Color B (Peach/Salmon) at the end of Rnd 8.
Round 9(Sc in next 7 sts, inc in next st) rep 6 times. (54 sc)
Round 10(Sc in next 8 sts, inc in next st) rep 6 times. (60 sc) Change to Color C (Burnt Orange) at the end of Rnd 10.
Round 11Sc in each st around. (60 sc)
Round 12Sc in each st around. (60 sc)
Round 13Sc in each st around. (60 sc)
Round 14Sc in each st around. (60 sc) Checkpoint: After Rnd 14, the bell should measure approximately 4.5 inches / 11.5 cm in diameter at its widest and approximately 3 inches / 7.5 cm tall. The dome shape should be clearly rounded.
Step by step: Work the invisible decrease (dec) as follows — insert hook into the front loop only of the next stitch; without completing the stitch, insert hook also into the front loop only of the stitch after that; yarn over and pull through both front loops (2 loops on hook); yarn over and pull through both loops on hook. One stitch decreased; this counts as 1 stitch in your count. This decrease keeps your amigurumi surface smooth and hides the decrease lines. Now work the decrease section:
Round 15(Sc in next 8 sts, dec) rep 6 times. (54 sc)
Round 16(Sc in next 7 sts, dec) rep 6 times. (48 sc)
Round 17(Sc in next 6 sts, dec) rep 6 times. (42 sc)
Round 18(Sc in next 5 sts, dec) rep 6 times. (36 sc) Checkpoint: After Rnd 18, stuff the bell firmly with polyfill now, before the opening becomes too small. Pack stuffing tightly into the crown first, then fill the rest.
Round 19(Sc in next 4 sts, dec) rep 6 times. (30 sc)
Round 20(Sc in next 3 sts, dec) rep 6 times. (24 sc) Do NOT fasten off. Do NOT close the opening yet. The ruffle comes next.
Section 2: The Ruffle Collar
Switch to Color D (Blush/Light Peach) for contrast. Join with a sl st into any stitch of Rnd 20.
Work into the front loops only of Rnd 20, leaving the back loops for later.
Ruffle Rnd 1: Working in FLO of Rnd 20, work 3 sc into each st around. (72 sc)
Ruffle Rnd 2: (Sc in next 2 sts, inc) rep 24 times. (96 sc)
Sl st into next st to join. Fasten off Color D. Weave in end.
The ruffle will naturally wave and frill. Don’t try to block it flat.
Section 3: Close the Bell Base
Return to the back loops of Rnd 20. Re-join Color C to any back loop.
Closing Rnd: (Sc in next 2 sts, dec) rep 6 times. (18 sc)
Closing Rnd 2: (Sc in next st, dec) rep 6 times. (12 sc)
Closing Rnd 3: Dec 6 times around. (6 sc)
Add any remaining stuffing through the small opening. Fasten off, leaving a 12 inch / 30 cm tail. Thread tail onto tapestry needle and weave through the front loops of the remaining 6 stitches. Pull tight to close. Weave in tail securely inside bell.
Section 4: Hanging Cord
At the crown of the bell, use the original starting tail or attach a new length of Color A approximately 24 inches / 61 cm long. Thread both ends through the magic ring from outside to inside, creating a loop. Tie a secure overhand knot 3 inches / 7.5 cm below the loop end. The hanging loop should extend approximately 6 to 8 inches / 15 to 20 cm above the crown.
Section 5: Spiral Bobble Tentacles
Make 8 total.
Using Color C (Burnt Orange), leave a 10 inch / 25 cm starting tail for attachment.
Foundation: Ch 51. (51 chains)
Work back along the chain, working into the back bump of each chain stitch.
Tentacle Row: Work 3 sc into the bb of the 2nd chain from hook, then 3 sc into the bb of each remaining chain across. (150 sc)
The tentacle will automatically spiral as you work. Let it curl. The spirals happen because you work 3 stitches into each chain; the coiling is automatic. Don't fight it when it starts curling on you — that's exactly what it's supposed to do.
Sl st into last st. Fasten off, leaving a 10 inch / 25 cm tail.
Color variation tip: Make 4 tentacles in Color C and 4 in Color A for the two-tone look shown in the photos.
Checkpoint: Each finished spiral should measure approximately 5 to 6 inches / 13 to 15 cm after coiling.
Section 6: Attaching Spiral Tentacles
Hold the bell with the ruffle facing downward. Attach the 8 spiral tentacles at evenly spaced points around the base, just above or through the ruffle row.
Using the starting tail and a tapestry needle, insert through the base of the bell at the joining point between bell and ruffle. Space tentacles approximately every 3 stitches around the 24-stitch base round. Push the tail through from outside to inside and tie a firm double knot. Run both tails through several stitches inside the bell and trim.
Repeat for all 8 tentacles.
Section 7: Trailing Yarn Tentacles
These are simply lengths of yarn attached with larks head knots.
Cut 16 lengths of Color A (Gold) each measuring 30 inches / 76 cm.
Cut 8 lengths of Color C (Burnt Orange) each measuring 24 inches / 61 cm.
Fold each length in half. Insert the folded midpoint loop up through a stitch at the base of the bell. Pull the two tails through the loop and pull snug.
Distribute 2 to 3 trailing strands alongside each spiral tentacle.
Trim trailing strands to varying lengths between 18 and 28 inches / 46 and 71 cm for a natural look.
Assembly
Step 1Weave in all remaining ends securely. Most can be buried inside the stuffed bell by threading through the stuffing with your tapestry needle.
Finishing
- Stuff the bell firmly before working the final closing rounds, since access disappears once it's sealed.
- Weave in color-change ends by burying them through the stuffing with a tapestry needle, right inside the bell.
- Attach the eight spiral tentacles and trailing yarn strands to the closed base. Then reinforce the hanging loop with the plastic ring.
Why it works
Round two doubles every stitch, but round three already spaces the increases out. That quick shift rounds the crown into a dome rather than a flat disc.
The ruffle works only into the front loops of round 20, leaving the back loops untouched. Those back loops stay free for a separate closing round that seals the bell.
The ruffle joins with a slip stitch instead of continuing the spiral. That join gives the collar a defined, flared edge instead of a seamless blend.
What it becomes
- Hang it from a plant hook near a window so the tentacles move with passing air.
- Set it on a bookshelf next to other amigurumi sea creatures for a small ocean-themed display.
- Give it to a kid's room as a soft mobile-style decoration over a reading chair.
FAQ
Can I substitute the yarn colors?
Yes, any smooth worsted yarn works as long as the gradient reads clearly from light to dark. Avoid fluffy or bouclé yarns since they hide the stitch definition the pattern relies on.
Why does the tentacle curl happen automatically?
Working three single crochets into each chain stitch forces more fabric than the chain can hold flat. That excess has nowhere to go but into a spiral.
Do I need the optional larger hook?
Only if your gauge runs tight on the ruffle. The H-8/5.0mm hook is there to loosen the ruffle rounds if the G-6/4.0mm feels too dense.
What is the plastic ring for?
It reinforces the hanging cord so the finished piece can bear its own weight without stretching the loop. It sits inside the cord, not visible from outside.