
Free Pattern
Step-by-Step
Crochet
AmigurumiAmigurumi Bunny in a Dress with Tiny Raspberry
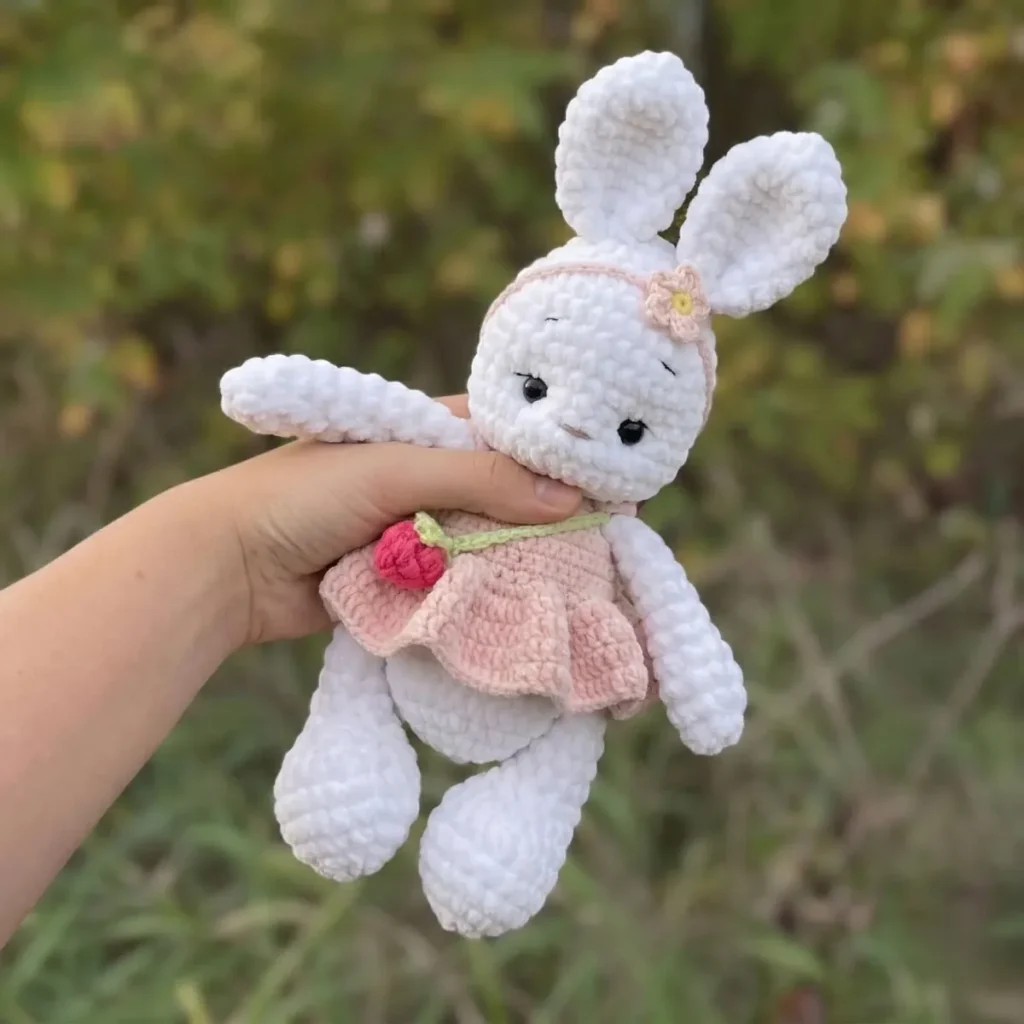
A crocheted bunny in a dress, holding a tiny raspberry, worked in white and pink DK yarn.
- Level
- Intermediate
- Time
- 4-6 hours
- Hook
- 2.0 mm
- Yarn
- DK
Pattern highlights
- Start with the head, working in a continuous spiral until it's time to stuff and close it.
- Crochet two arms and two legs separately, then set them aside for attaching later.
- Sew the head to the body, followed by the arms and legs at their marked round positions.
- Add a headband, then build the tiny raspberry with its leaf and stem for the bunny to hold.
- Dress the bunny, close the button, and tuck the raspberry into its paws to finish.
About This Pattern
This bunny joins the shelf of small dressed animals I keep coming back to. It sits between bigger projects, the kind of weekend make with a clear start and finish. The raspberry accessory sets it apart from a plain bunny shape, giving it a small narrative instead of just a form. I like that this piece isn't trying to be grand. It's a study in scale, nine small parts settling into one finished little figure.
Finished, the bunny stands with arms sewn at its sides and ears folded into place near the head's top rounds. The dress closes with a small button, and a raspberry with a separate leaf and stem gives it something to hold. It reads as a complete little character, not a bare shape waiting for accessories. Nine parts, one settled figure, ready for a shelf or a small hand to carry around.
Gauge isn't critical for this project, but keep your stitches tight enough that the stuffing doesn't show through, adjusting hook size if needed. The finished bunny measures approximately 28-30 cm (11-12 inches) tall.
Common mistakes
- Losing the round marker Continuous spiral rounds have no natural stopping point, so a misplaced marker throws off the whole count. Reset the stitch marker every few rounds instead of trusting memory.
- Skipping the invisible decrease A regular decrease leaves a visible bump on the head and body's curves. Use the invisible method through the front loops for a smoother finish.
- Overstuffing before adding eyes Safety eyes need soft fabric to snap into correctly. Insert them before the head is fully stuffed, not after.
- Guessing where limbs attach Arms and legs sewn off the marked rounds throw off the bunny's proportions. Follow the assembly step's round positions exactly.


Intermediate
Progress Tracker
0 of 0 rounds
Tap a round to tick it off — your place is saved on this device.
The kit
Yarn
- Wolans Bunny Baby yarn in White (for the main body)
- Yarn Art Jeans in Light Pink (for dress, flower petals)
- Yarn Art Jeans in Bright Pink (for raspberry)
- Yarn Art Jeans in Black (for eyebrows, eyelashes)
- Yarn Art Jeans in Brown (for nose)
- Yarn Art Jeans in Lime Green (for raspberry leaf)
- Yarn Art Jeans in Light Yellow (for flower center)
Hooks
- 2.0 mm crochet hook (for most parts)
- 3.5 mm crochet hook (for dress skirt)
- 12 mm safety eyes
- Tapestry needle (for sewing and weaving in ends)
- Scissors
- Small button (for dress closure)
- Fiberfill stuffing
- Lighter (for securing safety eye backs)
- Stitch marker or scrap yarn
Head (using 2.0 mm hook, White yarn)
Round 16 sc in mr (6)
Round 26 inc (12)
Round 3(1 sc, inc)*6 (18)
Round 4(2 sc, inc)*6 (24)
Round 5(3 sc, inc)*6 (30)
Round 6(9 sc, inc)*3 (33)
Round 7(10 sc, inc)*3 (36)
Round 8-11Sc in each stitch around (4 rounds) (36)
Round 12(5 sc, inc)*6 (42)
Round 13Sc in each stitch around (42)
Round 141 sc, (2 sc, dec)*10, 1 sc (32)
Round 15(1 sc, dec)*8 (24)
Round 16(2 sc, dec)*6 (18)Insert safety eyes between Rnds 11 and 12, with 6 sc between the posts of the eyes. Secure with a lighter on the inside to prevent them from coming loose. Stuff the head moderately, not too densely, distributing the fiberfill with a tapestry needle to shape.Fasten off, leaving a long tail for sewing.
Body (using 2.0 mm hook, White yarn)
Round 16 sc in mr (6)
Round 26 inc (12)
Round 3(1 sc, inc)*6 (18)
Round 4(2 sc, inc)*6 (24)
Round 5(3 sc, inc)*6 (30)
Round 6(4 sc, inc)*6 (36)
Round 7-11Sc in each stitch around (5 rounds) (36)
Round 12(4 sc, dec)*6 (30)
Round 13Sc in each stitch around (30)
Round 14(3 sc, dec)*6 (24)
Round 15Sc in each stitch around (24)
Round 16(2 sc, dec)*6 (18), sl st to join. Leave a long tail for sewing. Stuff the body with fiberfill.
Tail (using 2.0 mm hook, White yarn)
Round 16 sc in mr (6)
Round 26 inc (12)
Round 36 dec (6)Do not stuff! Fasten off, leaving a long tail for sewing.
Arms (Make 2, using 2.0 mm hook, White yarn)
Round 16 sc in mr (6)
Round 2(1 sc, inc)*3 (9)
Round 3-5Sc in each stitch around (3 rounds) (9)
Round 61 dec, 7 sc (8)
Round 7-11Sc in each stitch around (5 rounds) (8)Stuff only the bottom part of the arm lightly. Flatten the opening and sc 4 through both layers to close.Fasten off, leaving a long tail for sewing.
Legs (Make 2, using 2.0 mm hook, White yarn)
Round 16 sc in mr (6)
Round 26 inc (12)
Round 3(1 sc, inc)*6 (18)
Round 4(2 sc, inc)*6 (24)
Round 5-6Sc in each stitch around (2 rounds) (24)
Round 76 sc, 6 dec, 6 sc (18)
Round 86 sc, 3 dec, 6 sc (15)
Round 94 sc, 3 dec, 4 sc (12)
Round 10-13Sc in each stitch around (4 rounds) (12)Stuff the bottom part of the leg firmly, and the top part lightly. Flatten the opening and sc 6 through both layers to close.Fasten off, leaving a long tail for sewing.
Ears (Make 2, using 2.0 mm hook, White yarn)
Round 16 sc in mr (6)
Round 26 inc (12)
Round 3(1 sc, inc)*6 (18)
Round 4-10Sc in each stitch around (7 rounds) (18)
Round 11(1 sc, dec)*6 (12)Flatten the opening, do not stuff! Sc 6 through both layers to close. Fold in half again and sc 3 through both layers.Fasten off, leaving a long tail for sewing.
Dress (using 2.0 mm hook for bodice, 3.5 mm hook for skirt, Light Pink yarn)
Bodice (using 2.0 mm hook):
Round 1Ch 43. Sc in 2nd ch from hook and in each ch across. (42)
Round 2(1 sc, inc) 3, ch 6, skip 6 stitches, (2 sc, inc) 6, ch 6, skip 6 stitches, (1 sc, inc)*3. (42 sc stitches + 12 chs for armholes = 54 stitches for next round)
Round 3Working into the sc stitches and chs from Row 2, (8 sc, inc)*6 (60)
Round 4-8Sc in each stitch around (5 rounds) (60)Sl st to join to the first sc to form a circle. Switch to 3.5 mm hook.Skirt (using 3.5 mm hook):
Round 9Inc in each stitch around (120)
Round 10(1 dc, dc inc)*60 (180)
Round 11-14Dc in each stitch around (4 rounds) (180)Sl st to join, fasten off, and weave in ends.Sleeves (using 2.0 mm hook, Light Pink yarn): Join yarn to the underarm ch-6 space. Work 3 dc in each of the 6 chs. (18)Repeat for the second sleeve. Fasten off and weave in ends.Join Light Pink yarn to the back opening of the dress at the top edge. Ch 8, sl st into the adjacent stitch. Fasten off.
Button Loop:
Headband (using 2.0 mm hook, Light Pink yarn)
Ch 77. Starting in the 2nd ch from hook, sl st in each ch across. Fasten off, leaving a long tail for sewing.
Flower (using 2.0 mm hook): Center (Light Yellow yarn):
Round 16 sc in mr, sl st to join. (6)Fasten off.Petals (Light Pink yarn): Join Light Pink yarn to any sc of the flower center.In each sc around: (Ch 3, 1 dc, ch 3, sl st).Repeat this petal sequence 5 more times (6 petals total).Fasten off, leaving a long tail for sewing.
Raspberry (using 2.0 mm hook, Bright Pink yarn)
Round 14 Puff Stitches in mr (4)
Round 24 inc of Puff Stitches (8)
Round 3(1 Puff St, inc of Puff St)*4 (12)
Round 4-5Sc in each stitch around (2 rounds) (12)Sl st to join, stuff the berry with fiberfill. Fasten off and weave in ends.
Leaf (using 2.0 mm hook, Lime Green yarn)
Ch 4. In 2nd ch from hook, tr, tr, ch 4, sl st.
Repeat this process 2 more times to create 3 leaves.
Fasten off, leaving a long tail for sewing.
Raspberry Stem (using 2.0 mm hook, Lime Green yarn)
Ch 65. Starting in the 2nd ch from hook, sl st in each ch across. Fasten off.
Assembly
Step 1Attach the Head: Sew the head to the body, ensuring it is centered and securely attached. Use the long tail from the head.
Step 2Attach the Arms: Sew the arms to the sides of the body between Rnds 15 and 16. Position them symmetrically.
Step 3Attach the Legs: Sew the legs to the bottom of the body between Rnds 7 and 8, ensuring they are evenly spaced for stability.
Step 4Attach the Ears: Sew the ears to the top of the head between Rnds 4 and 5, positioning them symmetrically and folding them slightly for shape.
Step 5Attach the Tail: Sew the tail onto the back of the body between Rnds 6, 7, and 8.
Step 6Face Sculpting: Using a long strand of white Yarn Art Jeans, thread your tapestry needle. Insert the needle at the outer corner of one eye, bring it out at the inner corner of the same eye. Then insert it at the inner corner of the second eye and bring it out at the outer corner of the second eye. Gently pull the yarn to create a slight indentation around the eyes. Secure the yarn ends inside the head.
Step 7Embroider Facial Features:
Step 8Nose: With brown yarn, embroider the nose horizontally between Rnds 12 and 13, covering about 3 stitches with a few small stitches.
Step 9Eyebrows: With black yarn, embroider small arched eyebrows on Rnd 8, above each eye.
Step 10Eyelashes: With black yarn, embroider 2 small eyelashes on the outer side of each eye, approximately 2 sc stitches away.
Step 11Dress Closure: Sew the small button onto the opposite side of the dress opening, aligning it with the button loop you created.
Step 12Attach Headband and Flower: Sew the flower onto the headband. Then, carefully sew the headband onto the bunny’s head, positioning it as desired.
Step 13Assemble Raspberry: Sew the three leaves to the top of the raspberry. Then, sew the ch-65 stem to the top of the raspberry, securing it firmly. Attach the raspberry to one of the bunny’s hands or anywhere you like.
Step 14Weave in all remaining ends neatly to complete your bunny.
Finishing
- Weave in loose ends from color changes before joining parts, so nothing pulls loose during stuffing.
- Stuff the head and body firmly, but leave a little give in the arms and legs for a soft feel.
- Sew on the ears, arms, and legs at their marked rounds, then dress the bunny and close the button before adding the raspberry.
Why it works
The body's first rounds add six stitches per round, the classic amigurumi increase spiral that turns a flat disc into a rounded torso.
Arms increase only once before running several rounds straight, then decrease once — a narrow tube shape rather than a tapered limb.
The dress splits across two hook sizes: the smaller hook for the fitted bodice, the larger one for the skirt, so the tension loosens exactly where the garment needs to flare.
What it becomes
- A shelf piece alongside other small amigurumi animals, especially ones already holding a tiny accessory.
- A soft toy for a child's room, gentle enough given the fiberfill stuffing and secured safety eyes.
- A small handmade gift for someone who collects dressed animal figures or amigurumi dolls.
Original pattern: https://amigurumicorner.com/adorable-amigurumi-bunny-with-dress-raspberry-free-crochet-pattern/
FAQ
Can I skip the dress and just make the bunny?
Yes, the head, body, arms, and legs stand on their own as a plain bunny. The dress, headband, and raspberry are separate add-ons you can leave off entirely.
Why does the pattern call for two hook sizes?
The 2.0 mm hook keeps the bunny's body tight enough to hold its stuffing. The 3.5 mm hook loosens the skirt rounds so the dress flares instead of hugging tight.
What's the invisible decrease and why does it matter here?
It's a decrease worked through the front loops only, which keeps the stitch nearly hidden. On a rounded head or body that smoothness matters more than it would on flatter pieces.
Is this a good project if I've only made simple amigurumi before?
It's a step up because of the two hook sizes and the small separate raspberry pieces. If you've finished one basic amigurumi animal, the extra parts here stay manageable.