
Free Pattern
Step-by-Step
Crochet
AmigurumiAmigurumi crochet dinosaur pattern for a friendly stuffed toy
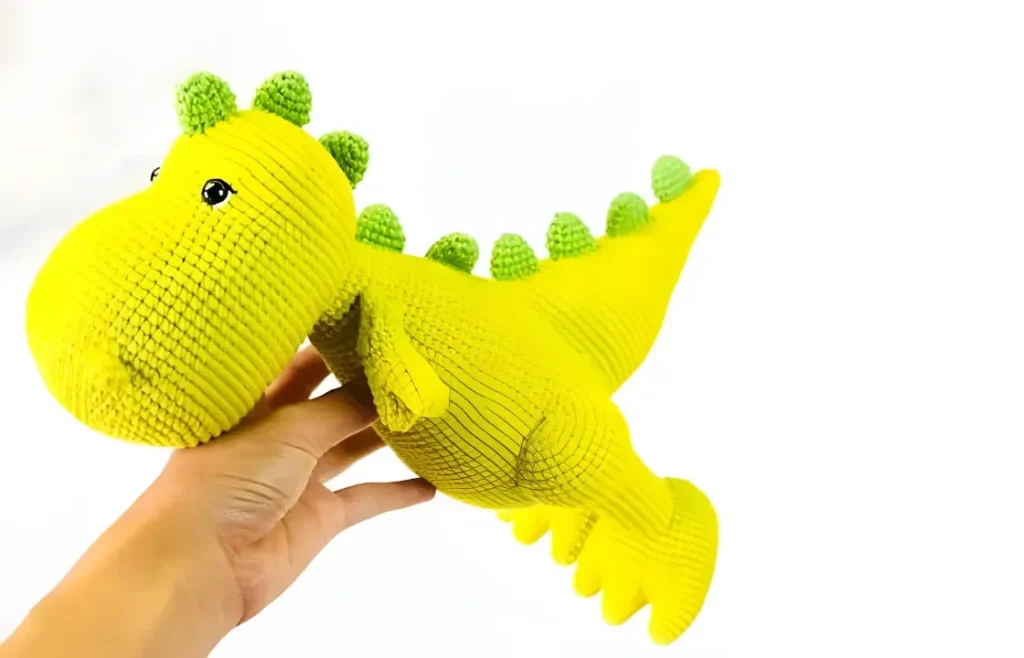
A crochet amigurumi dinosaur worked in rounds, finished at about 32 cm with safety eyes.
- Level
- Intermediate
- Time
- 4-6 hours
- Hook
- 2.25 mm
- Yarn
- Worsted
Pattern highlights
- Start the head in a magic ring and increase steadily until the dome shape forms.
- Keep working the head through all twenty-three rounds before any seaming begins.
- Make both legs separately, each one starting in its own magic ring.
- Increase the legs quickly in the first rounds, then work straight for the rest.
- Stuff the head and legs with fiberfill as each piece closes up.
- Attach the 6mm safety eyes before the head is fully stuffed and closed.
- Join the finished legs to the body using matching yellow green yarn.
About This Pattern
A dinosaur joins the amigurumi shelf the way a terrier joins a sock drawer. It arrives eventually, and it stays permanently. I keep a small cluster of toy-shaped projects — a bear, a fox, and now this dinosaur. Each one tests the same bones: single crochet and increase. This pattern earns its place with twenty-three rounds for the head alone. That's more shaping than most toys bother with. It's a studied piece, not a quick weekend fill-in.
The construction follows pure amigurumi grammar: start in a magic ring, then increase outward in a steady spiral. The head begins at six stitches and doubles to twelve by round two. Legs open the same way, six in the ring, then six increases. They level off at twenty-four stitches before running straight for the rest of the rounds. Nothing exotic here — just single crochet and increase, repeated with patience. The head runs twenty-three rounds; the legs settle for nine.
What comes out the other side stands about 32 cm tall. It's a solid handful of yellow green yarn and fiberfill. The eyes are 6mm safety eyes, with black and white yarn for detail work. Two legs hold it upright on a shelf. It's a toy built for handling, not a decoration meant to sit untouched. I'd call it sturdy rather than delicate.
Worth knowing
There's real satisfaction in watching six stitches in a magic ring become twenty-four by round four. The increase math does that work fast, in both the head and the legs. I like that the head gets the full twenty-three rounds of attention. The legs settle for nine, and the proportions feel considered, not arbitrary. Working two identical legs side by side has its own small rhythm. The yellow green yarn keeps it recognizably dinosaur without any fuss. The 6mm safety eyes do the heavy lifting on personality. By the time it's stuffed and standing at 32 cm, plain stitches have a spine and an expression.
Common mistakes
- Losing the spiral's starting point Mark round one on each part with a stitch marker, since there's no visible seam to guide you.
- Miscounting the increase rounds Check stitch counts after round two and round three to confirm twelve and eighteen stitches.
- Attaching eyes too early Wait until a few rounds of head shaping are done before placing the 6mm safety eyes.
- Legs ending up mismatched Work both legs side by side, round by round, instead of finishing one first.
- Under-stuffing the head Pack fiberfill firmly before closing round twenty-three, since the head needs weight to stand upright.


Intermediate
Progress Tracker
0 of 0 rounds
Tap a round to tick it off — your place is saved on this device.
The kit
- Crochet hook size 2,25mm
- Yarn: Yarnart Jeans in yellow green and green
- Black and white yarn, 6mm safety eyes
- Sewing needle, some pins
- Fiberfill for stuffing
Head
In yellow green yarn.
Round 16 sc in MR (6)
Round 26 inc (12)
Round 3(sc,inc)*6 (18)
Round 4(2sc,inc)*6 (24)
Round 5(3sc,inc)*6 (30)
Round 6(4sc,inc)*6 (36)
Round 7(5sc,inc)*6 (42)
Rounds 8–12sc around (42)
Round 1313 sc, dec, (5sc,dec)*2, 13 sc (39)
Round 14sc around (39)
Round 1513 sc, dec, (4sc,dec)*2, 12 sc (36)
Round 16sc around (36)
Round 1712 sc, dec, (3sc,dec)*2, 12 sc (33)
Round 18sc around (33)
Round 1910 sc, inc, (2sc,inc)*4, 10 sc (38)
Round 2013 sc, inc, (3sc,inc)*3, 13 sc (42)
Rounds 21–2242 sc (42)
Round 23(5sc,dec)*6 (36)
Round 24(4sc,dec)*6 (30)
Round 25(3sc,dec)*6 (24)Insert safety eyes: between round 19 and 20 23 stitches, eye, 12 stitches, eye, 23 stitches (round 19)
Round 26(2sc,dec)*6 (18)
Round 27(sc,dec)*6 (12)
Round 286 dec (6)Fasten off and leave a long tail for sewing. Stuffing.
Legs (Make 2)
In yellow green yarn.
Round 16 sc in MR (6)
Round 26 inc (12)
Round 3(sc,inc)*6
Round 4sc, inc, (2sc,inc)*5, sc (24)
Rounds 5–8sc around (24)
Round 9(2sc,dec)*3 (18)
Round 10(4sc,dec)*3 (15)
Round 11(3sc,dec)*3 (12)
Rounds 12–16sc around (12)Fasten off and leave a long tail for sewing.
Finishing
- Weave in the magic ring's starting tail before stuffing makes it harder to find.
- Stuff the head firmly with fiberfill, working it into the rounds as you go.
- Close the final round, then attach both legs with matching yellow green yarn.
Why it works
The head increases every round at first, doubling from six stitches to twenty-four by round four.
The legs mirror that opening, then run straight for the remaining rounds once they hit twenty-four.
Both parts start in a magic ring, worked in continuous spiral rounds with no visible seam.
What it becomes
- A shelf companion among other amigurumi animals, standing about 32 cm tall.
- A gift for a child who likes dinosaurs, sturdy enough for regular handling.
- A desk companion that pairs well with other yellow green or earth-toned makes.
Original pattern: https://onrecip.com/amigurumi-crochet-dinosaur-pattern-easy-and-fun/
FAQ
How long does the head take compared to the legs?
The head runs twenty-three rounds against nine for each leg, so it takes longer. Budget most of your stitching time there.
Can I use a different yarn color?
Yes, the pattern calls for yellow green, but the construction doesn't depend on color. Swap in whatever shade suits your dinosaur.
Do the legs need to match exactly?
They should, since both follow the same nine rounds and increase pattern. Working them side by side helps keep them even.
What hook size does this pattern use?
A 2.25mm hook, which keeps stitches tight enough to hold fiberfill without gaps. Stick close to that size for a similar result.