
Free Pattern
Step-by-Step
Crochet
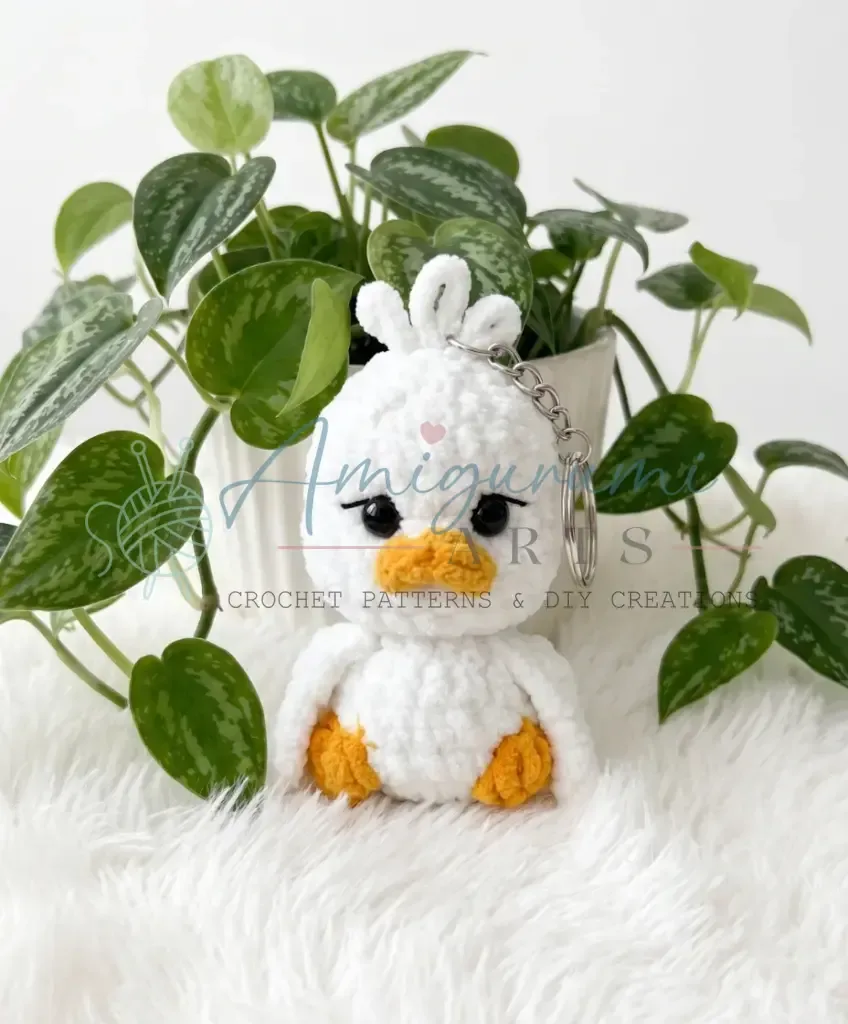
AmigurumiAmigurumi duck plushie crochet pattern for beginners
A beginner amigurumi duck with puff-stitch legs and mirrored wings, worked in a spiral.
- Level
- Intermediate
- Time
- 4-6 hours
- Hook
- 3.5 mm
- Yarn
- Worsted
Pattern highlights
- Start the body at the base with a magic ring and build outward in a continuous spiral.
- Add the chain-loop tail detail in the same round as the legs, right at the back of the body.
- Continue the spiral up through the head, stuffing as you close toward the top.
- Work the Wing flat as a short rectangle, then work the Mirror Wing as its reverse.
- Attach both wings symmetrically above the waist, checking that one faces right and one faces left.
- Finish the beak and use the top head tail to loop in a few finishing stitches.
About This Pattern
I keep a shelf for small animals that teach a new trick without asking too much. This duck belongs there. It is built from one body, two wings, and a beak, which keeps the project honest for anyone easing into amigurumi.
The techniques are the draw. Puff stitches worked right into the body become legs. One wing is worked flat and plain; its mirror twin adds a second flat section so the pair faces opposite ways. Both join a continuous spiral body.
Finished, it sits upright on its puff-stitch legs, head tipped slightly forward. The stripe color change and the tail detail at the back keep it from reading as a plain round body. It is a desk-sized duck, not a lovey-sized one.
This pattern is written in US crochet terminology. Stitch counts are given at the end of each round in parentheses (##) so you can check your progress as you go.
Worth knowing
The satisfaction here is in the puff stitches. You work them directly into a body round, no separate legs to sew on later, and pulling each one snug makes it pop forward like a real duck leg. The mirrored wings are the other quiet trick: one flat panel, then its reverse, so the finished pair actually faces two directions instead of looking like two copies of the same piece glued on backward. Add a tail worked in chain loops right off the body, and a continuous spiral that needs a stitch marker to behave, and you get a small project that teaches real shaping without ever feeling fussy.
Common mistakes
- Losing track of the spiral start Keep a locking stitch marker in the first stitch of every round and move it up as you go. Without it, the spiral drifts and the stripe placement shifts.
- Loose puff stitches Pull the working yarn snug after each puff stitch leg before continuing. A loose puff sinks flat instead of standing forward.
- Attaching wings without checking orientation Lay the Wing and Mirror Wing flat before sewing and confirm one faces left, one faces right. Sewing them on the wrong sides makes the duck look cross-eyed from the back.
- Skipping the gauge-for-stuffing check Gauge does not need to match a measurement here, but the fabric must be tight enough to hide fiberfill. If stuffing peeks through, go down a hook size.
- Decreases that show on the right side Work the invisible decrease by inserting your hook under the front loop only of the first stitch, then the front loop only of the second stitch, and completing the sc as normal. This technique keeps decreases virtually invisible from the right side.
- Overstuffing the head at once As you close Rounds 16 and 17, add small pinches of fiberfill rather than cramming a large amount in at once. This gives you better control over the final shape and keeps the head round, not lumpy.
- Visible knots where wings attach If sewing the wings on by hand, whipstitch around the entire edge of the wing base, then pull the needle through the body stuffing and out the other side before trimming. This anchors the wing and hides the knot inside.


Intermediate
Progress Tracker
0 of 0 rounds
Tap a round to tick it off — your place is saved on this device.
The kit
Yarn
- Light worsted or DK weight (CYCA #3), in black and yellow for the body stripes; a small amount of yellow for the puff-stitch legs
Hook
- E-4 (3.5 mm) — adjust as needed for a tight, even fabric
Safety eyes
- 6 mm, black — 1 pair
Stuffing
- Polyester fiberfill
Stitch markers
- 1–2 locking stitch markers
- Yarn needle / tapestry needle
- Scissors
Body & Head
Round 19 sc in MR. (9) (Alternatively: ch 2, work 9 sc in 2nd ch from hook.)
Round 2Inc in each st around. (18)
Round 35 sc, (switch to yellow yarn, Puff Stitch [4 dc together in same st] for leg) 2 times, 6 sc, (tail detail — ch 4, sl st in base st; ch 6, sl st in next st; ch 4, sl st in base st) (18)
The puff-stitch legs are worked directly into the body round. Pull each puff stitch snug so it pops forward.
Rounds 4–5Sc in each st around. (18) (Work 2 full rounds.)
Round 61 sc, (attach Wing: 4 sc across wing joining to body) , 4 sc, (attach Mirror Wing: 4 sc across wing joining to body) , 6 sc. (18)Work the wing attachment by holding each wing against the body and single crocheting through both layers simultaneously for 4 stitches.
Round 7Dec 9 times around. (9)
Round 8Inc in each st around. (18)
Round 9(2 sc, inc) repeat 6 times. (24)
Rounds 10–14Sc in each st around. (24) (Work 5 full rounds.)
Round 15(2 sc, dec) repeat 6 times. (18)Insert safety eyes now — position them between Rounds 13 and 14 with exactly 4 stitches between them. Begin stuffing the head firmly.
Round 16(1 sc, dec) repeat 6 times. (12)
Round 17Dec 6 times around. (6)Close the opening. Leave a 20 cm yarn tail — do not cut yet. You’ll use this to create the topknot tuft on the head.
Wing (Make 1)
Row 1Foundation: Ch 7, sc in 2nd ch from hook and in each ch across. (6 sc) Ch 1, turn.(6)
Row 2Sc in each of first 4 sts. Ch 1, turn. (4)
Row 3Sc in each of 4 sts. (4) Fasten off, weave in ends.
Mirror Wing (Make 1)
Row 1Foundation: Ch 5, sc in 2nd ch from hook and in each ch across. Ch 1, turn. (4)
Row 24 sc across. (4) Do not turn. Continuing: Ch 3, sc in 2nd ch from hook and in each of next 5 ch/sts. (6) Fasten off, leaving a tail for sewing.
The two wings are intentional mirror images of each other — one faces left and one faces right.
Beak
The beak is added directly to the face after the head is closed and pulled tight.
Join yarn to the right side of the face.
Work 1 sc into the joining stitch, then 1 hdc into the same stitch.
Work 2 hdc into the next stitch.
Work 1 sl st into the last hdc.
Fasten off and weave in the beak ends neatly on the inside.
Assembly
Step 1Lay both wings flat and confirm they mirror each other correctly before attaching — the Wing faces right, the Mirror Wing faces left.
Step 2If your wings were not joined during Round 6 as you worked, pin them symmetrically to the body on either side and sew in place using whipstitch and the yarn tails. The wings should sit just above the waist of the body.
Step 3Using the 20 cm yarn tail left at the top of the head, thread the tapestry needle and work a few loops of yarn through the very top of the closing stitches, pulling upward and knotting to form a small standing tuft. Trim to desired length.
Step 4Check that the beak sits centered on the face, just below the safety eyes. If needed, tack it down with a single stitch using the beak yarn tail.
Step 5Weave in all remaining ends securely.
Finishing
- Weave in all loose ends as each colored section finishes, especially around the puff-stitch legs.
- Stuff the body and head firmly as the spiral closes, so no fiberfill shows through the fabric.
- Use the top head tail to work a few finishing loops, then attach the beak and both wings.
Why it works
Round 2 doubles every stitch from Round 1, which is the standard flat increase that sets the base diameter before the body walls go straight.
The Wing is worked flat as a short rectangle because a single small panel needs no shaping, so turning rows are simpler than keeping it in the round.
The Mirror Wing adds its second flat section after the first without turning, which flips its orientation so it becomes the opposite-facing twin of the Wing.
What it becomes
- A shelf companion next to other small amigurumi animals, where its puff-stitch legs let it stand on its own.
- A handmade gift for a child old enough for small stuffed pieces, paired with a simple crocheted blanket square.
- A practice piece for a crocheter moving from flat panels into continuous spiral amigurumi bodies.
FAQ
Can I use a different yarn weight for this duck amigurumi?
Yes — you can use any yarn weight, but you should adjust your hook size accordingly so the fabric stays tight. A fingering weight yarn with a 2.25 mm hook will give you a much smaller duck, while a worsted weight with a 5 mm hook will produce a larger, squishier version. Just keep in mind that the safety eye size should scale with your finished piece.
Where exactly do I attach the wings to the body?
The wings are incorporated during Round 6 of the body by single crocheting through both the body stitches and the wing edge simultaneously for 4 stitches on each side. If you prefer to sew them on afterward, position each wing on the side of the body just above the waist seam where the head meets the body and whipstitch along the flat edge using the yarn tail.
What is the topknot tuft and how do I make it?
The topknot is a small bundle of yarn loops created from the 20 cm tail left after closing the final round of the head. Thread the tail onto a tapestry needle, pull several loops up through the top few closing stitches, and knot them together at the base. Trim the loops to an even length for a neat tuft, or leave them slightly varied for a scruffier look.
Do I need to stuff the body section as well as the head?
The body section below the neck decrease at Round 7 is relatively small, so a light amount of stuffing is enough to give it shape without making it stiff. The head, which is the larger portion worked after Round 8, benefits from firmer stuffing to hold the safety eyes in place and keep the face round. Stuff the head gradually as you work the final closing rounds.