
Free Pattern
Step-by-Step
Crochet
AmigurumiAmigurumi elephant pattern for beginner crocheters
A beginner-friendly amigurumi elephant pattern with trunk, ears, and a sculpted face.
- Level
- Beginner
- Time
- 8-10 hours
- Hook
- 2.75 mm
- Yarn
- DK
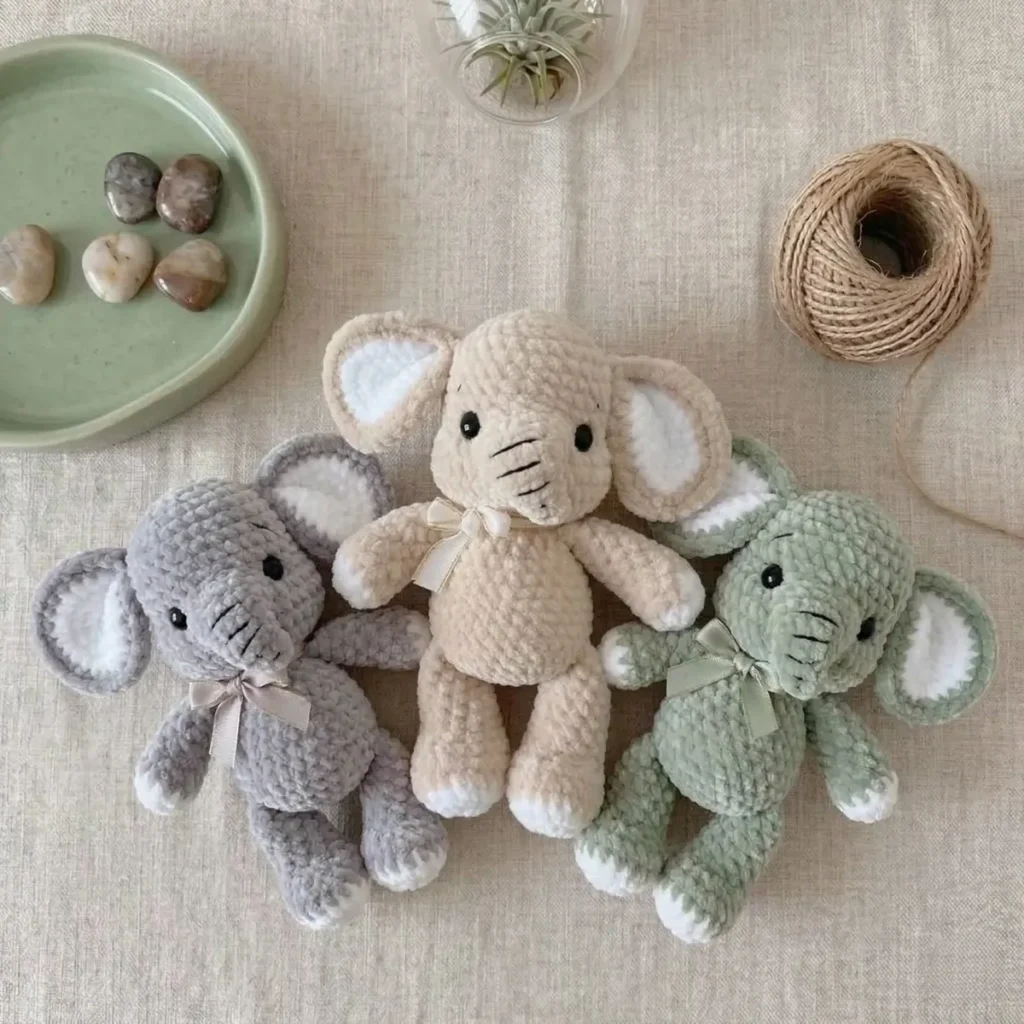
Pattern highlights
- Work the arms from a magic ring, increasing quickly before tapering toward the wrist with decreases.
- Crochet the tail as a short flat row, leaving yarn tails at both ends for attaching later.
- Build the ears separately, then set them onto the head once the main shaping is done.
- Shape the trunk on its own, ready to attach once the face begins to take form.
- Fold and close the tops of the legs and arms before joining them into the body.
- Finish with facial sculpting and embroidery, then add the ribbon for a final touch.
About This Pattern
I keep a shelf in my head for patterns that welcome new crocheters. This elephant belongs right on it. It sits among the classic amigurumi animals, the kind any collection eventually needs. The trunk and ears give it more personality than a basic ball-and-limbs toy. I like patterns that stretch a beginner just enough, without punishing a missed stitch.
The construction leans on a handful of core techniques, repeated with small variations. Legs and arms both start flat or in a magic ring, then shift into tight spiral rounds. Invisible decreases keep the limb tips smooth, and slip stitches for alignment square up the folded ends before closing. Facial sculpting with cotton yarn comes later, cinching the head to define cheeks and eye sockets. None of it is hard, but each step asks for a little patience.
What comes off the hook is a soft, round-bodied elephant with a proper trunk and floppy ears. Safety eyes give it a fixed, gentle expression, backed up by hand embroidery. A satin ribbon adds a small finishing touch without turning it fussy. It stands on four stuffed legs, sturdy enough for a shelf or a small hand. The whole piece reads as a toy first, a decoration second.
Worth knowing
The satisfaction here is in the shaping, not the stitch count. Working the legs from a flat chain into a spiral round teaches you to read where increases land. Invisible decreases on the arms taper the wrists without a visible seam. Folding each limb flat takes a slip stitch or two for alignment. That small trick makes the toe or thumb sit exactly right. Facial sculpting is the real payoff. A few cinching stitches with cotton yarn turn a plain round head into something expressive. Add safety eyes, embroidered lashes, and a ribbon, and the elephant stops looking like a sphere with ears.
Common mistakes
- Losing the spiral round marker Without a stitch marker you lose track of where each round starts. Place one in the first stitch and move it up every round.
- Overstuffing the limb tops The pattern asks you to leave the top of each leg and arm unstuffed so it can fold flat. Stuff too far and the closing seam won't lie right.
- Skipping the alignment slip stitches Closing a folded limb without a few slip stitches for alignment leaves the toe or thumb pointing the wrong way. Take the extra stitches before you close.
- Using a regular decrease instead of invisible A standard decrease leaves a visible bump on 3D shaping. Use the invisible decrease so the surface stays smooth.


Beginner
Progress Tracker
0 of 0 rounds
Tap a round to tick it off — your place is saved on this device.
The kit
- Fine plush yarn (e.g., 175m/100g) in main and accent colors
- Cotton yarn for facial sculpting and embroidery
Crochet hook
- 2.75mm–3mm
Safety eyes
- 8mm–10mm
- Satin ribbon for embellishment
- Tapestry needle for sewing and sculpting
- Scissors
- Stitch markers (highly recommended)
Tools
- Polyester fiberfill stuffing
Legs
Make 2Start with accent color yarn.
Round 1Ch 6. Starting in the second ch from hook, sc in next 4 ch, 3 sc in the last ch, working on the other side of the ch, sc in next 3 ch, inc in the last ch. (12)
Round 2inc, 3 sc, (inc) x3, 3 sc, (inc) x2. (18)
Round 31 sc, inc, 4 sc, inc, 3 sc, inc, 4 sc, inc, 2 sc. (22)Change to main color yarn after Round 3.
Round 422 sc. (22)
Round 522 sc. (22)
Round 66 sc, (dec, 1 sc) x4, 4 sc. (18)
Round 75 sc, (dec) x4, 5 sc. (14)
Round 814 sc. (14)
Round 914 sc. (14)
Round 1014 sc. (14)
Round 1114 sc. (14)
Round 1214 sc. (14)
Round 13(5 sc, dec) x2. (12)
Round 1412 sc. (12)
Round 1512 sc. (12)Stuff the leg moderately, leaving the top un-stuffed. Fold the leg flat, making any necessary sl sts for alignment so the 'toe' points forward. Crochet through both layers with 6 sc to close. Fasten off, leaving a long tail for sewing if desired (though legs will be crocheted into the body later).
Arms
Make 2Start with accent color yarn.
Round 16 sc in mr. (6)
Round 2(inc) x6. (12)Change to main color yarn after Round 2.
Round 312 sc. (12)
Round 412 sc. (12)
Round 5(dec) x2, 8 sc. (10)
Round 610 sc. (10)
Round 710 sc. (10)
Round 810 sc. (10)
Round 910 sc. (10)
Round 1010 sc. (10)
Round 1110 sc. (10)
Round 1210 sc. (10)Stuff the arm moderately, leaving the top un-stuffed. Fold the arm flat, making any necessary sl sts for alignment. Crochet through both layers with 5 sc to close. Fasten off, leaving a long tail for sewing if desired (though arms will be crocheted into the body later).
Tail
Round 1Ch 9. Starting in the second ch from hook, sc in next 8 ch. (8)Leave a small yarn tail before chaining, and another small tail after finishing the row; these tails will be used to secure the tail to the body.
Ears
Make 2Make two pieces for each ear: one with accent color, one with main color.
Round 1Accent Color Piece 7 sc in mr. (7)
Round 2Accent Color Piece (inc) x7. (14)
Round 3Accent Color Piece (1 sc, inc) x7. (21)
Round 4Accent Color Piece (2 sc, inc) x7. (28)Fasten off the accent color piece after Round 4; do not fasten off the main color piece.
Round 1Main Color Piece 7 sc in mr. (7)
Round 2Main Color Piece (inc) x7. (14)
Round 3Main Color Piece (1 sc, inc) x7. (21)
Round 4Main Color Piece (2 sc, inc) x7. (28)
Round 5Place the two ear pieces with wrong sides together and crochet around the entire edge through both layers using hdc; fasten off leaving a long tail for sewing. (28)
Body – Head
Start with main color yarn.
Round 16 sc in mr. (6)
Round 2(inc) x6. (12)
Round 3(1 sc, inc) x6. (18)
Round 4(2 sc, inc) x6. (24)
Round 5(3 sc, inc) x6. (30)
Round 630 sc. (30)
Round 730 sc. (30)
Round 830 sc. (30)
Round 930 sc. (30)
Round 1030 sc. (30)
Round 1110 sc, inc, 2 sc, ch 4, skip 4 sc, 2 sc, inc, 10 sc. (32)
Round 1210 sc, inc, inc, 2 sc, 4 sc over the ch-4, 2 sc, inc, inc, 10 sc. (36)
Round 1336 sc. (36)
Round 1436 sc. (36)
Round 15(4 sc, dec) x6. (30)
Round 16(3 sc, dec) x6. (24)
Round 17(2 sc, dec) x6. (18)
Round 18(1 sc, dec) x6. (12)Pause crocheting the head/body after Round 18 to work the Trunk.Return to the main body/head where you paused at Round 18 after completing the Trunk; the round count continues at Round 29.Insert safety eyes on Round 10, or aligned with the sides of the trunk.Stuff the head firmly, shaping it as you go.
Round 29(1 sc, inc) x6. (18)
Round 3018 sc; crochet the Arms into this round: sc through both the body and arm stitches to attach, 4-5 sc across the front between the arms (adjust as needed for even placement). (18)
Round 31(2 sc, inc) x6. (24)
Round 3224 sc. (24)
Round 33(3 sc, inc) x6. (30)
Round 3430 sc. (30)
Round 3530 sc. (30)
Round 3630 sc. (30)
Round 3730 sc; join the Tail: find the center back of the body, insert the tail by tying its yarn ends securely between stitches. (30)
Round 3830 sc; crochet the Legs into this round: sc through both the body and leg stitches to attach, 9 sc across the front between the legs (adjust as needed to ensure legs are directly below arms). (30)
Round 3930 sc. (30)
Round 4030 sc. (30)
Round 41(3 sc, dec) x6. (24)
Round 42(2 sc, dec) x6. (18)Stuff the entire toy firmly, ensuring an even and well-shaped body before Round 43.
Round 43(1 sc, dec) x6. (12)
Round 44(dec) x6. (6)Fasten off, leaving a tail. Close the remaining opening by weaving the yarn tail through the front loops of the remaining 6 stitches and pulling tight. Weave in the yarn end.
Trunk
Join yarn at the bottom of the opening created in Round 11/12 of the Body – Head (the side where you paused the main body/head work); trunk rounds are numbered separately for clarity.
Round 12 sc, inc in the corner, 4 sc, inc in the corner, 2 sc. (12)
Round 2dec, 11 sc. (11)
Round 3dec, 10 sc. (10)
Round 4dec, 9 sc. (9)
Round 5dec, 8 sc. (8)
Round 6dec, 7 sc. (7)
Round 7dec, 6 sc. (6)
Round 8dec, 5 sc. (5)
Round 9dec, 4 sc. (4)Fasten off and close the remaining opening by weaving the yarn tail through the front loops of the remaining stitches and pulling tight; the trunk is not stuffed.
Assembly
Step 1Facial Sculpting: Using cotton yarn and a tapestry needle, create facial sculpting (cinching) to define the eye area and cheeks. Insert the needle near an eye, pull through to the other eye, and gently pull to create a slight indentation. Repeat a few times for definition, securing the ends.
Step 2Embroidery: Embroider small white reflections on the safety eyes using white cotton yarn. Add eyelashes and eyebrows with black or dark brown cotton yarn for expression. You can also embroider small, contrasting stripes on the trunk for added detail.
Step 3Attach Ears: Fold each ear in half and secure the fold with a couple of stitches using the ear's yarn tail. Position the ears on the head around Round 6 from the magic ring, approximately 4 sc away from each eye. Sew them securely in place.
Step 4Trunk Tip: To prevent the trunk tip from sticking straight out, you can gently tack it down with a small stitch or use a tiny dab of fabric glue on the underside to curve it slightly.
Step 5Ribbon: Tie a decorative satin ribbon around your elephant's neck for a charming finishing touch.
Finishing
- Stuff each limb moderately, leaving the top open, then fold it flat before closing with single crochet through both layers.
- Weave in loose ends as you finish each piece, especially where colors change on the legs and arms.
- Once the body is complete, sculpt the face with cotton yarn, add embroidery, and finish with the ribbon.
Why it works
The legs start as a chain worked on both sides, which builds a flat oval foot before the rounds turn cylindrical.
The arms open in a magic ring and increase fast, then decrease again a few rounds later to taper toward the wrist.
The tail is worked as a single flat row rather than in rounds, since it is sewn on as a flat panel rather than stuffed.
What it becomes
- A shelf companion for other amigurumi animals, especially if you keep a small zoo going.
- A soft first toy for a baby's room, sized for small hands to hold.
- A quiet desk mascot next to the yarn stash, paired well with a matching set of smaller amigurumi.
Original pattern: https://amigurumicorner.com/amigurumi-elephant-pattern/
FAQ
Can I use embroidered eyes instead of safety eyes?
Yes, though the pattern is written around safety eyes for the sculpted face. If you swap in embroidery, plan the placement before you sculpt the cheeks, since sculpting shifts the fabric slightly.
Why does the tail start with a chain instead of a magic ring?
The tail is a small flat piece, not a tube, so it is worked as a short row rather than in the round. That is also why it leaves yarn tails at both ends, for sewing it on.
What hook size works best for this yarn?
The pattern calls for a hook in the 2.75mm to 3mm range, smaller than you'd expect for the yarn weight. That tighter gauge is what keeps the stuffing from showing through the stitches.