
Free Pattern
Step-by-Step
Crochet
AmigurumiCrochet Mini Goose Keychain: Sweet Amigurumi Pattern
Crochet an adorable mini goose keychain with this amigurumi pattern. Beginner-friendly, quick to stitch, and perfect for gifting or bag charms.
Level IntermediateTime 4-6 HoursHook 3.75 mmYarn Worsted
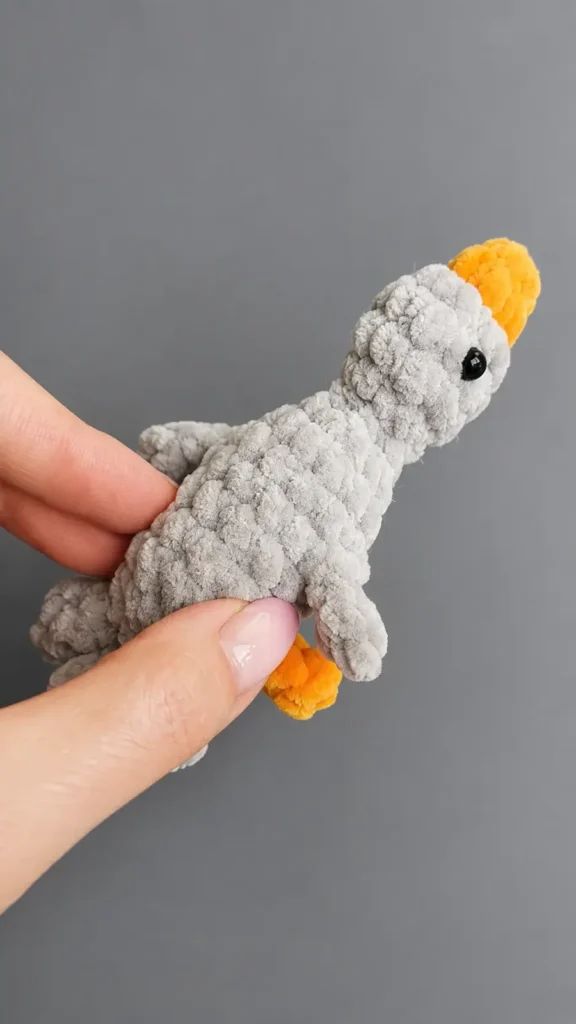
Pattern highlights
- Begin with a magic ring in the accent color to form the small beak base.
- Change to the main body color partway through, pulling it through cleanly on the last stitch.
- Increase steadily to widen the head, then hold steady for a few rounds to build roundness.
- Decrease to shape the narrower neck area, stuffing firmly in small amounts as you go.
- Continue shaping the body with more rounds, adjusting for a longer or shorter neck as desired.
- Glue the small eyes securely into place on the sides of the head for the finishing face.
- Fasten off, weave in the tail, and attach keyring hardware to complete your mini goose.
About This Pattern
This little pattern turns a handful of yarn scraps into the most charming mini goose keychain you've ever seen. Worked in just 13 rounds, this pattern creates a plump, huggable little bird with a bright orange beak and tiny orange feet peeking out from underneath. It's the kind of quick-stitch project that's perfect for crocheters who want a satisfying finish without committing to a huge amigurumi, and it makes an especially sweet gift for bird lovers, goose-obsessed friends, or anyone who just needs a little burst of joy clipped to their bag.
When it's done, you'll have a plump little goose about the size of your palm, with a rounded head and body, a cheerful orange beak, and little feet tucked beneath. The plush yarn gives it an irresistibly soft, squeezable feel, and the compact shape makes it ideal for clipping onto a keyring, backpack, or purse. It's a delightful handmade gift, a fun addition to an amigurumi flock, or just a tiny happy thing to keep close — the kind of make that gets a smile every time someone spots it.
Common mistakes
- Losing track of the first stitch in each round
- Plush yarn hides loop openings easily, so always place a stitch marker in the first stitch of every round and move it up as you go.
- Overstuffing or stuffing too late
- Add fiberfill in small amounts as you crochet down the body rather than waiting until the neck opening is small, since it becomes much harder to stuff evenly afterward.
- Placing the eyes too high, low, or crooked
- Count stitches carefully and glue the eye pegs symmetrically into round 4, checking placement from the front before the glue sets.
- Rushing the increases and decreases
- Count your stitches at the end of each round against the pattern's stitch totals to catch mistakes early, since a missed increase or decrease will throw off the goose's shape.


Intermediate
Progress Tracker
0 of 0 rounds
Tap a round to tick it off — your place is saved on this device.
Materials
- Plush yarn 100g/120m in 2 colors: main color for body (white, grey, black…) and additional color for beak and legs (orange)
- Crochet hook suitable for your density (author used Clover 3.75 mm)
- Fiberfill stuffing
- Yarn needle
- Stitch marker
- Eyes 6 mm
Main Pattern
Start crocheting with the additional color (this forms the beak).
After Round 2, switch to crocheting in FLO with the main color to begin the body/head.
Row 8 can be skipped if you want a shorter neck.
Legs in Round 14 are crocheted with the additional color.
- Round 15 sc in MR. (5)
- Round 25 sc. (5)
- Round 35 inc. (10)
- Round 4-510 sc. (10)
- Round 65 dec. (5)
- Round 7-85 sc. (5)
- Round 92 inc, 2 triple inc, inc. (12)
- Round 1012 sc. (12)
- Round 116 sc, WING (3 ch, from 2nd stitch from hook 2 hdc and hdc in base of stitch), 6 sc, WING. (12)
- Round 12-1312 sc. (12)
- Round 142 sc, LEG (crochet with additional color 3 ch from 2nd stitch from hook hdc, sl st and sl st in base of stitch), 2 sc, LEG, 8 sc. (12)
- Round 1512 sc. (12)
- Round 166 dec. (6) Make a shift stitch and crochet TAIL, fold together and crochet through both sides: (sc, 3 ch, 2 hdc and sl st in base of stitch) x3.
Assembly
- Step 1Fasten thread, cut and hide.
- Step 2Glue eyes on the sides in row 4.
- Step 3Our toy is ready.
Important notes
Stuff the head and body gradually as you crochet each round rather than all at once at the end, since the small neck opening makes late stuffing tricky and uneven.
Use a stitch marker in the first stitch of every single round, since plush yarn's fuzzy texture makes it surprisingly easy to lose track of where a round begins.
Apply a small drop of craft glue or hot glue to the eye pegs before inserting them into round 4 to keep them secure and centered through years of handling.
Row 8 is optional and can be skipped entirely if you prefer a shorter, stubbier neck on your finished goose.
Choose a hook size that gives you a tight, dense gauge so the fiberfill stuffing doesn't peek through the stitches, especially important since this pattern uses plush yarn.
Original pattern: https://craftwithnina.com/free-amigurumi-pattern-mini-goose-keychain/
FAQ
What hook size works best for plush yarn?
A 3.5 mm to 3.75 mm crochet hook works wonderfully with bulky plush yarn to keep stitches tight enough so stuffing does not peek out.
Can I use worsted weight acrylic yarn instead of plush yarn?
Yes, standard worsted weight acrylic or cotton yarn works fine, though your completed goose will turn out much smaller.
Do I need to sew the wings and legs on separately?
No, the wings and legs are crocheted directly into the body rounds as you work through the pattern.
How do I attach a key ring to this plush?
You can loop a sturdy jump ring or chain attachment directly through the plush stitches at the top of the goose's back or head.
Is this pattern suitable for complete beginners?
Yes, as long as you know basic stitches like single crochet, increases, decreases, and working into chain stitches, this project is simple and fun.