
Free Pattern
Step-by-Step
Crochet
AmigurumiAmigurumi Phoenix Fawkes Bird Free Crochet Pattern
Crochet a magical amigurumi Phoenix Fawkes bird with velvet yarn in burgundy and mustard—free pattern with easy assembly and expert tips included.
Level IntermediateTime 4-6 HoursHook 5 mmYarn Worsted
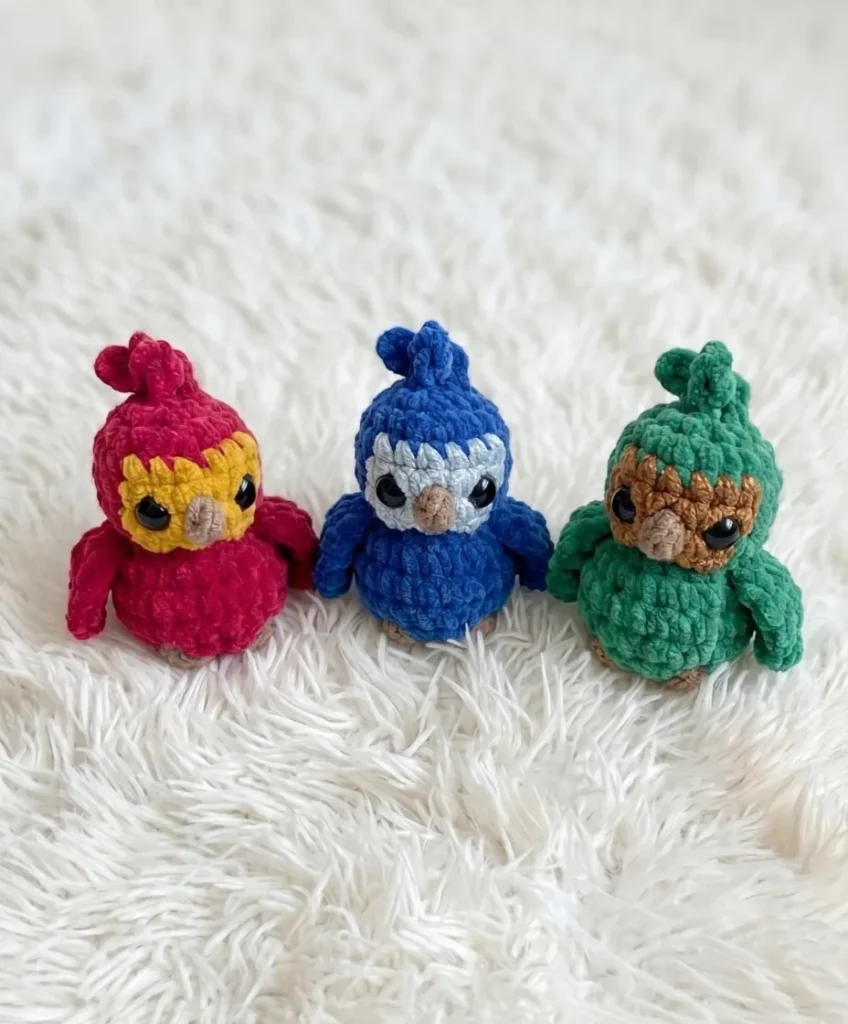
Pattern highlights
- Start the head and body together as one continuous spiral, building up through increase rounds without ever joining.
- Track your round starts carefully with a stitch marker since the spiral construction never pauses to join.
- Add stuffing gradually as the body grows, keeping tension tight so filling stays hidden inside.
- Shape the head and body through the full 13 rounds, watching stitch counts to keep the form even.
- Set the two 14mm safety eyes in place and check spacing before locking them permanently.
- Crochet the two burgundy wings separately, then set them aside ready for attaching.
- Make the burgundy crest piece to give the head its signature flame-like plume.
- Assemble everything by sewing the wings and crest onto the finished body to complete the phoenix.
About This Pattern
This Amigurumi Phoenix Fawkes bird brings a touch of magic to basket, transforming simple worsted-weight velvet yarn into a richly textured mythical creature. Worked in deep burgundy with warm mustard accents, this little phoenix captures that soft-yet-fiery look fans of fantasy creatures adore. It's perfect for crocheters who love a project with personality — whether you're stitching it for a bookshelf, a nursery, or a gift for someone who believes a little magic belongs in every home.
The body and head come together as one continuous piece worked in a spiral across 13 rounds, so you'll get comfortable with steady increases, stitch marker tracking, and shaping a rounded amigurumi form without ever joining rounds. The wings and crest add just enough extra assembly to keep things interesting without overwhelming an intermediate maker. Expect to spend a relaxed afternoon or evening session, roughly 4 to 6 hours, moving from a magic ring start through stuffing and final assembly.
When finished, you'll have a plush, huggable phoenix with a plump velvety body, softly rounded head, and a pair of wings that give it real character on a shelf or in a keepsake box. The velvet yarn gives the surface a luxurious sheen that catches the light beautifully, making this a standout handmade piece. It makes a thoughtful gift for Harry Potter fans, bird lovers, or anyone who appreciates a cozy, one-of-a-kind stuffed companion.
Variations
There's something so satisfying about watching this phoenix take shape round by round, especially since the head and body are worked as one continuous spiral — no seams to sew up the middle, just smooth, confident stitching from the magic ring all the way to the final decrease rounds. I love how the burgundy velvet yarn from Alize Velluto catches the light and gives Fawkes that rich, almost feathered texture without any complicated color-change techniques. The wings and crest come together quickly as separate little pieces, which makes for a nice change of pace after the main body. Assembly is where this pattern really shines for me — placing those 14mm safety eyes just right and attaching the wings gives the bird so much personality in just a few steps. It's the kind of project where you can listen to a podcast, work through the rounds, and suddenly have this adorable mythical creature staring back at you. Perfect for anyone who wants a slightly more special amigurumi project than your average round animal.
Common mistakes
- Losing track of the beginning
- Place a stitch marker in the first stitch of every round and move it up as you go — this is essential since rounds are never joined and it's easy to lose your place.
- Stuffing too loosely, causing
- Work your stitches slightly tighter than usual and stuff firmly in small amounts as you go, especially in the head, rather than trying to stuff everything at the very end.
- Placing the 14mm safety eyes too early
- Insert the eyes but don't lock the safety backs in place until you've stuffed a bit of the head and checked the spacing looks symmetrical from the front.
- Rushing through the increase rounds
- Count your stitches at the end of every round against the pattern's stated count before moving on, especially during the increase-heavy early rounds of the body.
- Attaching the wings without matching
- Use pins or stitch markers to test-fit both wings in place before sewing, checking from multiple angles that they sit evenly before committing to the final stitches.
- Using a hook size too large for velvet
- Stick with the recommended US H-8 / 5mm hook, and if your tension runs loose, consider sizing down slightly to keep stitches tight enough to hide the polyfill stuffing.


Intermediate
Progress Tracker
0 of 0 rounds
Tap a round to tick it off — your place is saved on this device.
Materials
Yarn
- Alize Velluto in color 107 (burgundy), color 329 (mustard), and color 62 — worsted weight velvet yarn
Hook
- US H-8 / 5 mm
Safety eyes
- 14 mm, 2 pieces
Stuffing
- Polyfill / fiberfill
- Yarn needle (large-eye tapestry needle)
- Stitch markers
- Scissors
Head & Body(worked as one continuous piece)
Begin with burgundy yarn.
- Round 16 sc in MR. (6)
- Round 2inc in each st around. (12)
- Round 3sc, inc repeat 6 times. (18)
Rounds 4–6 are worked in two colors: burgundy (B) and mustard (M), alternating in blocks of 6 stitches per color.
- Round 46 sc in B, 6 sc in M, 6 sc in B. (18)
- Round 56 sc in B, 6 sc in M, 6 sc in B. (18)
- Round 66 sc in B, 6 sc in M, 6 sc in B. (18)After completing Rnd 6, insert safety eyes between Rounds 5 and 6, spaced 2–3 stitches apart on the mustard section. Secure the backings firmly on the inside.
- Round 73 dec in B, 3 dec in M, 3 dec in B. (9)Stuff the head now, before the opening becomes too small. Fill it firmly and evenly.Continue with burgundy yarn only for all remaining rounds.
- Round 8sc, inc repeat 6 times. (18) (This begins the body.)(18)
- Round 92 sc, inc repeat 6 times. (24)
- Round 1024 sc in each st around. (24)
- Round 112 sc, dec repeat 6 times. (18)
- Round 12sc, dec repeat 6 times. (12)Add more stuffing now, working it from the center outward toward the edges so the body holds a rounded shape.
- Round 13dec 6 times. (6)Close the opening: thread a yarn needle with the working yarn and run it through the front loops of all 6 remaining stitches. Pull snug to close, make a couple of small stitches to secure, then bury the tail inside the piece .
Wings(make 2, in burgundy)
Foundation chain: ch 5. Starting in the 2nd ch from the hook, work along the chain as follows: sc in 1st ch, hdc in next ch, dc in next ch, then (tr, dc, sl st) all into the last ch.
Fasten off, leaving a long yarn tail for sewing. Make the second wing identically.
Crest(in burgundy)
Attach yarn to any stitch in Round 1 of the head.
- Round 1Chain 5, then sl st under the next sc of Round 1 to anchor it.
- Round 2Chain 4 from the same point of attachment, then sl st under the next sc to anchor.
- Round 3Chain 3 from the same point of attachment, then sl st under the next sc to anchor.Fasten off all ends and bury them neatly inside the head.
Assembly
- Step 1Attach the wings. Position one wing on each side of the body between Rounds 8 and 9. Using the long yarn tail and a yarn needle, sew each wing in place with whipstitches. Keep the shaped tip pointing away from the body.
- Step 2Embroider the beak. Using mustard yarn and a yarn needle, embroider the beak between the safety eyes, working across Row 6 (the full mustard row). Make several horizontal stitches layered on top of each other to build a small, visible beak shape.
- Step 3Embroider the claws. Using burgundy or a contrasting yarn, embroider claws along Round 12 at the base of the body. Space each set of claws 2 stitches apart and make several firm stitches for each claw to give them definition.
- Step 4Weave in all remaining ends by threading each tail onto a yarn needle and running it through several stitches inside the body before trimming.
Important notes
💡 Keep a stitch marker in the first stitch of every round from start to finish — since the body and head are worked in a continuous spiral, this is the only way to keep track of where each round begins.
💡 Velvet yarn like Alize Velluto can be slightly slippery, so work with a firm, even tension throughout to keep stitches consistent and prevent stuffing from peeking through.
💡 Stuff the head and body gradually in small handfuls as you crochet rather than waiting until the very end — this gives you much better control over the finished shape.
💡 Test the placement of your 14mm safety eyes with removable stitch markers before snapping the backs on permanently, since safety eyes cannot be repositioned once secured. Once you work the decrease round in the head, the opening narrows quickly, so get your eyes positioned and locked in at the end of Round 6 — it's much harder to reach inside afterward.
💡 Since gauge isn't critical here, focus on consistent tension round to round rather than exact stitch measurements — your phoenix will still turn out beautifully even if it's slightly larger or smaller than expected.
💡 This pattern is written in US crochet terminology.
💡 Mark your color sections in Rounds 4–6: place a stitch marker at the start of each color block (burgundy / mustard / burgundy) when you begin Round 4. This keeps your color columns tidy and aligned across all three rounds.
💡 When sewing on the wings, the flat (chain) edge is the attachment edge — pin each wing in place first to check symmetry, then sew along that edge with small, even stitches, matching the yarn color so the seam disappears into the velvet.
FAQ
Can I use a different yarn instead of Alize Velluto?
Yes — any worsted weight velvet or chenille yarn will give you a similar plush finish. Keep in mind that velvet yarns can make it harder to see individual stitches, so count carefully after each round. Avoid substituting with a fuzzy or textured yarn that hides the stitch definition even further.
What size will the finished phoenix be?
Worked with Alize Velluto and a 5 mm hook, the finished bird is approximately 10–12 cm (4–5 inches) tall — a palm-sized amigurumi. Your gauge and stuffing density will affect the final size slightly, but it should stay within that range.
Do I need to join rounds anywhere in the body?
No, the head and body are worked in one continuous spiral without joining, which is why a stitch marker is essential to track your round starts. Only join if the pattern specifically instructs you to at a particular step.
Is this pattern safe to make as a toy for young children?
The pattern uses 14 mm safety eyes, which are designed to lock securely into crocheted fabric for amigurumi. However, any item with safety eyes or small embroidered details is generally recommended for children over 3 years old. For infants or toddlers, consider embroidering the eyes instead of using the plastic components.
How much yarn do I need for each color?
The pattern uses three Alize Velluto colors — burgundy (107), mustard (329), and a third accent color (62) — with burgundy dominating the wings and crest. Exact yardage will depend on your tension, so it's wise to have a full skein of each color on hand before starting.
How do I keep the color sections even in Rounds 4 through 6?
Place a stitch marker at the first stitch of each color block when you begin Round 4. Check that your color changes land on the same stitch in each subsequent round — the markers make this quick to verify. Carrying the unused color loosely along the inside of the work is the tidiest approach for short color blocks like these.