
Free Pattern
Step-by-Step
Crochet
AmigurumiAmigurumi sweet little bear crochet pattern
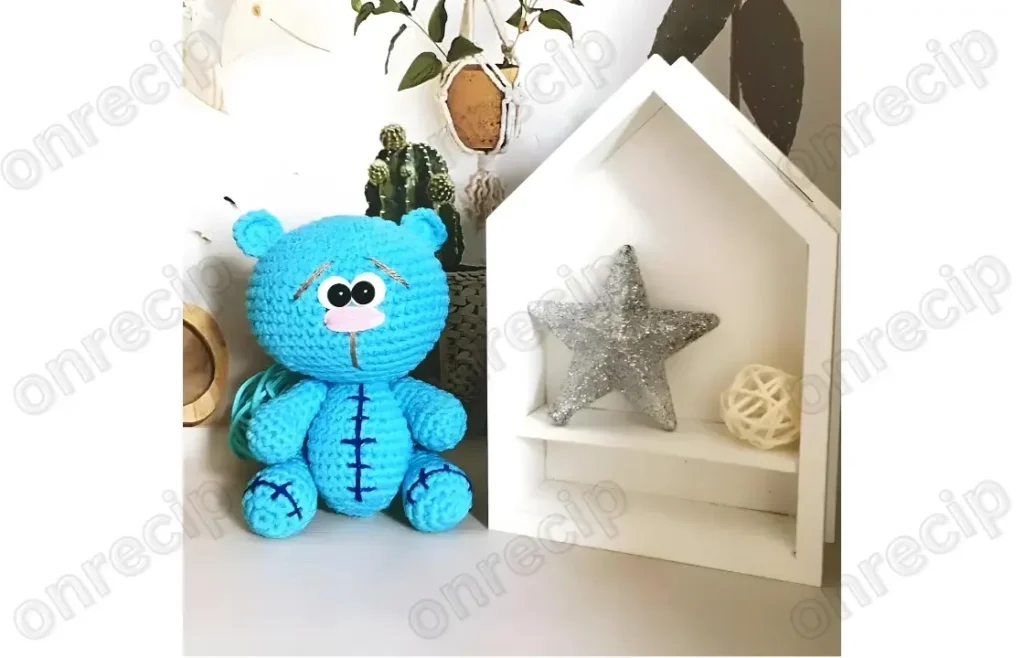
A small crocheted bear worked in the round with beaded eyes and a soft fiberfill body.
- Level
- Intermediate
- Time
- 4-6 hours
- Hook
- 2.5 mm
- Yarn
- Worsted
Pattern highlights
- Start the head with a tight magic ring and work steady increase rounds to build its curve.
- Keep climbing through the middle rounds of the head without further shaping to set its height.
- Shift to the body and repeat the increase pattern until the rounds taper off into straight sections.
- Work the limbs and ears as separate smaller pieces using the same increase-then-even approach.
- Embroider the nose, mouth, eyebrows, and any detail stitches in brown yarn once pieces are stuffed.
- Set the 5 mm black beads for the eyes before closing up each piece completely.
- Join all the pieces by hand once stuffing and embroidery are done.
About This Pattern
I keep a shelf for the small bears. Every collector seems to end up with one eventually, and this little bear earns its spot with a round head, round ears, and the kind of face you build with thread instead of plastic. It is the sort of pattern that gets picked up on a slow evening and finished before the kettle's gone cold twice.
The technique list here is short on purpose. Increases and decreases shape the head, the rounds climb steadily through the teens for the body, and the nose, mouth, and eyebrows come after, worked in brown yarn with a sewing needle. Nothing fancy, nothing I'd call a trick. Just a bear built the way bears usually are, one round at a time.
What comes out the other end is a 15 cm bear, firm with fiberfill, eyes set with 5 mm black beads. It stands on its own on a shelf, which matters more than pattern writers usually admit. I like a finished piece that doesn't need propping.
Worth knowing
There's a quiet satisfaction in watching a flat circle of increases turn into a head. Round 2's incs to 12, round 3's spread to 18, round 4 pushing past 24 — each step is small, but the shape arrives fast. YarnArt Jeans has enough body to hold a stitch without fighting the hook. The embroidery stage is where the bear actually becomes a bear: nose, mouth, eyebrows, all stitched by hand, no shortcuts. For 5 mm beads to read as eyes rather than buttons, you have to place them with some care, and that small act of attention is the whole appeal of amigurumi. It rewards patience in short bursts rather than long stretches.
Common mistakes
- Losing count through the increase rounds Mark every sixth stitch with a scrap of yarn before starting an increase round. It saves a frog session later.
- Beads placed before stuffing Set the 5 mm beads after the piece has some stuffing in it so you can judge spacing against the actual curve of the head.
- Under-stuffing the head Pack fiberfill in firmly, especially near the face, or the embroidered features will sit on a soft, uneven surface.
- Rushing the embroidered face Pin or baste the nose and mouth placement with a scrap thread first, step back, then stitch for real in brown yarn.
- Tension drifting loose on flat sections Check gauge against the earlier rounds when working the straight, non-increasing sections so the body doesn't flare.


Intermediate
Progress Tracker
0 of 0 rounds
Tap a round to tick it off — your place is saved on this device.
The kit
- YarnArt Jeans yarn
- 2.5 mm crochet hook
- 5 mm black beads
- Brown yarn for embroidering nose, mouth, eyebrows and stitches
- Sewing needle and scissors
- Fiberfill
Head
Round 16 sc in magic ring [6](6)
Round 2(inc) repeat 6 times [12](12)
Round 3(1 sc, inc) repeat 6 times [18](18)
Round 4(2 sc, inc) repeat 6 times [24](24)
Round 51 sc, inc, (3 sc, inc) repeat 5 times, 2 sc [30](30)
Round 6(4 sc, inc) repeat 6 times [36](36)
Round 72 sc, inc, (5 sc, inc) repeat 5 times, 3 sc [42](42)
Round 8(6 sc, inc) repeat 6 times [48](48)
Rounds 9–1648 sc (8 rows)(48)
Round 17(6 sc, dec) repeat 6 times [42](42)
Round 18(5 sc, dec) repeat 6 times [36](36)
Round 19(4 sc, dec) repeat 6 times [30](30)
Round 20(3 sc, dec) repeat 6 times [24](24)
Round 21(2 sc, dec) repeat 6 times [18](18)
Round 22(1 sc, dec) repeat 6 times [12](12)
Round 23(dec) repeat 6 times [6] Fasten off.(6)
Body
Round 16 sc in magic ring [6](6)
Round 2(inc) repeat 6 times [12](12)
Round 3(1 sc, inc) repeat 6 times [18](18)
Round 418 sc(18)
Round 5(2 sc, inc) repeat 6 times [24](24)
Round 610 sc, 4 inc, 10 sc [28](28)
Round 710 sc, (1 sc, inc) repeat 4 times, 10 sc [32](32)
Rounds 8–932 sc (2 rows)(32)
Round 10(2 sc, dec) repeat 8 times [24](24)
Round 1124 sc(24)
Round 12(2 sc, dec) repeat 6 times [18](18)
Round 13(1 sc, dec) repeat 6 times [12](12)
Round 14(dec) repeat 6 times [6] Fasten off and leave a long tail for sewing.(6)
Legs (make 2)
Round 16 sc in magic ring [6](6)
Round 2(inc) repeat 6 times [12](12)
Round 3(1 sc, inc) repeat 6 times [18](18)
Rounds 4–518 sc (2 rows)(18)
Round 66 dec, 6 sc [12](12)
Rounds 7–1212 sc (6 rows)(12)
Round 13(dec) repeat 6 times [6] Fasten off.(6)
Arms (make 2)
Round 16 sc in magic ring [6](6)
Round 2(inc) repeat 6 times [12](12)
Round 3(3 sc, inc) repeat 3 times [15](15)
Rounds 4–515 sc (2 rows)(15)
Round 6(3 sc, dec) repeat 3 times [12](12)
Rounds 7–1112 sc (5 rows)(12)
Round 12(dec) repeat 6 times [6] Fasten off.(6)
Ears (make 2)
Round 18 sc in magic ring [8](8)
Round 2BLO (1 sc, inc) repeat 8 times [16] Sl st. Fasten off and leave a long tail for sewing.(16)
Finishing
- Stuff each piece firmly with fiberfill as you go, pushing it into the curves before closing the last rounds.
- Fasten off and leave a long tail on pieces meant for sewing, then use that tail to close gaps and attach parts.
- Attach jointed arms and legs using thread.
- Weave in every remaining end on the inside of the work so nothing shows once the bear is assembled.
- Enjoy!
Why it works
The head starts with a six-point increase round, then spaces increases one stitch apart each following round, which is the standard way to flatten a sphere's curve evenly.
Several rounds in the body and limb sections carry no increases or decreases at all, which keeps those sections straight-sided rather than tapered.
Separate short pieces, like the ears, are worked as their own small rounds rather than picked up from the main body, which means they get seamed on by hand afterward.
What it becomes
- A desk companion that pairs well with a small stack of books or a mug on a quiet workspace.
- A gift for a new baby's room, sitting alongside soft blankets or a knit cap.
- A shelf piece in a growing amigurumi collection, next to other small stuffed figures of similar scale.
Original pattern: https://onrecip.com/amigurumi-sweet-little-bear-free-pattern/
FAQ
What yarn weight does this bear actually need?
The pattern calls for YarnArt Jeans, which behaves like a lightweight worsted. A similar-weight cotton-acrylic blend should work if you match gauge.
Why are some rounds worked without shaping?
Several straight sections in the body and limbs carry no increases or decreases at all. They exist purely to add length before the next shaping round, keeping those sections straight-sided rather than tapered.
Can I swap the beads for embroidered eyes?
Yes, though the pattern as written uses 5 mm black beads for a cleaner, glossier look. Embroidery will read softer and more matte.
How firm should the stuffing be?
Firm enough that the bear holds its shape and stands without sagging. Too soft and the embroidered face will look lumpy rather than defined.