
Free Pattern
Step-by-Step
Crochet
AmigurumiAmigurumi tiger cub crochet pattern with scarf
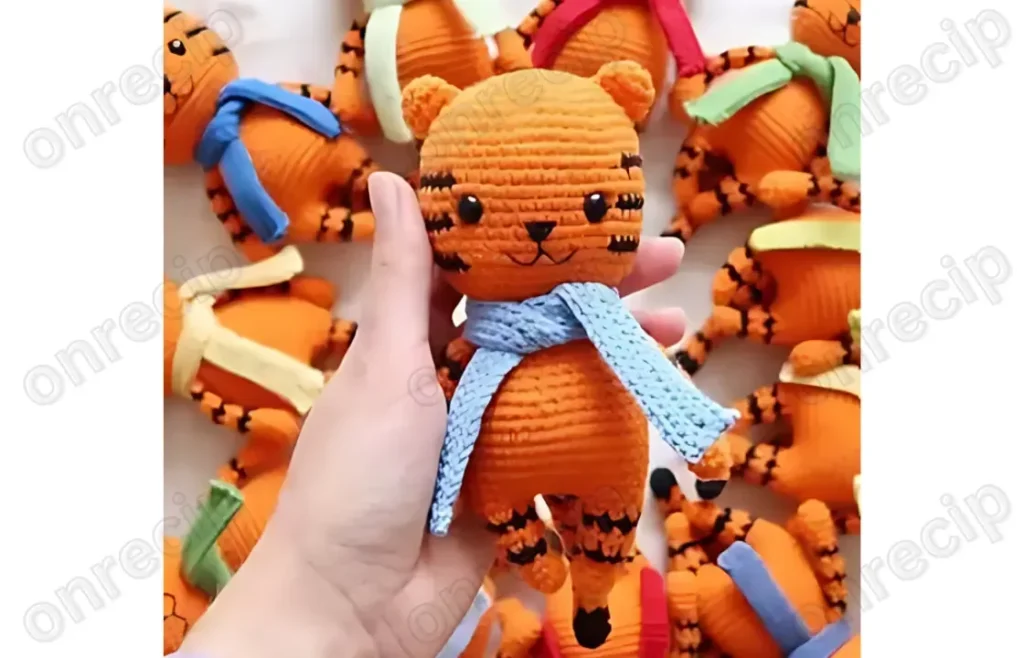
An amigurumi tiger cub with striped tail, round ears, and a knit-look scarf.
- Level
- Intermediate
- Time
- 4-6 hours
- Hook
- 2 mm
- Yarn
- Worsted
Pattern highlights
- Start with the two ears, worked quickly in orange before anything else.
- Crochet the tail in alternating black and orange, then fold and close it flat.
- Make two legs, then chain between them to begin the torso without cutting yarn.
- Work the handles as separate striped pieces, folding and closing each one.
- Attach the tail partway up the torso and the handles higher, spaced apart.
- Finish by attaching ears and eyes to the head, then add the knit-look scarf.
About This Pattern
Every collector's shelf needs a jungle corner, and this tiger cub earns its spot. It sits between the plain single-color amigurumi and the ones that make you count rounds twice. The scarf is a nice touch — most animal patterns stop at the eyes and call it done.
The techniques here are the familiar amigurumi backbone: magic ring starts, steady increase rounds, and a stripe sequence on the tail that asks for attention, not skill. The head carries the real test, with color changes placed at specific rounds to build the face markings. Nothing exotic, just timing.
Finished, the cub stands on four stubby legs with a connecting chain between them, ears perched above a striped face, and a scarf looped at the neck from a second yarn. It reads as a toy built with intention, not just stitched to a shape.
Common mistakes
- Losing track of stripe rounds on the tail Mark each color change on paper as you go, since the black-orange sequence doesn't repeat evenly. A stitch marker at the color swap helps too.
- Misplacing the head's color-change rounds Note the rounds before you start — the face markings depend on hitting them exactly. One round off shifts the whole pattern upward.
- Cutting yarn between the legs Leave the yarn attached after the second leg so the connecting chain flows straight into the torso. Cutting here means rejoining and extra ends to weave.
- Closing the tail and handles unevenly Fold each piece flat before working the connecting row of single crochet, lining up the edges first. A crooked fold shows once it's attached.
- Spacing the handles incorrectly on the torso Count the distance between attachment points before stitching either handle down. Eyeballing it tends to pull one side off-center.


Intermediate
Progress Tracker
0 of 0 rounds
Tap a round to tick it off — your place is saved on this device.
The kit
- Yarn Lana Grace Classic (75% acrylic, 25% merino, 100 g / 300 m) in black and orange
- YarnArt Jeans yarn (for the scarf)
- 2 mm crochet hook
- 8 mm safety eyes for toys
- Filler/stuffing for toys
- Needle for sewing details
- Scissors
Ears
Make 2Worked in orange.
Round 16 sc. (6)
Round 2(1 sc, inc) x 3. (9)
Round 39 sc. (9)
Head
Base color is orange; change to black at Round 12, then back to orange, repeating the black color-change pattern at Rounds 15 and 18 to form the face markings.
Round 16 sc. (6)
Round 26 inc. (12)
Round 3(1 sc, inc) x 6. (18)
Round 4(2 sc, inc) x 6. (24)
Round 5(3 sc, inc) x 6. (30)
Round 6(4 sc, inc) x 6. (36)
Round 7(5 sc, inc) x 6. (42)
Round 8(6 sc, inc) x 6. (48)
Rounds 9–1148 sc. (3 rows) (48)
Round 12black: 36 sc, orange: 12 sc. (48)
Rounds 13–14orange: 48 sc. (48)
Round 15knit as Round 12. (48)
Rounds 16–17orange: 48 sc. (48)
Round 18knit as Round 12. (48)
Round 19orange: (6 sc, dec) x 6. (42)
Round 20(5 sc, dec) x 6. (36)
Round 21(4 sc, dec) x 6. (30)
Round 22(3 sc, dec) x 6. (24)
Round 23(2 sc, dec) x 6. (18)
Tail
Begin with black color.
After the last round, fold the part in half and crochet a connecting row of 3 sc to close it.
Rounds 1–3black: 6 sc. (6)
Rounds 4–5orange: 6 sc. (6)
Round 6black: 6 sc. (6)
Rounds 7–8orange: 6 sc. (6)
Round 9black: 6 sc. (6)
Rounds 10–11orange: 6 sc. (6)
Round 12black: 6 sc. (6)
Rounds 13–14orange: 6 sc. (6)
Round 15black: 6 sc. (6)
Rounds 16–17orange: 6 sc. (6)
Round 18black: 6 sc. (6)
Round 19orange: 6 sc. (6)
Handles
Make 2Worked starting in orange.
Round 16 sc. (6)
Round 2(2 sc, inc) x 2. (8)
Rounds 3–48 sc. (8)
Round 5(2 sc, dec) x 2. (6)
Round 66 sc. (6)
Round 7black: 6 sc. (6)
Rounds 8–9orange: 6 sc. (6)
Round 10black: 6 sc. (6)
Rounds 11–12orange: 6 sc. (6)
Round 13black: 6 sc. (6)
Round 146 sc. (6)After the last round, fold the part in half and crochet a connecting row of 3 sc to close it.
Legs
Make 2Worked starting in orange.
Rounds 1–45 sc. (4 rows) (5)
Round 5black: (1 sc, inc) x 2, 1 sc. (7)
Rounds 6–7orange: 7 sc. (7)
Round 8black: 7 sc. (7)
Round 9orange: (2 sc, inc) x 2, 1 sc. (9)
Torso
At Round 6, attach the tail to the body.
At Round 15, attach the handles, leaving a 9 sc distance between them.
Round 126 sc (9 sc on one leg, 4 sc on the air chain, 9 sc on the second leg, 4 sc on the air chain). (26)
Round 29 sc, 4 inc, 9 sc, 4 inc. (34)
Round 334 sc. (34)
Round 412 sc, 2 inc, 15 sc, 2 inc, 3 sc. (38)
Round 538 sc. (38)
Round 638 sc, knit tail. (38)
Rounds 7–838 sc. (38)
Round 915 sc, dec, 17 sc, dec, 2 sc. (36)
Round 1036 sc. (36)
Round 11(4 sc, dec) x 6. (30)
Round 1230 sc. (30)
Round 13(3 sc, dec) x 6. (24)
Round 1424 sc. (24)
Round 1524 sc, knit handles. The distance between the handles – 9 sc. (24)
Round 16(2 sc, dec) x 6. (18)
Scarf
Rounds 1–5behind the back wall of the loop: 75 sl-st. (75)
Assembly
Step 1Do not cut the thread at the second leg. Chain 4 (the distance between the legs) to connect both legs, then begin to crochet the body.
Step 2Tail: fold the finished piece in half and crochet a connecting row of 3 sc to close it, then attach to the body at Torso Round 6.
Step 3Handles: fold each finished piece in half and crochet a connecting row of 3 sc to close it, then attach to the body at Torso Round 15, leaving 9 sc distance between the handles.
Step 4Attach the ears and eyes (8 mm) to the head, and sew the head to the torso.
Finishing
- Weave in every color-change tail as you go, especially on the head and tail stripes — there are several.
- Stuff the head, torso, and limbs firmly but evenly before closing, so the color bands don't warp.
- Attach the eyes, ears, tail, and handles last, then knot and trim the scarf ends neatly at the neck.
Why it works
The head's increase rounds build steadily from round 2 through round 5, giving a smooth curve before the color-change rounds begin higher up.
The tail is worked flat at the end — folding it in half and closing with a connecting row of single crochet turns a tube into a flat tip.
The legs are not finished separately before joining; the chain between them doubles as the start of the torso, skipping a seam entirely.
The black stripes on the tail follow no single rhythm — some stretch across multiple rounds, others sit alone, which is worth tracking row by row.
What it becomes
- A nursery shelf piece that pairs well with other jungle-themed amigurumi animals.
- A handmade gift for a child who already owns a growing stuffed-toy collection.
- A photo prop for craft fairs or shop displays, styled alongside the scarf detail.
Original pattern: https://onrecip.com/free-amigurumi-tiger-cub-crochet-pattern/
FAQ
Can I use a different yarn for the scarf?
Yes — the pattern calls for YarnArt Jeans for that knit-look texture, but any yarn you have will work. Just keep it separate from the Lana Grace Classic used for the body.
Why does the head have so many rounds compared to other parts?
19 rounds, the head carries the shaping and all three color-change rounds for the face markings. It's the most detailed single piece in the pattern.
Do the legs need to be stuffed before joining?
Stuff each leg before you reach the chain that connects them, since access gets tighter once the torso begins. Waiting until later makes it harder to pack evenly.
What hook size does this pattern use throughout?
A 2 mm hook is used for the whole toy, paired with the 8 mm safety eyes. Keep your tension even since that small hook with worsted-weight yarn makes for a dense fabric.