
Free Pattern
Step-by-Step
Crochet
AmigurumiBlue-Haired Amigurumi Keychain Crochet Pattern
A blue-haired amigurumi keychain worked in rounds, with hair strands and a tassel finish.
- Level
- Intermediate
- Time
- 4-6 hours
- Hook
- 1.50 mm
- Yarn
- Worsted
Pattern highlights
- Start the head with a magic ring and work steady increase rounds until it reaches its widest point.
- Continue the head in straight rounds to build height before shaping tapers it back in.
- Stuff the head firmly with fiberfill as you close the remaining rounds.
- Crochet the hair cap separately in blue yarn, following its own increase sequence.
- Add individual hair strands and tufts to the cap for texture and movement.
- Embroider the facial highlights and attach safety eyes for the expression.
- Fit the hair cap over the head, sew it in place, then attach the tassel and keychain ring.
About This Pattern
This one lands in the small-project drawer, the bin I reach for when I want a finish line I can actually see. A keychain amigurumi is a full character shrunk to pocket scale, which means every choice — head shape, hair volume, expression — has to read at a glance. Joy is that kind of piece: compact, opinionated, done in an evening or two.
The techniques are the amigurumi basics but used with intention. Magic ring starts, steady increase rounds, an invisible decrease that keeps the shaping smooth instead of stepped. The hair cap and individual strands ask for a bit more patience than the head does, since texture is doing the storytelling here.
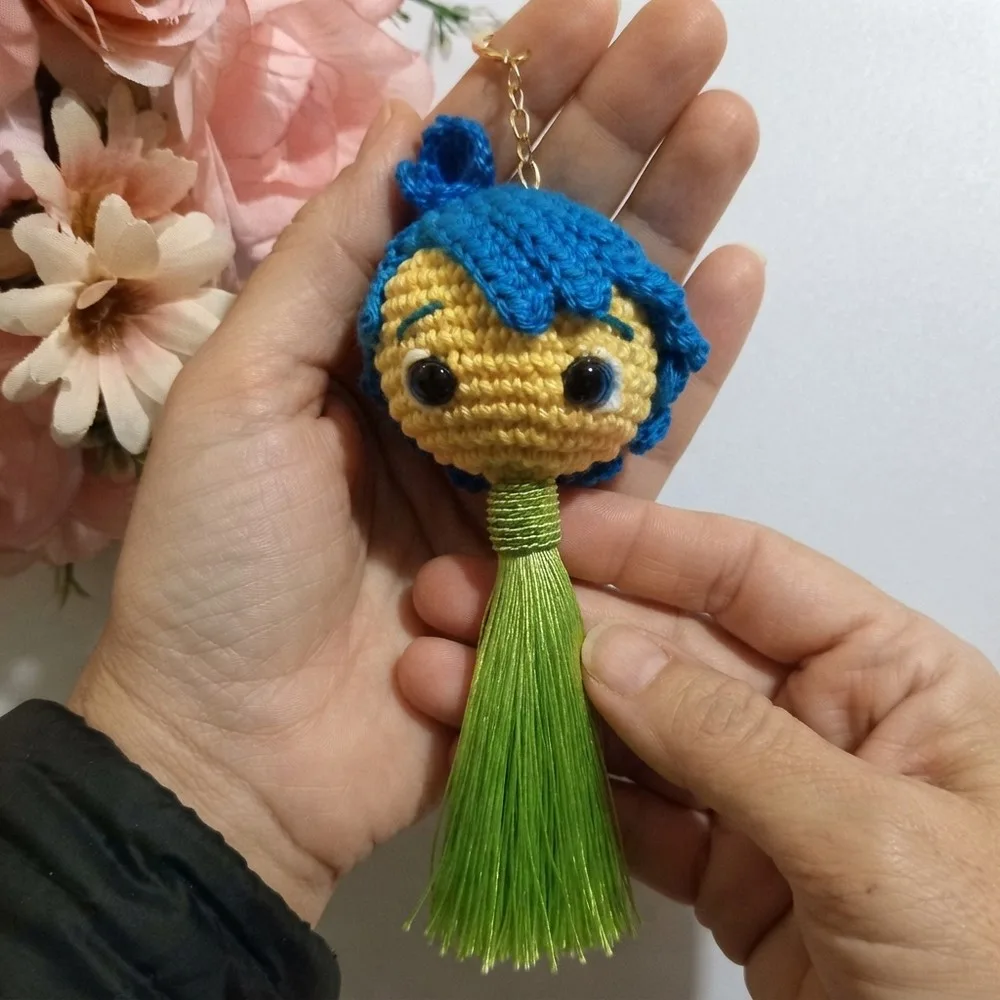
What comes off the hook is a rounded head in skin-tone yarn under a bold blue hair cap, with embroidered features and a lime tassel swinging below. It is built to clip onto a keyring or bag zipper, so the finished object has to survive handling, not just sit on a shelf.
This sits at an intermediate-beginner to intermediate level: you should be comfortable working in the round from a magic ring, working increases and decreases, attaching amigurumi parts, and doing basic embroidery for the facial highlights.
Worth knowing
The satisfaction here is proportional to how small the piece is. Nine rounds build the head from a magic ring through a clean sequence of increases, and watching that flat circle turn into a sphere is still a small trick worth enjoying. The hair cap repeats the same logic in blue, then hands off to individual hair strands and tufts, which is where the pattern stops being generic and starts being Joy. Attaching safety eyes, embroidering eyebrows and highlights, then tying on a lime tassel — each step adds a layer of personality to a shape that started as six single crochets in a ring. It is a fast, expressive make, and a good one for practicing invisible decreases without committing to a full-size doll.
Common mistakes
- Losing track of the round in a spiral Use a stitch marker on round 1 and move it up each round, since there's no slip stitch join to mark the boundary.
- Stuffing too late Add fiberfill gradually as the head rounds close rather than trying to stuff a nearly-finished sphere through a small opening.
- Visible decrease bumps Work the invisible decrease through front loops only, not both loops, to keep the shaping smooth.
- Hair cap doesn't sit centered Pin the cap in place before sewing and check it looks even from the front and both sides first.
- Hair strands look sparse or uneven Distribute strands evenly around the cap and trim them to a matching length after attaching.


Intermediate
Progress Tracker
0 of 0 rounds
Tap a round to tick it off — your place is saved on this device.
The kit
- Planeta Solar yarn (colors: skin, hair blue, accents as needed)
- #8 safety eyes (or as per desired scale)
- Fiberfill stuffing
- Lime green tassel (store-bought or handmade)
- Keychain ring
- 1.50mm crochet hook
- Small scissors
- Yarn/tapestry needle
- Stitch marker (recommended)
- Embroidery floss or thin yarn for facial details
HEAD (Skin color yarn)
MR, 6 sc
Magic Ring (MR): Form a loop, insert hook, and work the first round's stitches into the ring before tightening.
Round 1Inc in each st (6 inc) = 12 sc
Round 2(1 sc, inc) repeat 6 times = 18 sc
Round 3(inc, 1 sc) repeat 12 times = 36 sc
Rounds 4–101 sc in each st ( work 36 sc per round; total of 7 rounds )
Eye Placement:
After Round 10 and before decreasing, insert #8 safety eyes between rounds 5 & 6, spaced with a 6-stitch interval.
Embroider lashes, eyebrows, and add small white thread for highlights or dots in/around eyes as desired for expressiveness.
Invisible Decrease: Insert hook under front loops of two stitches, yarn over and draw up a loop, yarn over and finish sc (yields a close, unnoticeable decrease).
Round 11(4 sc, dec) repeat 6 times = 30 sc
Round 12(3 sc, dec) repeat 6 times = 24 sc
Round 13(2 sc, dec) repeat 6 times = 18 sc Stuff firmly with fiberfill.
Round 14(1 sc, dec) repeat 6 times = 12 sc
Round 156 decreases = 6 sc . Fasten off and sew closed neatly.
HAIR CAP (Blue yarn)
MR, 6 sc
Round 1Inc in each st = 12 sc
Round 2(inc, 1 sc) repeat = 18 sc
Round 3(inc, 2 sc) repeat = 24 sc
Round 4(inc, 3 sc) repeat = 30 sc
Round 5(inc, 4 sc) repeat = 36 sc
Rounds 6–91 sc in each st = 36 sc per round
Features
Seamless Amigurumi Construction: Created in continuous spirals for a professional finish.
Expressive Details: Accurate facial placements, with safety eyes, drawn/embroidered eyebrows, and white highlights.
Dimensional Hair: Cap with individualized strands and tufts for signature appeal.
Keychain & Tassel: Excellent for gifting or personal use, designed for everyday durability.
HAIR STRANDS – All with Blue Yarn
Small Strands (make 8): For each: Ch 5 , skip 2 ch from hook, work 3 hdc down next chains, sl st into 3rd base st.
Medium Strands: Ch 6 , skip 2, work 4 hdc back, sl st to hair cap.
Long Strands: Ch 7: skip 2, 5 hdc, sl st (similarly, ch 8 → 6 hdc, ch 9 → 7 hdc, etc.).
Top Tuft: Ch 4: sl st in next ch, 2 sc in last 2 ch.
Ch 6: sl st, then 4 sc back.
Ch 8: 2 sl st, 6 sc back.
(Each tuft is started from hairline, returned with variety of sl st/sc for a textured tuft.)
Assembly
Step 1Arrange and Pin Hair Cap & Strands: Position cap so that seam is at back. Align shorter strands at either temple, medium/longer towards back sides moving up to crown, with tufts atop center.
Step 2Sew Hair Elements to Head: Using matching blue yarn and whipstitch, sew the hair cap onto the head, ensuring strands and tufts are affixed firmly and evenly. Take extra care with strand positioning for authentic character look.
Step 3Install Accessories: Attach the keychain ring securely at the crown or slightly toward the back for balanced hanging. Sew or knot the lime green tassel to the base of the head at the desired position.
Step 4Final Touches: Make sure all embroidery (eyes, eyebrows, highlights) is neat. Trim and secure all yarn ends on the inside. Check all elements are tightly attached for safety and durability.
Step 5Finished Height: ~6–7 cm from tuft to base.
Step 6Width: ~4 cm at widest (head/hair area).
Step 7Designed to fit seamlessly on keyrings, bags, or as a special collectible charm.
Finishing
- Weave in loose ends from the head and hair cap before assembly, working them into the stuffing so nothing shows.
- Stuff the head firmly as the final rounds close, keeping the shape round rather than lumpy.
- Sew the hair cap onto the head, then attach the tassel and keychain ring to finish.
Why it works
The head's increase rounds happen early and fast — six new stitches per round through round 3 — then the piece holds a steady stitch count for seven straight rounds to build height before any shaping returns.
The hair cap uses the same increase logic as the head but stops sooner, since it only needs to arch over the crown rather than form a full sphere.
Hair strands and tufts are worked as a separate, non-round component, which lets them stand away from the cap's surface instead of lying flat against it.
Gauge: Consistency matters more than an exact gauge for amigurumi — keep stitches tight so the stuffing never shows through.
Stitch Pattern: The head and hair cap are worked entirely in single crochet; the hair strands add chains, slip stitch, and half double crochet for texture.
Finished measurements: head diameter approx. 3.5–4 cm, total height with hair and tufts ~6–7 cm, and tassel length ~2–3 cm — sized to fit comfortably in hand or pocket.
The pattern uses US crochet terminology and is worked in continuous rounds without joining unless a step says otherwise.
Adjust hair strand counts and positioning to taste, and keep every sewn element — hair cap, tassel, keychain ring — secure since this piece gets handled daily.
What it becomes
- Clip it to a keyring for everyday keys, where the tassel adds movement and makes it easy to spot in a bag.
- Hang it from a backpack zipper as a small personality marker among plain gear.
- Give it as a handmade accessory alongside a tote bag or pouch made in matching colors.
FAQ
What hook size does this pattern use?
A 1.50mm hook, which keeps the stitches tight enough to hold stuffing without gaps. That size also suits the fine detail work on the facial features.
Can I use a different yarn than Planeta Solar?
Yes, as long as it works well with a 1.50mm hook for a dense, amigurumi-tight fabric. Match weight and gauge rather than brand to keep the finished size close to the original.
Why does the head use an invisible decrease?
It keeps the shaping smooth on a small, visible sphere where regular decreases would show as bumps. It's worth practicing since it appears at the head's shaping points.
How are the hair strands attached?
They're worked as a separate step after the hair cap is complete, following the strand and tuft directions in the pattern. This keeps the texture raised rather than flat against the cap.