Free Pattern
Step-by-Step
Crochet
BagsBoho mandala bag with circle bamboo handles
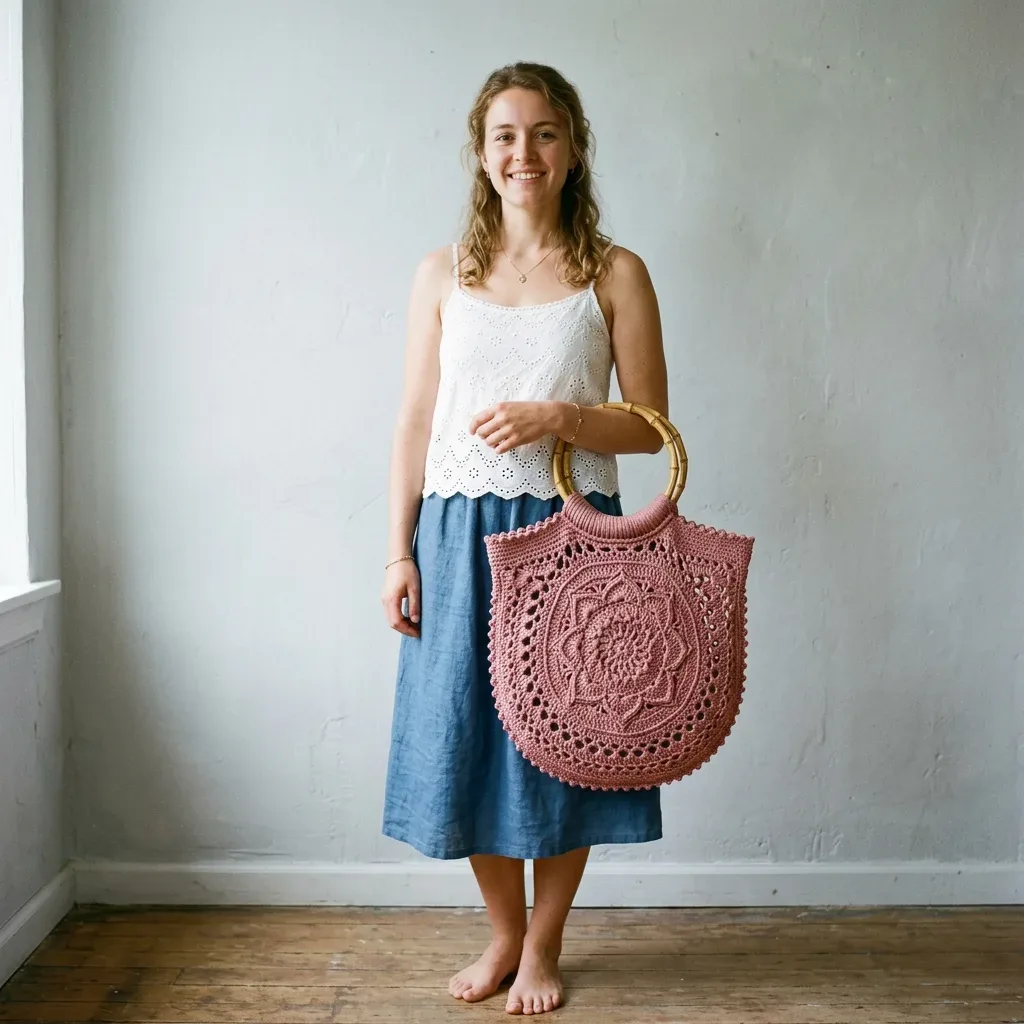
A dusty rose crochet tote with raised floral mandala panels and bamboo circle handles.
- Level
- Advanced
- Time
- 12-18 hours
- Hook
- 3.5 mm
- Yarn
- DK
Pattern highlights
- Start each panel's mandala from a magic ring, then build raised petals outward through joined rounds.
- Shift into filet-style mesh rounds that frame the mandala in open, lacy concentric texture.
- Repeat the full round sequence to make two identical panels with matching mandala sizing.
- Crochet a long gusset strip in simple turned rows until it reaches the needed length.
- Seam the gusset along the sides and bottom of both panels to build the bag's depth.
- Crochet directly around the bamboo rings at the top edge to attach both handles.
- Wet block every piece before assembly so the motif rounds hold true to gauge.
About This Pattern
I keep a shelf for crossover pieces. Doily skills put to structural use. This bag belongs there. The mandala center reads like a filet doily. But it's reinforced into something that holds its own shape on a shoulder. If you've built mandalas or granny squares before, this is the next step. It's not casual. But it justifies keeping all those stitch markers in a jar.
Each panel starts at a magic ring center. From there it grows outward with raised front post double crochet. That alternates with plain dc to build petal texture, round by round. Once the floral center is done, the panel shifts into filet-style mesh. That frames the motif in concentric lace. A long gusset strip, worked flat in turned rows, joins both panels along the sides and bottom. The bamboo rings get crocheted around directly. No separate strap seams needed.
The finished bag lands near fourteen inches wide and thirteen tall. A shallow gusset of about one and a half inches gives it real volume. Hold it up, and the bamboo rings add another five inches of height. The silhouette is softly squared, more shield than rectangle. Each side centers on the floral mandala as the obvious focal point. It's a structured, cotton-firm tote built to carry its shape.
Worth knowing
The satisfaction here is watching a flat magic ring become dimension. Round 2 adds front post double crochet into round 1's stitches. Suddenly you've got raised petals instead of a flat disc. That shift is the whole appeal. From there, the pattern keeps layering texture. More post stitches, then a pivot into open filet mesh. Making two identical panels forces real consistency. That pays off once you seam the gusset. Both mandalas sit level, side by side. Attaching the handles means crocheting straight around a rigid bamboo ring. It's hardware and fiber fused in one pass. No separate strap pattern required.
Common mistakes
- Skipping the motif gauge check Measure rounds 1 through 6 before continuing. Adjust your hook if the diameter is off.
- Using fuzzy or wool yarn Raised post stitches blur in fuzzy fiber. Stick to smooth cotton or cotton-blend DK.
- Losing track of FPdc placement Mark each post stitch with a stitch marker. This confirms you're working around the right stitch.
- Guessing the gusset length Measure the gusset against the panel edge as you go. Row counting alone won't account for tension differences.
- Ignoring ring fit before attaching Check your gauge before crocheting around the rings. The bamboo size is fixed and won't adjust to a loose panel.
Advanced
Progress Tracker
0 of 0 rounds
Tap a round to tick it off — your place is saved on this device.
The kit
- Option 1: Lion Brand 24/7 Cotton in Dusty Pink (DK weight, 186 yards per 3.5 oz skein). Widely available, consistent twist, excellent stitch definition. You will need approximately 4 skeins.
- Option 2: Paintbox Yarns Simply DK Cotton in Blush Pink (DK weight, 137 yards per 1.75 oz skein). Smooth, tightly plied, holds shape well. You will need approximately 6 skeins.
- Option 3: Drops Safran in Old Rose (DK weight, 175 yards per 1.75 oz skein). A sport-weight cotton that works at DK gauge with this hook. Excellent sheen and drape while retaining structure. You will need approximately 4 skeins.
Substitution Note
- Any smooth 100 percent cotton or cotton-blend DK weight yarn will work. Avoid wool, acrylic, or fuzzy fibers for this project. Raised post stitches require a smooth, firm twist to read clearly. Check your gauge carefully with any substitute.
Yarn
- Approximately 700 yards (640 meters) of DK weight (light worsted) 100 percent cotton yarn in dusty rose or antique mauve. Cotton gives the raised post stitches crisp definition and provides the structural firmness the bag requires.
Hook
- US size E-4 (3.5 mm) for panels and gusset. Using a smaller hook than typical for DK weight produces the dense, structured fabric necessary for a bag that holds its shape.
Notions
- Two circular bamboo ring handles, 6 inch (15 cm) outer diameter
- Yarn needle for seaming and weaving ends
- Stitch markers, at least 8
- Scissors
Optional
- fabric lining cut to finished bag dimensions, hand-sewing needle and matching thread
Panel (Make 2)
The mandala center is built outward from a magic ring. If you prefer not to use a magic ring, chain 4 and join with sl st to form a ring.
Round 1Inner Flower Center Make a magic ring. Ch 3 (counts as dc). Work 11 dc into the ring. Pull ring closed. Sl st to top of ch-3 to join.(12)
Round 2Petal Base Layer Ch 3 (counts as dc). FPdc around same stitch as ch-3. Work (dc, FPdc) in each remaining stitch around. Sl st to top of ch-3 to join.(12 dc, 12 FPdc = 24 sts)
Round 3Raised Inner Petals Ch 1 (does not count as st). Sc in first dc. Ch 3. Sk the FPdc. (Sc in next dc, ch 3, sk FPdc) 11 times. Sl st to first sc to join.(12 sc, 12 ch-3 sps)
Round 4Petal Fill Sl st into first ch-3 sp. Ch 3 (counts as dc). Work 4 dc in same ch-3 sp (first shell made). Sc in next sc. (Shell of 5 dc in next ch-3 sp, sc in next sc) 11 times. Sl st to top of ch-3 to join.(12 shells of 5 dc, 12 sc = 72 sts)
Round 5Post Stitch Petal Outline Ch 3 (counts as dc). BPdc around each dc of first shell (work 1 BPdc around each of the 5 dc), then sc in the sc between shells. (Work 1 BPdc around each of the 5 dc of next shell, sc in next sc) 11 times. Sl st to top of ch-3 to join.(60 BPdc, 12 sc = 72 sts)
Round 6Second Flower Layer, Increase Round Ch 3 (counts as dc). Work 2 dc in next BPdc. Dc in next BPdc. 2 dc in next BPdc. Dc in next BPdc. Sc in sc. (Dc in first BPdc of next group, 2 dc in next BPdc, dc in next, 2 dc in next, dc in next, sc in sc) 11 times. Sl st to top of ch-3 to join.(12 groups of 7 sts, 12 sc = 96 sts)
Round 7Extended Petal Round Ch 1. Sc in first st. Ch 5. Sk 3 sts. (Sc in next st, ch 5, sk 3 sts) rep around, ending with last sc before the sc between petal groups. When you reach an sc between groups from Round 6, work sc in that sc, ch 3, sk 1, then continue. Continue working (sc, ch-5, sk 3) through petal tops and (sc, ch-3, sk 1) at each sc connector. You will complete 12 large ch-5 loops and 12 small ch-3 bridges. Sl st to first sc to join.(24 sc, 12 ch-5 sps, 12 ch-3 sps)
Round 8Petal Fill, Second Layer Sl st into first ch-5 sp. Ch 3. Work 6 dc in same ch-5 sp. Sc in ch-3 sp. (7 dc in next ch-5 sp, sc in next ch-3 sp) 11 times. Sl st to top of ch-3 to join.(12 groups of 7 dc, 12 sc = 96 sts)CHECKPOINT 1: After Round 8 the mandala center should measure approximately 4.75 inches (12 cm) in diameter. The raised petal texture should be visible on the RS.
Round 9Inner Filet Mesh Setup Ch 5 (counts as dc, ch 2). Sk 2 sts. (Dc in next st, ch 2, sk 2 sts) around, ending with sl st to 3rd ch of beg ch-5 to join. You will place a dc approximately every 3 stitches. Work 32 dc total evenly spaced around, adjusting sk counts at each sc connector to keep the round flat.(32 dc, 32 ch-2 sps)
Round 10Filet Mesh Sl st into first ch-2 sp. Ch 5 (counts as dc, ch 2). (Dc in next dc, ch 2) 31 times. Sl st to 3rd ch of beg ch-5 to join.(32 dc, 32 ch-2 sps)
Round 11Raised Starburst Outline Ch 3 (counts as dc). FPdc around first dc of Round 10. Ch 2. (FPdc around next dc, ch 2) 31 times. Sl st to top of ch-3 to join.(1 dc, 31 FPdc, 32 ch-2 sps = 64 stitch positions)
Round 12Filet Expansion, Increase Round Sl st into first ch-2 sp. Ch 5 (counts as dc, ch 2). Dc in next post stitch. Ch 2. Work (dc, ch 2, dc) in the 9th, 17th, 25th, and 33rd ch-2 sp of this round (4 corner V-sts added to begin the squaring process). In all other ch-2 sps work (dc, ch 2). Continue around, placing the 4 corner increases evenly at positions marking the four sides of the eventual square panel.(36 dc, 36 ch-2 sps)CHECKPOINT 2: After Round 12 the piece should begin to show the faint squaring that will become the panel shape. Diameter approximately 7 inches (18 cm).
Round 13Outer Filet, Begin Squaring Sl st into ch-2 sp. Ch 5 (counts as dc, ch 2). Work around in filet mesh, placing V-st (dc, ch 2, dc) in each of the 4 corner ch-2 sps from Round 12, and (dc, ch 2) in every other sp.(40 dc, 40 ch-2 sps)Round 14 (Outer Filet, Continue Squaring): Work as Round 13, placing V-st in each of the 4 corner sps (the center sp of each corner V-st from Round 13).(44 dc, 44 ch-2 sps)
Round 15Decorative Cluster Round Ch 3 (counts as dc). Work around in the following pattern: in each regular ch-2 sp work (dc, ch 1, dc). In each corner ch-2 sp work (dc, ch 2, dc, ch 2, dc). Continue around.(88 dc, 36 ch-1 sps, 8 ch-2 sps at corners)
Round 16Raised Post Outline, Panel Frame Ch 3 (counts as dc). FPdc around each dc from Round 15. Work (dc, ch 2, dc) at each corner ch-2 sp. In ch-1 sps work ch 1 passing through.(96 dc total, 32 ch-1 sps, 8 ch-2 sps at corners)
Round 17Shell Border, Lower Portion For the three sides of the panel (both side edges and the bottom edge), work as follows: sl st to first ch-1 sp of lower 3 sides. (Shell of 5 dc in ch-1 sp, sc in next dc, sc in next ch-1 sp, sc in next dc) across lower 3 sides. At each lower corner sp work (shell, ch 2, shell). At the top edge (which will become the handle attachment zone) work sc across all sts and sps without shells, keeping the top edge straight and firm.After this round the panel should measure approximately 13.5 inches (34 cm) at its widest and 12.5 inches (32 cm) tall.
Round 18Picot Edge, Lower Three Sides Only Working only along the bottom and two side edges (not the top opening), join yarn at corner of top opening edge. Sc in each st across to first shell. (3 sc across shell, picot in center dc of shell, 3 sc continue) across each shell. Sc in each sc between shells. At lower corners work (sc, picot, sc) in corner ch-2 sp. End at opposite corner of top opening. Fasten off.
CHECKPOINT 3: Both panels, before seaming, should each measure approximately 14 inches wide by 13 inches tall (35.5 x 33 cm) when blocked flat. Stack them together to confirm they match.
Gusset
The gusset is a narrow strip that runs along the bottom and both side edges of the bag, creating the 1.5-inch depth. The gusset does not run across the top opening.
Foundation chain: Ch 7.
Round 1Sc in 2nd ch from hook and in each ch across. Turn. (6 sc)
Round 2onward: Ch 1. Turn. Sc in each sc across. (6 sc) Repeat Row 2 until the gusset strip measures approximately 38 inches (96.5 cm), which is the combined length of the bottom plus both side edges of one panel. Fasten off.
Assembly
Step 1Weave in all ends on the WS, running each tail in two directions for security.
Step 2If adding an optional fabric lining: Cut lining fabric to match the finished panel dimensions plus 0.5-inch seam allowance on all sides. Fold seam allowance under, press, and hand-stitch the lining inside the bag along all four edges. A lining adds polish and prevents small items from poking through the lace openings.
Finishing
- Weave in every end on the WS, running tails in two directions for security.
- Wet block both panels and the gusset to set the motif gauge precisely.
- Seam the gusset to each panel, then crochet around the bamboo rings to attach handles.
Why it works
Round 1 starts from a magic ring, so the mandala grows outward in joined rounds.
Round 2 works FPdc into round 1's stitches, alternating with dc to raise the petals.
The gusset is worked flat in turned rows, not rounds, since it's a straight strip.
What it becomes
- A weekend farmers market trip, paired with linen or chambray.
- An everyday errand bag that pairs well with denim and canvas sneakers.
- A boho-styled outing bag, paired with woven sandals and a wide-brim hat.
FAQ
Can I use a different hook size than E-4?
Only if you check gauge against the motif diameter first. The bamboo rings are a fixed size, so loose gauge means loose handles.
Is the fabric lining required?
No, it's optional. It does hide seams and keeps small items from slipping through the filet mesh.
Can I skip the magic ring start?
Yes. Chain 4 and join with a slip stitch to form the ring instead.
Is this a good first mandala project?
Not really — it's rated advanced for a reason. I'd recommend trying a doily or simpler mandala first to build comfort with post stitches and filet mesh.