Free Pattern
Step-by-Step
Crochet
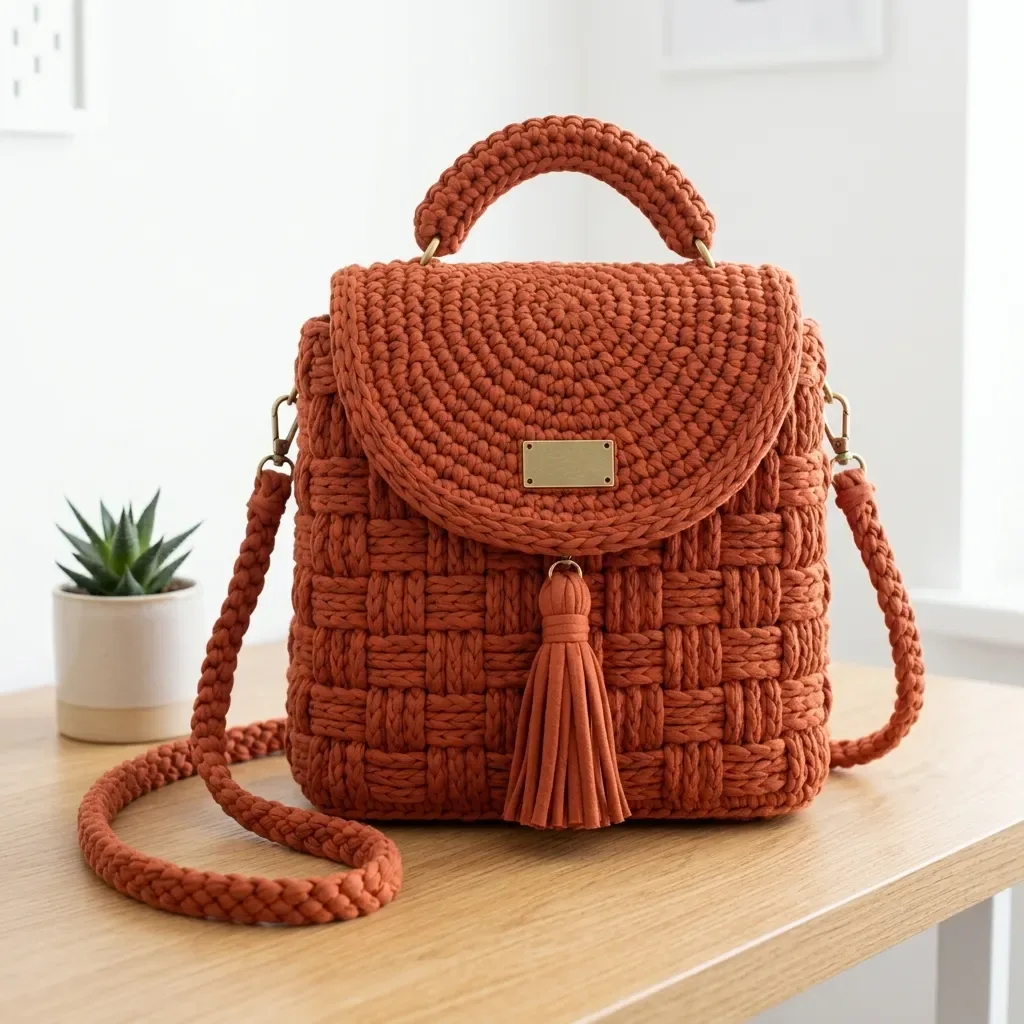
BagsTerracotta basketweave backpack with braided straps pattern
A structured crochet backpack with basketweave texture, a flap, and braided cord straps.
- Level
- Intermediate
- Time
- 8-12 hours
- Hook
- 5 mm
- Yarn
- Super Bulky
Pattern highlights
- Swatch first, since this cord needs a firm, consistent gauge to hold its shape later.
- Work two matching main panels, starting flat and building up through rows of basketweave texture.
- Crochet a long narrow side gusset separately to run around the base and sides.
- Seam the gusset to both main panels to form the square body of the backpack.
- Position hardware, the front plate, the O-ring, and any magnetic snap by eye, then attach.
- Add braided straps and a handle, then finish with the tassel accent.
About This Pattern
Every collector of patterns has a shelf for structured bags, the ones that hold their shape without a single safety pin. This backpack belongs there. It is not a soft slouchy tote. It is built like furniture, panel by panel, in cord thick enough to argue back when you squeeze it.
The technique doing the heavy lifting is post stitch basketweave, front post and back post double crochet traded in blocks of four. That texture is what keeps the panels from going floppy. A side gusset, a shaped flap worked with gradual decreases, and a seamed assembly round out the build.
What comes off the hook is a compact mini backpack, square shouldered and about the size of a large book. Braided straps, a rounded flap, and brass-tone hardware give it a finished, store-bought air. The terracotta cord just makes it look like it belongs in October.
Common mistakes
- Losing track of FPdc BPdc blocks Use a stitch marker at the start of each four-stitch block. It stops the whole row from drifting out of alignment.
- Skipping the gauge swatch Swatch in the basketweave pattern itself, not plain stitches. The post stitches pull in differently than flat single crochet.
- Pressing the texture flat while steaming Steam from above without touching the fabric with the iron. Let the post stitches keep their raised dimension.
- Choosing a stretchy yarn A soft or stretchy fiber will not hold the squared shape. Stick to a firm cotton cord unless you add a base insert.
- Attaching hardware before the bag rests Let the pieces lie flat for thirty minutes first. Attaching too soon can pull the panels out of true.
Intermediate
Progress Tracker
0 of 0 rounds
Tap a round to tick it off — your place is saved on this device.
The kit
Yarn
- 150 to 180 yards (137 to 165 meters) of 5mm cotton macrame cord or very bulky cotton tube yarn in terracotta
Yarn Suggestions
- Hoooked Zpagetti or similar cotton tube yarn
- BobbinYarn 5mm braided cotton cord
- Ganxxet 5mm recycled cotton cord
Substitution Note
- Choose a smooth, firm cord that holds post-stitch texture well. Avoid stretchy yarns unless you plan to add lining and a firm base insert.
Hook
- US L/11 (8mm) crochet hook, or size needed to match gauge
Notions
- Removable stitch markers
- Tapestry needle
- Sharp scissors
- Measuring tape
- Pins or clips
Optional
- Fabric liner
- Magnetic snap
- Plastic canvas or bag base insert for extra structure
Main Pattern
Round 1Single crochet in 2nd chain from hook and across. Turn. (24 sc)
Round 2Chain 2, double crochet in each stitch across. Turn. (24 dc)
Round 3Chain 2, FPdc around next 4 stitches, BPdc around next 4 stitches; repeat from 3 times. Turn. (24 sts)
Round 4Chain 2, FPdc around next 4 stitches, BPdc around next 4 stitches; repeat from 3 times. Turn. (24 sts)
Round 5Chain 2, FPdc around next 4 stitches, BPdc around next 4 stitches; repeat from 3 times. Turn. (24 sts)
Round 6Chain 2, FPdc around next 4 stitches, BPdc around next 4 stitches; repeat from 3 times. Turn. (24 sts)
Round 7Chain 2, BPdc around next 4 stitches, FPdc around next 4 stitches; repeat from 3 times. Turn. (24 sts)
Round 8Chain 2, BPdc around next 4 stitches, FPdc around next 4 stitches; repeat from 3 times. Turn. (24 sts)
Round 9Chain 2, BPdc around next 4 stitches, FPdc around next 4 stitches; repeat from 3 times. Turn. (24 sts)
Round 10Chain 2, BPdc around next 4 stitches, FPdc around next 4 stitches; repeat from 3 times. Turn. (24 sts)
Round 11Chain 2, FPdc around next 4 stitches, BPdc around next 4 stitches; repeat from 3 times. Turn. (24 sts)
Round 12Chain 2, FPdc around next 4 stitches, BPdc around next 4 stitches; repeat from 3 times. Turn. (24 sts)
Round 13Chain 2, FPdc around next 4 stitches, BPdc around next 4 stitches; repeat from 3 times. Turn. (24 sts)
Round 14Chain 2, FPdc around next 4 stitches, BPdc around next 4 stitches; repeat from 3 times. Turn. (24 sts)
Round 15Chain 2, BPdc around next 4 stitches, FPdc around next 4 stitches; repeat from 3 times. Turn. (24 sts)
Round 16Chain 2, BPdc around next 4 stitches, FPdc around next 4 stitches; repeat from 3 times. Turn. (24 sts)
Round 17Chain 2, BPdc around next 4 stitches, FPdc around next 4 stitches; repeat from 3 times. Turn. (24 sts)
Round 18Chain 2, BPdc around next 4 stitches, FPdc around next 4 stitches; repeat from 3 times. Turn. (24 sts)
Round 19Chain 2, FPdc around next 4 stitches, BPdc around next 4 stitches; repeat from 3 times. Turn. (24 sts)
Round 20Chain 2, FPdc around next 4 stitches, BPdc around next 4 stitches; repeat from 3 times. Turn. (24 sts)
Round 21Chain 2, FPdc around next 4 stitches, BPdc around next 4 stitches; repeat from 3 times. Turn. (24 sts)
Round 22Chain 2, FPdc around next 4 stitches, BPdc around next 4 stitches; repeat from 3 times. Turn. (24 sts)
Round 23Chain 1, single crochet in each stitch across. Turn. (24 sc)
Round 24Chain 1, single crochet in each stitch across. Fasten off. (24 sc) Checkpoint: Panel measures approximately 8.75 inches wide x 8.8 to 9 inches tall (22 x 22.5 to 23 cm).
Main Pattern
Round 1Single crochet in 2nd chain from hook and across. Turn. (24 sc)
Round 2Chain 2, double crochet in each stitch across. Turn. (24 dc)
Round 3through 6: Chain 2, FPdc around next 4 stitches, BPdc around next 4 stitches; repeat from 3 times. Turn. (24 sts)
Round 7and 8: Chain 1, sc2tog, single crochet across to last 2 stitches, sc2tog. Turn. (22 sc, then 20 sc)
Round 9and 10: Repeat Row 7. (18 sc, then 16 sc)
Round 11Chain 1, single crochet in each stitch across. Fasten off. (16 sc) Border: Single crochet evenly around flap, placing 2 sc in each lower curve corner and keeping the top edge flat. Sew top edge of flap to back top rim, centered over 24 back stitches.
Front Hardware Placement
Center the rectangular plate on the lower half of the flap area later, about 1.25 inches (3 cm) above the flap curve.
Place the small O-ring for the tassel at center front, about 1 row below the bottom edge of the flap.
If using a magnetic snap, install it through the lining or behind the flap before final assembly.
Optional Raised Frame
For a thicker framed look, join yarn at the lower left corner of the front panel and work 1 round of single crochet evenly around the panel: 24 sc across top, 24 sc across bottom, and 24 sc along each side edge, placing 3 sc in each corner. Join with slip stitch. Fasten off. (104 sc)
Checkpoint: Front and back panels must match in width and height before assembly. Steam gently and pin flat if one panel is slightly wider.
Assembly
Step 1Take your time with these final steps. They make a huge difference in the professional look of your finished bag:
Step 2Weave in all ends with a tapestry needle, splitting the cord layers when needed for security.
Step 3Steam lightly from above without pressing the raised texture flat.
Step 4Install hardware, plate, clasp, and optional lining after the bag has rested flat for at least 30 minutes.
Step 5For extra structure, cut plastic canvas to fit the base and lining before inserting.
Finishing
- Weave in every end with a tapestry needle, splitting the cord's layers so the tails stay buried.
- Steam the pieces lightly from above, taking care not to flatten the raised basketweave texture.
- Let the bag rest flat for at least thirty minutes before attaching hardware, the plate, and any lining.
Why it works
Each main panel starts with a plain single crochet and double crochet base before the post stitch pattern begins, which sets up a stable foundation for the texture rows above.
The basketweave repeats in blocks of four stitches, front post then back post, so the panels and gusset share one readable rhythm even though they are worked as separate pieces.
What it becomes
- A day bag for errands, light enough for a wallet, phone, and a paperback.
- A structured accessory to pair with a wool coat or a canvas jacket for fall outings.
- A desk-to-weekend bag that pairs well with denim and ankle boots.
FAQ
Can I use a different yarn weight than the cotton cord?
You can, but the structure depends on a firm, non-stretchy fiber. A softer yarn will need a lining and a base insert to hold the squared shape.
Do I need the magnetic snap and plastic canvas insert?
Both are optional but recommended for extra structure. The snap keeps the flap closed, and the canvas keeps the base from sagging.
How important is matching gauge for this project?
Very important, since the bag needs to hold its shape without stuffing or a stiff lining. Swatch in the basketweave pattern and adjust hook size before starting the panels.