Free Pattern
Step-by-Step
Crochet
BagsSage green textured bobble clutch bag pattern
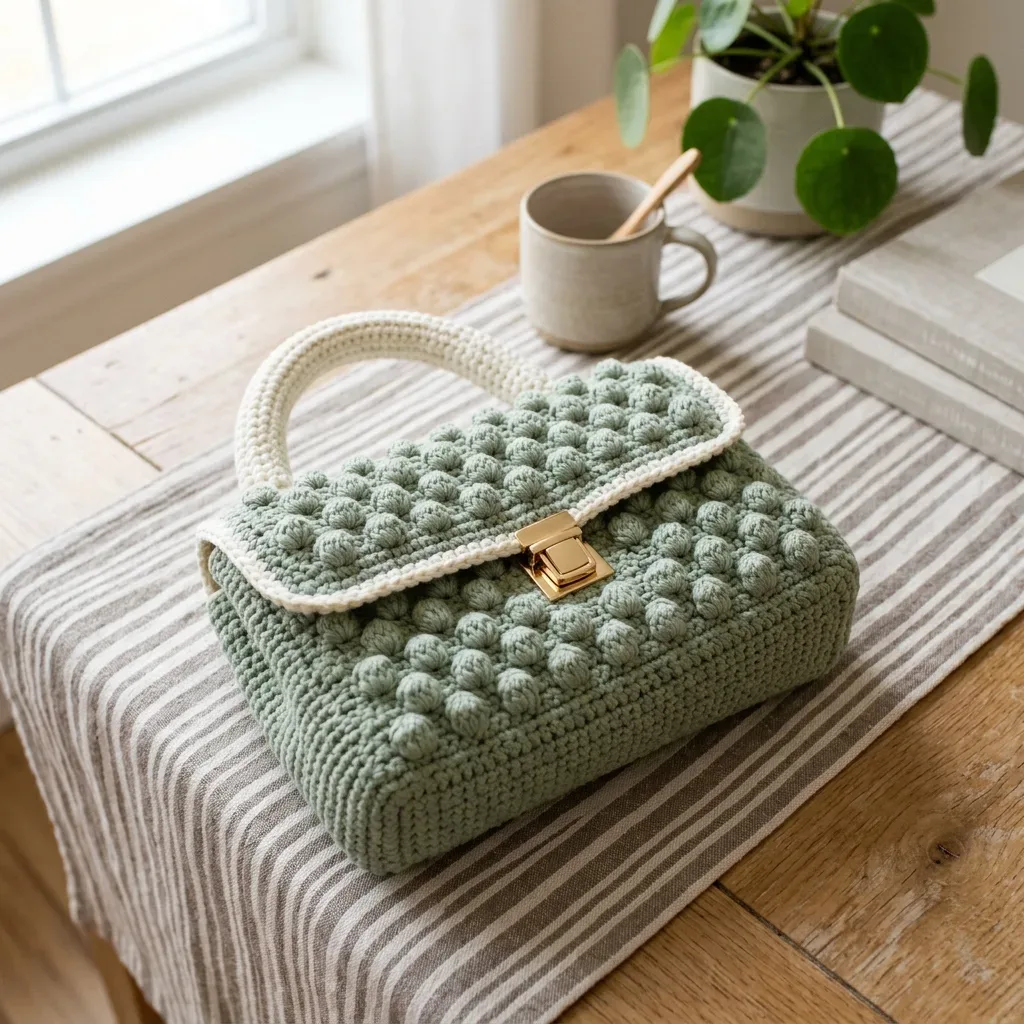
A flat-worked bobble clutch in sage cotton cord, folded and seamed into a structured bag.
- Level
- Intermediate
- Time
- 4-6 hours
- Hook
- 5 mm
- Yarn
- Bulky
Pattern highlights
- Chain and work rows of single crochet to build a plain rectangular base panel.
- Shift into the textured section, alternating a bobble row with a single crochet row.
- Stagger the bobble placement row after row so the bumps form a diamond pattern.
- Continue the textured section until it reaches the length needed for the body.
- Fold the lower section up into a pouch shape and seam the sides closed.
- Add the cream border and handle, then install the magnetic clasp on the flap.
About This Pattern
I keep a shelf for pieces that behave like fabric rather than yarn. This clutch belongs there. It is built from a single flat rectangle, no shaping, no mystery — just a long stretch of single crochet interrupted by rows of bobbles. That simplicity is deceptive. The texture does all the talking.
The technique here is really one repeated idea: a bobble row, then a plain row, staggered so the bumps land on the diamond instead of stacking. It is the kind of rhythm that lets your hands go quiet while your eyes still have to check stitch counts. Cotton cord does the rest, holding every bobble crisp.
What comes out the other end is a folded, seamed pouch with a flap, a cream contrast border, and a magnetic clasp. It reads as structured and finished, not homespun. I like that a bag this polished starts as something as plain as a rectangle.
Worth knowing
The satisfaction is in the bobble rows pulling the fabric into something sculptural, not flat. Watching a plain rectangle of single crochet suddenly bloom into a quilted diamond grid is genuinely fun to track, row by row. Staggering the bobbles so they don't stack is a small decision that changes the whole look. The cotton cord makes the texture stand up on its own, no stiff interfacing required. And because the construction is just fold-and-seam, there is no shaping to second-guess. By the time the cream handle and border go on against the sage body, the contrast does more design work than any extra stitch could. It is a satisfying build for anyone who likes texture over complication.
Common mistakes
- Bobbles stacking instead of staggering Shift the placement of each bobble row so the bumps fall between the ones below. Otherwise the diamond effect flattens into stripes.
- Losing a stitch after a bobble Count stitches at the end of every few rows, especially after bobble rows. A skipped stitch there is easy to miss until the edges stop lining up.
- Tension tightening around bobbles Bobble rows pull tighter than plain single crochet rows. Check your rectangle stays straight-edged, not hourglass-shaped.
- Loose, flat-looking bobbles Pull the final yarn over of each bobble snugly. A firm pull is what keeps the bobble pushed forward and defined.
- Skipping the gauge swatch This is a structured bag, so size depends on accurate gauge. Swatch first and adjust hook size before committing to the full rectangle.
Intermediate
Progress Tracker
0 of 0 rounds
Tap a round to tick it off — your place is saved on this device.
The kit
Yarn
- Bulky cotton cord yarn, 250 to 300 yards total
Suggested yarns
- YarnArt Macrame Cotton, Bobbiny Junior, or Lion Brand Rewind
Hook
- 5 mm crochet hook
Notions
- Magnetic clasp (one set)
- Tapestry needle for weaving ends and seaming
- Why cotton cord yarn? This type of yarn gives the bag structure and body. It holds its shape beautifully and creates crisp, defined bobbles. The slight stiffness of cotton cord means your finished bag will stand upright and look polished rather than floppy.
Foundation and Base Section
Foundation: Chain 41.
Round 1through 12: Single crochet 40 stitches across. (40 sts) At the end of Row 12, you should have a neat rectangle of dense single crochet fabric. This forms the back panel of your bag.
Textured Bobble Section
This is where the magic happens. You will alternate between bobble rows and single crochet rows to create that beautiful quilted texture.
Round 13through 36: Repeat the following two-row sequence: One bobble row One single crochet rowContinue this pattern, maintaining 40 stitches in each row. The bobble rows create the raised texture, while the single crochet rows provide a flat background that makes the bobbles pop.
Tip for bobble rows: Work your bobbles in a staggered pattern so they do not stack directly on top of each other. This creates the diamond-like quilted effect you see in the photos. Push each bobble to the front (right side) of your work as you complete it.
Flap Section
Round 37through 52: Single crochet 40 stitches across for the flap. (40 sts each row) The flap is worked in plain single crochet, which provides a nice visual break from the textured body and creates a smooth surface for attaching your clasp.
Border
Border Round: Using your contrast color, single crochet evenly around the entire piece.
Work your way around all four sides, placing approximately 3 single crochets for every 2 rows along the side edges. Add 3 single crochets in each corner to keep the border lying flat. This border frames the piece beautifully and adds that designer touch.
Handle
Handle: Chain 56, then work 55 single crochets back across the chain.
Sew the handle securely to the top corners of the bag, positioning it on the back panel just behind where the flap folds over.
Checkpoint
Before assembling, lay your piece flat and measure. The body should measure approximately 11 inches by 7 inches before folding. If your measurements are significantly different, check your gauge and adjust as needed.
Assembly
Step 1Installing the magnetic clasp: Position the clasp centered on the flap, marking where the two pieces need to go. Follow the manufacturer’s instructions for your specific clasp. Most magnetic clasps have prongs that push through the fabric and fold flat on the back side.
Step 2Steam blocking: Lightly steam block your finished bag to even out the stitches and help the piece hold its shape. Hold your steamer or iron a few inches above the fabric and let the steam do the work. Do not press directly on the bobbles.
Step 3Weaving in ends: Weave all yarn tails securely through multiple stitches on the wrong side of your work. For a bag that will see regular use, I recommend weaving each tail through at least 2 inches of stitches, then doubling back for extra security.
Finishing
- Weave in all loose ends with a tapestry needle before folding anything.
- Fold the lower section upward and seam the two sides closed to form the pouch.
- Steam block lightly to even out the bobble texture, then attach the handle, border, and magnetic clasp.
Why it works
The whole body is worked as one flat piece across 40 stitches, so the fold line falls where the textured section ends and the flap begins.
The bobble and single crochet rows alternate in pairs, which is why the texture reads as a repeating diamond rather than a random bump.
Working flat rather than in rounds lets the side seams be sewn after the fact, so shaping happens through folding and seaming, not stitch increases.
What it becomes
- An evening clutch that pairs well with a simple dress or tailored outfit.
- A compact daytime bag for essentials — phone, cards, keys — worn under an arm.
- A handmade gift for someone who likes structured, texture-forward accessories over soft knits.
FAQ
Why does the bag use cotton cord instead of regular yarn?
Cotton cord gives the fabric structure and body that softer fibers lack. It holds the bobbles crisp and keeps the finished bag standing upright instead of flopping.
Do I need to be experienced with bobble stitches to make this?
No, the pattern repeats the same two-row sequence throughout, so you only need to learn the bobble once. The real skill is staying consistent and counting stitches.
Why is the whole bag worked flat instead of in rounds?
Working one flat rectangle keeps the bobble pattern simple to track row by row. The pouch shape comes later, from folding and seaming rather than circular shaping.
What if my bobble rows pull tighter than my plain rows?
That is common with bobble stitches and worth watching closely. Keep tension even and check your swatch gauge before starting the full piece.