Free Pattern
Step-by-Step
Crochet
WearablesBoho Peacock Feather Lace Sweater Crochet Pattern
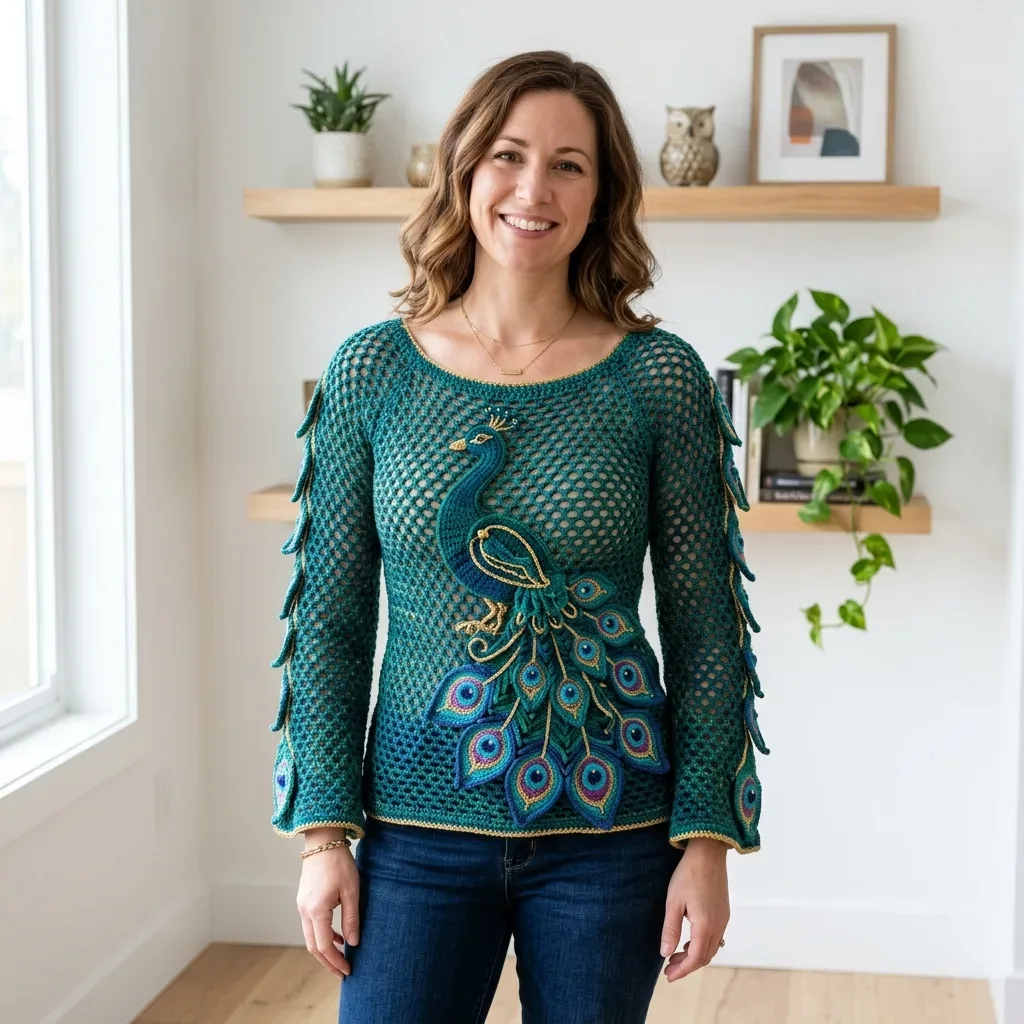
Make a stunning boho peacock feather lace sweater with hexagon mesh, dimensional applique, and gold accents. Full sizing XS-2XL included.
Level AdvancedTime 60-90 HoursHook 4.0 mmYarn DK
Pattern highlights
- Crochet the Front Panel and Back Panel flat in hexagon mesh, keeping tension even across every repeat.
- Work both Sleeves side by side so their mesh rows and fringe placements stay perfectly matched.
- Seam the panels and sleeves together to form the finished sweater body and armholes.
- Build the Peacock Eye Motif and every Peacock Feather Unit and Large Peacock Feather Unit separately.
- Block the sweater and all peacock pieces flat before pinning the peacock onto the lower left front.
- Stitch the peacock body and fanned feathers permanently in place along the side seam.
- Attach the Sleeve Leaf Fringe Elements at their base points, then add gold embroidery along the neckline, cuffs, and hem.
About This Pattern
The Boho Peacock Feather Lace Sweater is a true wearable art piece, pairing an airy hexagon mesh body with a dimensional peacock applique that spreads its tail feathers across the front panel. What makes it so special is that the sweater and the peacock are built completely separately, then joined like puzzle pieces during assembly. This pattern is perfect for makers who love a slow-build project with a jaw-dropping payoff, and who want a handmade garment that genuinely looks like nothing on the rack.
The finished sweater is graded from XS through 2XL with about 1 to 2 inches of positive ease, so it drapes comfortably rather than clinging. Deep teal mesh, gold neckline and cuff accents, and a jewel-toned peacock in navy, royal blue, purple, magenta, and grass green combine into a boho statement piece that feels equally at home at a music festival or a cozy autumn brunch. It's a showstopping handmade gift for the peacock-obsessed fiber artist in your life—or a bucket-list make for yourself.
Variations
Once you've mastered the base construction, this sweater is a playground for personalization. For a moodier palette, swap Deep Teal MC for a rich Emerald or Forest Green from Cascade 220 Superwash Sport, and shift the peacock feathers into jewel-toned burgundy, plum, and copper instead of navy and magenta—stunning for a fall wedding guest look. Want something brighter and more tropical? Try a Coral or Turquoise MC with Paintbox Yarns Simply DK and let the peacock feathers pop in sunset oranges, yellows, and hot pink. If you're making this for a beach vacation, Hobbii Rainbow Cotton 8/4 in a sandy or seafoam MC keeps the mesh airy and cool while holding its shape beautifully. For sizing flexibility beyond the given XS-2XL grading, add or subtract full hexagon mesh repeats symmetrically on both the Front Panel and Back Panel before seaming, remembering that one repeat measures 1.25 inches wide—so four extra repeats adds roughly 5 inches of bust circumference. You can also scale the project down dramatically by making just the Peacock Eye Motif and one Peacock Feather Unit as a statement brooch or bag applique instead of committing to the full sweater. For a monochrome minimalist version, work all the feather units in tonal shades of a single color family using CCD through CCG in lights and darks of blue instead of the full rainbow. And if gold isn't your accent of choice, silver or copper metallic yarn along the neckline and cuffs shifts the whole vibe from boho-warm to boho-cool without changing a single stitch count.
I adore this sweater because it's really two projects fused into one incredible garment. First you get lost in the rhythm of the hexagon mesh, watching the body and sleeves grow in that lacy, open six-chain repeat. Then the real magic starts: building a peacock from the ground up, piece by piece, starting with the neck and head section, adding the wing and head circle, and finally crocheting every single feather unit and leaf-shaped sleeve fringe by hand. Pinning the finished peacock onto the front panel and watching those tail feathers fan toward the side seam is one of the most satisfying moments in crochet I've experienced. The gold surface embroidery along the neckline, cuffs, and hem is the finishing touch that makes the whole thing shimmer just enough. This isn't a weekend pattern, and that's exactly the point—it's a meditative, months-long project for someone who wants to create a genuine heirloom. Every yarn end you weave in is part of building something nobody else owns.
Common mistakes
- Skipping the gauge swatch
- Work a swatch with your G-6/4.0mm hook and MC until you can measure one full mesh repeat at 1.25 inches wide and six rows at 3 inches tall—adjust hook size up or down until you match this exactly, since mesh gauge drift compounds fast across a full sweater.
- Losing track of which contrast color
- Label small yarn bobbins or use sticky notes with color letters before you start the Peacock Eye Motif and feather units, and keep a printed color key nearby so CCB navy and CCC royal blue never get swapped mid-feather.
- Attaching the peacock applique before
- Block the mesh Front and Back Panels flat to finished measurements first, let them dry completely, then pin the peacock pieces in place with sewing pins and step back to check placement before stitching anything down permanently.
- Working the Sleeves without matching
- Use a stitch marker to flag the start of every fifth row on Sleeve 1, then match those exact marker positions on Sleeve 2 so both sleeves finish at identical lengths and mesh row counts.
- Rushing the Sleeve Leaf Fringe Element
- Attach each leaf fringe piece only at its base point rather than tacking down the whole leaf, allowing the tip to hang free so it swings naturally when you move your arm.
- Using a fuzzy or bouclé yarn
- Stick to a smooth DK or light worsted yarn with strong stitch definition like Paintbox Yarns Simply DK or Cascade 220 Superwash Sport so every hexagon in the mesh stays crisp and visible.
Advanced
Progress Tracker
0 of 0 rounds
Tap a round to tick it off — your place is saved on this device.
Materials
- Main Color (MC): Deep Teal, approximately 900 (900, 1000, 1050, 1100, 1200) yards of DK weight yarn
- Contrast Color A (CCA): Gold, approximately 80 yards
- Contrast Color B (CCB): Navy Blue, approximately 60 yards
- Contrast Color C (CCC): Royal Blue, approximately 60 yards
- Contrast Color D (CCD): Teal (lighter than MC, for feather midtones), approximately 50 yards
- Contrast Color E (CCE): Purple, approximately 40 yards
- Contrast Color F (CCF): Magenta or Hot Pink, approximately 30 yards
- Contrast Color G (CCG): Grass Green, approximately 30 yards
- Paintbox Yarns Simply DK works beautifully for this project. It is 100% acrylic with excellent stitch definition and takes blocking well. Budget-friendly and widely available online.
- Cascade 220 Superwash Sport is a step up in luxury with gorgeous drape. The superwash treatment makes it safe for delicate machine washing, which helps with a garment that has this many yarn ends.
- Hobbii Rainbow Cotton 8/4 provides excellent drape and structure for the open mesh, keeping the garment from stretching over time.
- Choose a smooth DK or light worsted yarn with clear stitch definition and minimal halo. Fuzzy or bouclé yarns will obscure the mesh structure and applique detail.
- US Size G-6 / 4.0 mm for mesh body and sleeves
- US Size E-4 / 3.5 mm for applique and border details
- Yarn needle for seaming and weaving ends
- Stitch markers (at least 12)
- Blocking mats and pins
- Rust-proof T-pins
- Sewing pins for applique placement
- Sharp tapestry needle for surface embroidery with gold yarn
- Scissors
Main Pattern
Hexagon Mesh Pattern: This creates the beautiful open lace texture of the sweater body. It is worked flat over a multiple of 6 chains plus 4.
Foundation Chain: Work a multiple of 6 chains plus 4.
- Round 1(RS): Sc in 2nd ch from hook, ch 5, sk 5 ch, sc in next ch , rep from to across, ch 1, turn.
- Round 2Ch 5, sc in center of next ch-5 sp , rep from to across, ending with sc in last sc, ch 1, turn.Repeat Row 2 for pattern. Each ch-5 arch creates one hexagon mesh cell. The sc anchors sit in the center of the arch below.
Peacock Eye Motif
This creates the stunning eye spots on each feather. Worked in the round.
- Round 1With CCB (navy), make a magic ring, ch 1, work 6 sc into ring, sl st to first sc to join. (6 sc)
- Round 2Ch 1, work 2 sc in each sc around, sl st to join. (12 sc)
- Round 3Join CCC (royal blue), ch 1, sc in next st, 2 sc in next st , rep 6 times, sl st to join. (18 sc)
- Round 4Join CCE (purple), ch 1, sc in next 2 sts, 2 sc in next st , rep 6 times, sl st to join. (24 sc)
- Round 5Join CCF (magenta), ch 1, sc in next 3 sts, 2 sc in next st , rep 6 times, sl st to join. (30 sc)Fasten off, leaving a long tail for attaching to feather unit.
Peacock Feather Unit
This creates the individual tail feathers. The feather unit is worked from the eye outward into an elongated teardrop shape with a central rib.
Step 1: Complete one Peacock Eye Motif through Rnd 5. Do not fasten off.
Step 2: With CCD (lighter teal), ch 1, sc evenly around the eye motif picking up the back loop only of each st, creating a smooth ridge at the edge. Work 30 sc total around. Sl st to join. (30 sc)
Step 3: With MC (deep teal), work an elongated point by working back and forth in short rows. Find the top center of the eye motif (this will become the bottom of the feather tip). Join MC at this point.
- Round 1Ch 1, sc in next 5 sts, ch 1, turn. (5 sc)
- Round 2Sc2tog, sc in next 1 st, sc2tog, ch 1, turn. (3 sc)
- Round 3Sc in next 3 sts, ch 1, turn. (3 sc)
- Round 4Sc3tog. (1 sc) Fasten off. Step 4: With CCA (gold), surface slip stitch a central stem line from the tip of the feather point up through the center of the eye motif. The stem should be approximately 1.5 inches long on small feathers and up to 2.5 inches on large feathers.
Sleeve Leaf Fringe Element
With MC and E-4 / 3.5 mm hook, ch 14.
- Round 1Starting in 2nd ch from hook, sc in next 2 ch, hdc in next 3 ch, dc in next 3 ch, hdc in next 3 ch, sc in last 2 ch. Do not turn. Work along the opposite side of the foundation chain: sc in next 2 ch, hdc in next 3 ch, dc in next 3 ch, hdc in next 3 ch, sc in last 2 ch. Sl st to first sc to close. (26 sts total around)Fasten off with a long tail for attaching. Make 24 total (12 per sleeve).
Body Section
With CCD (lighter teal), ch 20.
- Round 1(RS): Sc in 2nd ch from hook, sc across. Ch 1, turn. (19 sc)
- Round 22 sc in first st, sc to last st, 2 sc in last st. Ch 1, turn. (21 sc)
- Round 32 sc in first st, sc to last st, 2 sc in last st. Ch 1, turn. (23 sc)
- Round 4-5Sc across. Ch 1, turn. (23 sc)
- Round 6Sc2tog, sc to last 2 sts, sc2tog. Ch 1, turn. (21 sc)
- Round 7Sc2tog, sc to last 2 sts, sc2tog. Ch 1, turn. (19 sc)
- Round 8Sc across. Ch 1, turn. (19 sc)
- Round 9Sc2tog, sc to last 2 sts, sc2tog. Ch 1, turn. (17 sc)
- Round 10Sc2tog, sc to last 2 sts, sc2tog. Ch 1, turn. (15 sc)
- Round 11Sc2tog, sc to last 2 sts, sc2tog. Ch 1, turn. (13 sc)
- Round 12Sc2tog, sc across to last 2 sts, sc2tog. (11 sc) Fasten off. This is the main body oval.
Neck and Head Section
With CCB (navy), ch 9.
- Round 1Sc in 2nd ch from hook, sc across. Ch 1, turn. (8 sc)
- Round 22 sc in first st, sc to last st, 2 sc in last st. Ch 1, turn. (10 sc)
- Round 3-4Sc across. Ch 1, turn. (10 sc)
- Round 5Sc2tog, sc across to last 2 sts, sc2tog. Ch 1, turn. (8 sc)
- Round 6Sc2tog, sc to last 2 sts, sc2tog. Ch 1, turn. (6 sc)
- Round 7Sc across. (6 sc) Fasten off.
Wing
With CCC (royal blue), ch 15.
- Round 1Sc in 2nd ch from hook, sc in next 5 ch, hdc in next 4 ch, dc in next 3 ch, 3 dc in last ch. Working back along the opposite side of the foundation chain: dc in next 3, hdc in next 4, sc in next 5, sc in last. Ch 1, turn. (30 sts total)(30)
- Round 2(RS): Sl st across first 3 sts, sc in next 4, hdc in next 4, dc in next 4, hdc in next 4, sc in next 4, sl st in last 3. (30 sts)Fasten off.
Head Circle
With CCB, make a magic ring, ch 1, work 6 sc into ring, sl st to join. (6 sc)
- Round 2Ch 1, 2 sc in each st, sl st to join. (12 sc)
- Round 3Ch 1, sc in next st, 2 sc in next st , rep 6 times, sl st to join. (18 sc) Fasten off.
Sleeves (Make 2)
With MC and G-6 hook, ch 46 (46, 46, 52, 52, 58).
Foundation Row: Sc in 2nd ch from hook, ch 5, sk 5 ch, sc in next ch , rep across. Ch 1, turn.
For size M: 7 mesh repeats.
- Round 2-5Work even in mesh pattern. (7 mesh repeats) Sleeve Increase Row: At the beginning of this row, after turning, ch 8 (this adds one full mesh repeat to the left edge), sc in 2nd ch from hook, ch 5, sk 5, sc, then continue in pattern across. At the end of the row, work sc into the last sc as normal, then ch 5, sc into the base of that last sc post to add one repeat to the right edge. Ch 1, turn. (9 mesh repeats)Work 4 rows even. (9 mesh repeats)Repeat the increase row again. (11 mesh repeats)Work 4 rows even. (11 mesh repeats)Work 1 final increase row. (13 mesh repeats)Work even until sleeve measures 18 inches from cuff foundation (approximately 36 rows).(9)
Sleeve Cap Shaping:
- Round 37Sl st across first 1.5 mesh repeats, continue in pattern until 1.5 repeats remain, leave those unworked. Ch 1, turn. (10 mesh repeats)(10)
- Round 38Sl st across 0.5 repeats, continue across until 0.5 repeats remain, leave those unworked. Ch 1, turn. (9 mesh repeats)(9)
- Round 39-42Dec 1 mesh repeat total at each end across these 4 rows. (7 mesh repeats after Row 42)Rows 43-45: Continue decreasing 0.5 repeats at each end every row. (5.5 mesh repeats after Row 45)Fasten off.
Large Peacock Feather Units
For the lower front tail feathers, work the Peacock Eye Motif through Rnd 6 before beginning the elongated point.
- Round 6Join CCG (grass green), ch 1, sc in next 4 sts, 2 sc in next st , rep 6 times, sl st to join. (36 sc)Then proceed with Steps 2 through 4 using the 36-stitch base.
Back Panel
With MC and G-6 hook, ch 88 (82, 88, 94, 100, 112).
Foundation Row: Sc in 2nd ch from hook, ch 5, sk 5 ch, sc in next ch , rep across. Ch 1, turn.
For size M: 14 mesh repeats across.
Work in Hexagon Mesh Pattern (Row 2 repeated) for 30 rows total.
Checkpoint: After Row 30, the back panel should measure approximately 15 inches wide and 15 inches tall (size M) before blocking.
Armhole Shaping:
- Round 31Sl st across first 1.5 mesh repeats (approximately 8 stitches), ch 1, then continue in mesh pattern across until 1.5 repeats remain at the end of the row, leave those unworked. Ch 1, turn.Continue in mesh pattern without shaping for 18 rows.Work across first 3.5 mesh repeats, ch 1, turn. Work 2 rows even over this shoulder section. Fasten off.Rejoin yarn at center and skip center 4 mesh repeats for back neck. Join yarn at right shoulder marker and work 3.5 mesh repeats for 2 rows. Fasten off.
For size M, you now have 11 mesh repeats across.
Shoulder and Neckline Shaping:
Front Panel
With MC and G-6 hook, ch 88 (82, 88, 94, 100, 112).
Work exactly as back panel through Row 30 (same stitch count and row count).
Work armhole shaping identically to back panel.
Continue in mesh pattern for 12 rows after armhole shaping.
Front Neckline Shaping:
Row 43: Work across first 3.5 mesh repeats, ch 1, turn. Leave remaining stitches unworked. (3.5 mesh repeats, left shoulder)
- Round 44-48Dec 0.5 repeats at neck edge every other row until 3 mesh repeats remain. Work even to match back shoulder length. Fasten off.Rejoin yarn 4 mesh repeats from right edge for right front shoulder. Work symmetrically to left shoulder. Fasten off.
Assembly
- Step 1Attach the neck section to the upper narrow end of the body oval using a tapestry needle and matching yarn, whip stitching through the edge stitches. Attach the head circle to the top of the neck section. Attach the wing flat over the right side of the body. Attach the five crest feathers standing at slight angles from the top of the head. Work gold surface embroidery lines around the wing edge and along the neck.
Important notes
💡 Place stitch markers at each corner and center point of the Front and Back Panels before seaming the Sleeves in, since mesh stitches can look identical and it's easy to seam into the wrong loop.
💡 Weave in yarn tails from every color change as you go rather than saving them all for the end—with eight yarn colors in play, an end-of-project weaving session can take hours on its own.
💡 Use rust-proof T-pins and dedicated blocking mats when shaping the mesh Body Section and Sleeves, since regular pins can leave rust marks on light-colored MC yarn during the extended drying time open mesh needs.
💡 Lay out all your Large Peacock Feather Units and Peacock Feather Units on your blocking mat in their final fanned arrangement before attaching anything, so you can adjust spacing while everything is still loose.
💡 Save the gold surface embroidery with your sharp tapestry needle for the very last step, after all seaming and applique attachment is complete, so you don't accidentally snag or pull those delicate metallic-look stitches.
📏 Gauge: With G-6/4.0mm hook and MC, in Hexagon Mesh Pattern, one mesh repeat (6 chains plus 1 single crochet) measures 1.25 inches wide, and six rows of mesh measure 3 inches tall. Do not skip gauging this project—the open mesh will grow significantly with blocking and with the weight of the applique embellishments. Work a swatch of at least 5 full repeats wide by 8 rows tall, block it flat, and measure before cutting yarn.
📐 Finished Measurements (approx. 1-2 inches positive ease): XS: Bust 32in, length 22in, sleeve 24in. S: Bust 34in, length 22.5in, sleeve 24in. M: Bust 36in, length 23in, sleeve 24.5in. L: Bust 38in, length 23.5in, sleeve 25in. XL: Bust 40in, length 24in, sleeve 25in. 2XL: Bust 44in, length 24.5in, sleeve 25.5in. Instructions throughout are written for size Medium with other size adjustments noted in parentheses in the order XS, S, M, L, XL, 2XL.
Original pattern: https://crochetwithmia.com/boho-peacock-feather-lace-sweater-free-crochet-pattern/
FAQ
Can I make this sweater with a different yarn weight than DK?
You can substitute a light worsted with similarly clear stitch definition, but you'll need to re-swatch the Hexagon Mesh Pattern to confirm you still hit 1.25 inches per repeat, and adjust your hook size accordingly. Avoid anything fuzzy or textured since it will blur the mesh and applique detail.
How much yarn do I really need for all the peacock colors combined?
Beyond the 900-1200 yards of MC depending on size, you'll need roughly 350 total yards across CCA through CCG for the peacock applique and gold accents. Buying an extra 10-15% of each contrast color is wise since dye lots vary and you don't want to run short mid-feather.
Is this pattern really appropriate for intermediate crocheters?
Yes, if you're confident with seaming, following multi-part written patterns, and have made at least one applique or colorwork project before. The individual techniques aren't extremely difficult, but managing many pieces and colors across 60-90 hours is what pushes this into advanced territory.
How do I keep the two sleeves and their fringe elements looking identical?
Work both Sleeves side by side rather than one at a time, completing each round on both before moving to the next, which keeps tension and color placement consistent. Do the same with the Sleeve Leaf Fringe Elements, attaching mirrored pairs in the same session.
What's the best way to store all my yarn colors while working on this project?
A yarn bowl or small divided caddy with each of the eight colors labeled keeps you from constantly hunting for the right shade mid-round. Many makers also wind small color-coded bobbins for CCA through CCG since you'll use them in short bursts throughout the feather units.