Free Pattern
Step-by-Step
Crochet
WearablesCrochet Granny Stitch Gown Dress With Flowers Pattern
Make a stunning crochet granny stitch gown dress with flower accents, strap shaping, and a fitted rib waist for a romantic, stylish handmade look.
Level IntermediateTime 6-9 HoursHook 3.5 mmYarn Worsted
Pattern highlights
- Locate and mark the middle stitch of your worked piece, then mark the 10th stitch in from each edge.
- Attach yarn at the middle stitch and single crochet evenly across to the marker on one side.
- Chain 11 to form the back strap opening, then skip the ten marked stitches on the other side.
- Resume single crocheting into each stitch to the end of the round, then join with a slip stitch.
- Work a turning chain and a full single crochet round across both stitches and chains to stabilize the strap edges.
- Shape the torso by working the non-increasing rounds evenly from underbust down to the waist.
- Complete the Center Rib and Edging rounds to finish the waist and hem cleanly.
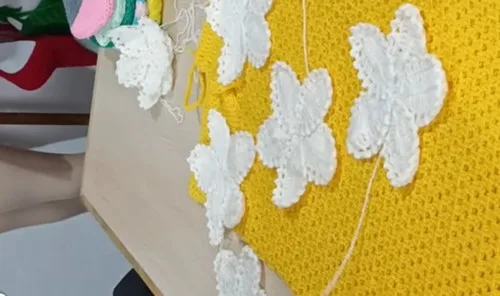
- Make the Small Flower Leaf motifs separately, then attach them to the straps or bodice as a finishing touch.
About This Pattern
This Granny Stitch Gown Dress is a flowy, feminine piece built around a fitted rib waist, a shaped bust band, and delicate flower appliques that add just the right touch of whimsy. What makes it special is the clever strap construction — worked directly into the top edge using marked stitches and a chained gap for the back strap — so the fit feels tailored rather than generic. It's perfect for crocheters who want to wear their craft, whether for a beach day, garden party, or a warm summer evening out.
You'll work with single crochet, chain spacing, double crochet flower petals, and a non-increasing rib section that shapes the torso from underbust to waist. Stitch markers are essential here, since you're locating a middle stitch and measuring ten stitches from each edge before setting up the straps. This is an intermediate-friendly project — comfortable if you've joined rounds and followed multi-part garment patterns before — and realistically takes a couple of focused evenings or one solid weekend to complete.
The finished gown drapes with soft, textured granny-stitch fabric, a snug ribbed midsection, and pretty leafy flower accents scattered across the bodice or straps. It feels substantial yet breathable in medium weight yarn, with a look that's equal parts boho and romantic. Made in a soft cotton blend or a bold solid color, this dress also makes a gorgeous handmade gift for a bride-to-be, a summer birthday, or anyone who loves standing out in something nobody else owns.
Variations
This gown is begging for color experimentation. Try a soft sage green body with cream and blush flowers for a garden-party vibe, or go dramatic with a black gown and bright red flower leaves for an evening-out statement piece. For a beachy feel, work the whole dress in a cotton-blend yarn like 24/7 Cotton or Hobbii Rainbow Cotton 8/8 in a sunny yellow or coral, which will hold the granny stitch texture crisply while staying breathable in warm weather. If you want a more delicate finish, swap the medium weight yarn for a DK weight and drop to a 3.0mm hook, which will shrink the flowers and give the whole gown a more refined, lacy drape — just expect a smaller overall fit. To size up, add extra single crochet stitches evenly around the Top/Bust Band before starting the strap setup so your middle-stitch marker still lands centered, and work an extra non-increasing round or two between underbust and waist for more torso length. For a layered, ombre effect, transition yarn colors row by row through the Center Rib & Edging section, shifting from a deep color at the waist to a lighter shade toward the hem. Themed versions are fun too: pastel flowers on white for a bridal shower gift, deep orange and brown blooms for an autumn wedding guest dress, or metallic gold flowers on a navy gown for a special occasion piece. You could also scatter the Small Flower Leaf motifs asymmetrically across one shoulder strap instead of centering them, giving each gown a unique, one-of-a-kind placement every time you make it.
I adore how this dress feels like real garment-making, not just a big granny square. Setting up the straps by marking the middle stitch and counting ten stitches from each edge felt so satisfying once I saw the strap gap appear exactly where it should. Chaining 11 for the back strap and skipping those marked stitches is such a clever trick — it shapes the neckline without any fussy shaping rows. The non-increasing rounds from underbust to waist give the dress a fitted, flattering silhouette instead of a shapeless tube, which honestly surprised me for a pattern built on such simple stitches. And then there are the flowers! Working the small flower leaf with a chain-9 base and popping in double crochet petals from the fourth chain is such a relaxing, meditative part of the process. Attaching them afterward feels like the reward step — suddenly a plain rib and bust band transform into something boutique-worthy. This pattern strikes that rare balance of being technically interesting enough to stay engaging, but still totally doable in a weekend. It's become one of my favorite makes to recommend to crocheters ready to level up from amigurumi into wearables.
Common mistakes
- Not marking the exact middle stitch
- Lay your work flat and count total stitches carefully, then place a locking stitch marker in the true center stitch before doing anything else — this keeps both straps symmetrical.
- Miscounting the 10 stitches in
- Count slowly and place the marker directly in the 10th stitch itself, not after it, and double-check both sides match before attaching yarn.
- Forgetting to skip the 10 marked
- After chaining 11, look for your stitch marker on the far side and place your next single crochet immediately after it, skipping the marked stitches entirely to form the strap opening.
- Losing track of the join point
- Always slip stitch into the very first single crochet of the round, then chain 1 and turn — use a contrasting scrap of yarn as a round-start marker if you tend to lose count.
- Working the flower's double crochet
- Remember the petal begins with a yarn over before inserting into the 4th chain from the hook — count chains carefully so your Small Flower Leaf petals stay even and full.
- Adding increases
- As the name suggests, these rounds should have zero added stitches — place one single crochet per stitch and recount your total stitch count at the end of each round to confirm it matches the round before.
Intermediate
Progress Tracker
0 of 0 rounds
Tap a round to tick it off — your place is saved on this device.
Materials
- 3.5 mm crochet hook
- Medium weight yarn
- Stitch markers (for the middle stitch, strap edges, and increase points)
- Darning needle (for joining flower leaves)
- Craft glue (optional, for a firmer flower shape)
The Top/Bust Band
Materials Hook: 3.5 mm crochet hook Yarn: Medium weight yarn Measurements: Your bust measurement Starting & Row 1 (Foundation Row)
Start with a slip knot. Chain until the length equals your bust measurement (e.g., 36 inches, 94 chains for creator).
Hold the last chain. Chain 3 (counts as the first Double Crochet - DC).
Yarn over and place 1 DC into the chain you are holding (the 4th chain from the hook).
Place 1 DC into each chain across to the end.
- Rows 2-12(Repeat for Coverage) Chain 3 (counts as DC) and turn . Place 1 DC into the second stitch and into each stitch across.Ensure your final DC is placed on top of the chain-3 turning chain of the previous row.Repeat this row until you have the desired height/coverage for your bust area (creator worked 12 rows).At the end of the last row, Chain 1 and cut off the yarn to fasten.
Connecting the Underbust Section
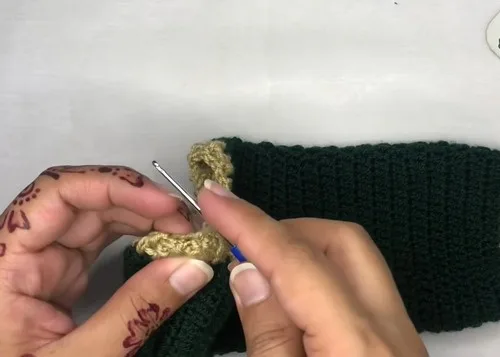
Setting up for the Straps (SC and Chain)
Identify the middle stitch of your work and mark it (e.g., 48th stitch).
From each edge, count in 10 stitches and mark the 10th stitch.
- Round 1Attach yarn to the middle stitch (remove marker), slip stitch , Chain 1 , and place 1 Single Crochet (SC) into the same stitch. Place 1 SC into each stitch across until you reach the stitch marker on the other side. Chain 11 (This is for the back strap). Skip the 10 marked stitches, and in the stitch immediately after the stitch marker, place 1 SC . Continue placing 1 SC into each stitch across to the end. Slip stitch into the first SC to join the round, then Chain 1 and turn .
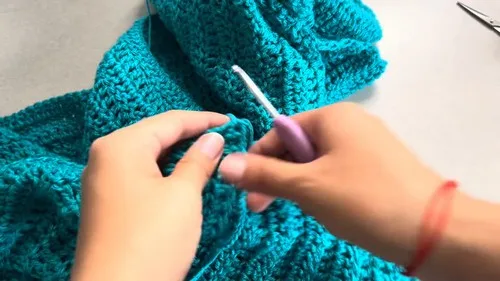
- Round 2Next Round: SC into the second stitch and continue placing 1 SC into each stitch and each chain around. Slip stitch into the first SC to join the round.
Non-Increasing Rounds (Underbust to Waist)
Chain 3 (counts as DC) and turn .
- Round 1(Granny Stitch): Place 1 DC into the very first stitch (you now have 2 DC). Skip 1 stitch, place 2 DC into the next stitch. Repeat from * to * all around.Join: Slip stitch on top of the starting chain 3.
- Round 2(Repeat Round): Chain 3 and turn . Place 1 DC into the first space (the space between the 2-DC clusters). Place 2 DC into the next space. Repeat placing 2 DC into each space all around.Join: Slip stitch on top of the chain 3.Repeat Round 2 until the work reaches the length from below your bust to your natural waist (creator worked 16 rows).
Increasing Rounds (Waist to Hip)
Marking: Identify the exact middle space on the side opposite the starting join (the back side) and mark it with a stitch marker.
- Row 17Increase Round (Row 17): Chain 3 and turn . Work 2 DC into each space until you reach the first marked increase point. Increase: In the marked space, work: 2 DC, Chain 1, 2 DC . Mark the chain-1 space. Work 2 DC into each space until you reach the second marked increase point. Second Increase: In the marked space, work: 2 DC, Chain 1, 2 DC . Mark the new chain-1 space. Work 2 DC into the remaining spaces. Slip stitch into the chain 3 to complete.Subsequent Increase Rounds: Repeat the Increase Round, always placing the increase (2 DC, Chain 1, 2 DC) in the marked chain-1 spaces and re-marking the new chain-1 spaces.Continue increasing until the work, when stretched slightly, reaches your full hip measurement (creator increased for 7 total rows).
Final Skirt Length
Remove the stitch markers.
Continue to repeat Round 2 (2 DC into every space, with no further increases ) until the gown reaches the desired full length (creator did a total of 90 rows for the full length).
A. Large Flower Leaf (Chain 15)
Start: Chain 15.
- Row 1(Foundation): Starting in the 2nd chain from the hook, work the following stitches sequentially: 1 SC, 1 HDC (Half Double Crochet), 1 DC (Double Crochet), 8 TR (Triple Crochet), 1 DC, 1 HDC, 1 SC (Last chain).Working Around: Chain 1, turn to work along the other side of the starting chain.
- Row 2(Working Around): Work the corresponding stitches into the opposite side: 1 SC, 1 HDC, 1 DC, 8 TR, 1 DC, 1 HDC, 1 SC . Chain 1 , and slip stitch into the first SC to join the round.
Center Rib & Edging
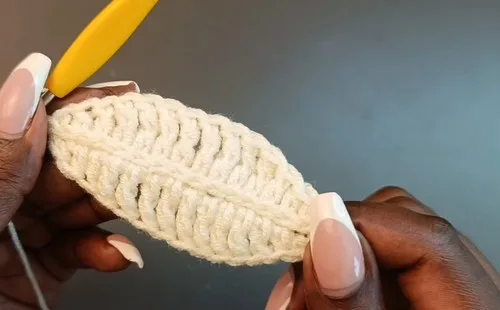
Center Rib: Chain 1. Slip stitch into each of the center spaces/chain connections all the way to the other end to make the leaf firm.
- Round 2(Netting): Work a pattern of HDC, Chain 1, Skip 1 all the way around, with the exception of the 3 stitches at the tips where you work HDC, Chain 1, HDC without skipping.
- Round 3(Picot Edging): Work a picot/puff stitch (Chain 2, slip stitch back into the same stitch) on top of every HDC, and slip stitch into the chain-1 spaces all the way around.
B. Small Flower Leaf (Chain 9)
This follows the exact same structure as the large leaf, but with a shorter starting chain and fewer stitches in the middle section.
Start: Chain 9 .
- Row 1(Part 1): Starting in the 2nd chain from the hook: 1 SC, 1 HDC, 1 DC, 2 TR, 1 DC, 1 HDC, 1 SC .Working Around: Chain 1, turn. 1 SC, 1 HDC, 1 DC, 2 TR, 1 DC, 1 HDC, 1 SC .Finish: Complete the Center Rib, Netting Round, and Picot Edging as detailed for the large flower.
Assembly
- Step 1Weave in all ends, leaving one long end on one leaf for joining.
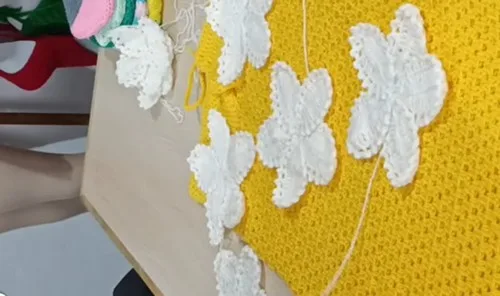
- Step 2Overlap the 5 large leaves to form one large flower, and sew them together at the tips with a darning needle and/or use glue for a firmer shape.
- Step 3Do the same for the smaller flowers (2 leaves each).
- Step 4Attach the assembled flowers to the dress.
Important notes
💡 Use a 3.5mm crochet hook consistently throughout the gown so your granny stitch fabric and rib section keep matching tension and gauge.
💡 Place a stitch marker in the middle stitch AND both 10th-stitch marks before you attach yarn — this trio of markers is the backbone of the entire strap setup.
💡 Choose a medium weight yarn with good stitch definition, like a cotton-acrylic blend, so the granny stitch texture and flower petals both hold their shape nicely.
💡 When working the Chain 11 for the back strap, keep your tension relaxed so the strap has enough stretch to go comfortably over the shoulder.
💡 Count your total stitches after every round in the Non-Increasing Rounds section to make sure the waist stays snug and doesn't accidentally widen or narrow.
💡 Keep a small bag of stitch markers on hand for the Center Rib & Edging rounds, since precise stitch placement there affects how neatly the finished edge lies against the body.
More photos
Original pattern: https://crocheteverything.com/crochet-granny-stitch-gown-dress-with-flowers-pattern-for-a-stylish-look/
FAQ
What yarn weight works best for this granny stitch gown?
A medium (worsted) weight yarn is ideal, giving the granny stitch body without making the dress too heavy. A cotton-acrylic blend also adds nice drape and breathability for warm-weather wear.
How do I make sure both straps come out even?
The key is accurately marking the middle stitch and the 10th stitch from each edge before you start — those three markers control the entire strap symmetry. Take your time counting rather than estimating.
Can I make this dress bigger or smaller?
Yes, you can adjust the stitch count in the Top/Bust Band before placing your middle and edge markers to change the overall width. Adding or removing non-increasing rounds also lets you customize the torso length.
How many flowers does the pattern use?
The pattern includes a Large Flower Leaf motif worked from a chain-15 base and a Small Flower Leaf motif worked from a chain-9 base, and you can make as many as you like to decorate the straps, bodice, or hem. Most crocheters make several to scatter across the design.
What hook size should I use?
A 3.5mm crochet hook is used throughout the pattern for both the gown body and the flower motifs. Keeping the same hook size helps maintain consistent gauge between the rib, bust band, and edging sections.