
Free Pattern
Step-by-Step
Crochet
AmigurumiBullfinch Amigurumi Pattern: Free Crochet Bird Tutorial
Make a plush bullfinch amigurumi with this free crochet bird pattern featuring a spiral-worked body, flat back panel, and detailed beak in worsted yarn.
Level IntermediateTime 4-6 HoursHook 4 mmYarn Worsted
Pattern highlights
- Begin the body in a continuous spiral, using a stitch marker to track each round as you shape and increase.
- Work the body through all its rounds without joining, keeping stitches snug so stuffing stays hidden inside.
- Add fiberfill gradually as the body rounds progress, packing it firmly rather than waiting until the end.
- Set the body aside and crochet the back panel flat, chaining 1 and turning at the start of every row.
- Make two matching wings using the same flat, turned-row technique as the back panel.
- Insert the safety eyes into the body and check placement before securing them permanently.
- Whip stitch the back panel, both wings, and the beak onto the body using fine thread or matching yarn to finish your bullfinch.
About This Pattern
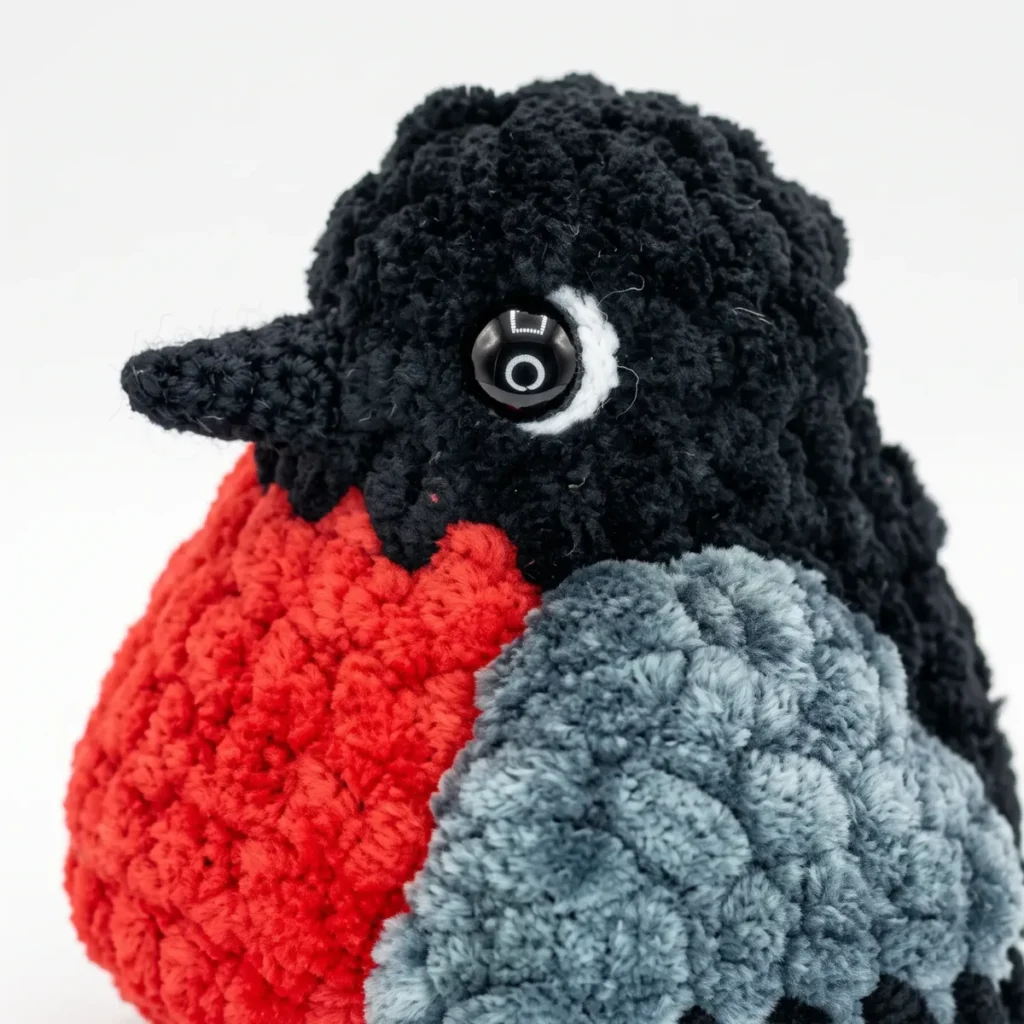
This pattern creates a plump little bullfinch amigurumi, complete with a rounded black-and-gray body, a rosy red back panel, delicate wings, and a tiny detailed beak. What makes it special is the use of plush or velvet yarn, which gives the finished bird an irresistibly soft, realistic feather-like texture instead of the usual smooth acrylic look. It's perfect for crocheters who love bird watching, nature-themed nurseries, or anyone wanting a stuffed animal that feels a little more grown-up and sculptural than a typical round amigurumi.
Once assembled, you'll have a compact, huggable bird with a distinctly bullfinch silhouette: a full black head and wings, a warm red chest and back, and a neat little beak worked in fine detail with the steel hook. The plush yarn gives it a plump, tactile finish that feels wonderful in the hands, making it a lovely handmade gift for a birder, a cozy addition to a shelf of woodland creatures, or a sweet nursery decoration.
Variations
This bullfinch pattern is wonderfully easy to customize once you understand the basic construction. For a classic bullfinch look, stick with black, red, white, and gray, but try swapping in a rusty orange or deep coral for the chest instead of true red for a robin-inspired variation. You could also make an all-gray or all-cream version using a plush yarn like Bernat Baby Velvet or Comfy Cotton Blend for a softer, more neutral nursery-friendly bird. If you want a bigger huggable version, work the body and back panel with a bulkier weight yarn and a larger hook (try 5mm), which will naturally increase your stitch counts and finished size without changing the pattern's basic shaping logic. For a mini keychain-sized bullfinch, drop down to a 3mm hook with sport weight yarn and add fewer rounds of increases before you begin the straight body rounds. Consider working the wings in a two-tone gradient by carrying a second color partway through the flat rows for a more painterly, realistic wing effect. Swap the black for a rich navy or plum velvet yarn for a moodier, elegant finish that would look wonderful on a bookshelf. If you're making a set, whip up a companion cardinal by keeping the same black beak and body shape but working the entire back panel and wings in solid red instead of the bullfinch's black-and-red combo. You could also experiment with embroidering tiny wing details or adding a fluffy pom-pom tail for extra texture. Whatever direction you take it, this construction method — spiral body, flat back panel, fine beak detail — adapts beautifully to all kinds of little garden bird variations.
I adore how this bullfinch pattern blends two amigurumi techniques into one satisfying project — the body and beak worked in continuous spiral rounds for that seamless, no-gap finish, while the back panel and wings are stitched flat in turned rows with a chain 1 at the start of each. That contrast keeps the hook moving in fresh ways so it never feels repetitive. Using plush or velvet yarn instead of standard worsted is a game changer here; the finished bird has this soft, almost feathery texture that makes it feel so much more like a real little creature. I especially love working the beak with the tiny steel 1.5mm hook — it's such a satisfying bit of fine detail work that gives the face so much personality. Sewing the red back panel and black wings onto the body is where the bullfinch really comes to life, and that moment when the safety eyes go in and it suddenly looks back at you? Pure magic. This is a project that rewards patience with a genuinely gorgeous, gift-worthy result.
Common mistakes
- Losing track of the round start in
- Place a stitch marker in the first stitch of every round and move it up as you go — without a join, it's the only way to know where each round truly begins and ends.
- Forgetting to chain 1 and turn
- Since these pieces are worked flat rather than in a spiral, skipping the chain 1 and turn will distort your row height and edges — get in the habit of doing it every single row before starting your first stitch.
- Stuffing the body too loosely, causing
- Work your stitches at a tension tight enough that stuffing doesn't peek through, and stuff firmly in small amounts as you go rather than cramming it all in at the very end.
- Sewing the safety eyes in before
- Insert the eyes without securing the backs first, hold the piece up, and adjust positioning until the bullfinch's expression looks right before locking them into place.
- Attaching the back panel, wings
- Use sewing thread or a fine strand of matching black yarn to whip stitch these pieces on invisibly, keeping your seams tidy and letting the plush texture take center stage.


Intermediate
Progress Tracker
0 of 0 rounds
Tap a round to tick it off — your place is saved on this device.
Materials
Yarn
- Worsted weight plush/velvet yarn in black, red, small amounts of white, and gray
Hook
- US G-6 (4 mm) for the main pieces
Hook
- US steel size 8 (1.5 mm) for fine detail work on the beak
Safety eyes
- 6–8 mm, 1 pair
- Stuffing / fiberfill
- Stitch marker
- Yarn needle
- Scissors
- Sewing thread or fine black yarn for attaching the back panel, wings, and beak
Body
Begin with white yarn.
- Round 16 sc in MR. (6)
- Round 2inc in each st around. (12)Change to red yarn.
- Round 3sc in each st around. (12)
- Round 4sc, inc repeat around. (18)
- Round 53 sc, sc, inc repeat around x6, 3 sc. (24)
- Round 63 sc, 2 sc, inc repeat around x6, 3 sc. (30)
- Round 7-9sc in each st around. (30)
- Round 103 sc, 2 sc, dec repeat around x6, 3 sc. (24)
- Round 11-12sc in each st around. (24)
- Round 133 sc, sc, dec repeat around x6, 3 sc. (18)Change to black yarn.
- Round 147 sc, dec repeat around x2. (16)
- Round 15-16sc in each st around. (16)
- Round 172 sc, dec repeat around x4. (12)Stuff the body firmly now, paying close attention to the belly, before closing the final round.
- Round 186 dec. (6) Fasten off, leaving a yarn tail for closing.
Back Panel
On the back of the head, mark 7 sts symmetrically and work 7 sc into them to begin. Chain 1 and turn at the start of every row that follows.
- Round 1sc across. (7)
- Round 2sc across. (7)
- Round 3inc, 5 sc, inc. (9)
- Round 4sc across. (9)
- Round 5sc across. (9)
- Round 6sc across. (9)
- Round 7sc, dec, 3 sc, dec, sc. (7)
- Round 8sc across. (7)
- Round 9sc, dec, sc, dec, sc. (5)
- Round 10sc across. (5)
- Round 11sc across. (5)
- Round 12sc across. (5)
- Round 13sc across. (5)
- Round 14sc, 2 dec. (3)
- Round 15sc across. (3)
- Round 16sc across. (3)
- Round 17sc across. (3)
- Round 18inc, sc, inc. (5) Fasten off, leaving a long tail for sewing.
Wing (make 2)
Make 2Begin with gray yarn. Chain 4, turn, and beginning in the 2nd chain from the hook, work Row 1.
- Row 1sc across. (3)
- Row 2inc, sc, inc. (5)
- Row 3inc, 3 sc, inc. (7)
- Row 4inc, 5 sc, inc. (9)Change to black yarn.
- Row 5sc across. (9)
- Row 6sc across. (9)
- Row 7sc across. (9)
- Row 8sc across. (9)
- Row 9sc, dec, 3 sc, dec, sc. (7)
- Row 10sc, dec, sc, dec, sc. (5)
- Row 11sc, 2 dec. (3)
- Row 12sc, dec. (2) Fasten off, closing the last stitch and leaving a tail for sewing.
Beak
Using black yarn and the smaller hook, chain 10 and join with a sl st to form a ring. Begin counting rounds.
- Round 1sc in each st around. (9)
- Round 2sc in each st around. (9)
- Round 3sc in each st around. (9)
- Round 4sc, dec repeat around x3. (6)
- Round 5sc in each st around. (6)
- Round 63 dec. Fasten off, weaving the tail end into the inside of the beak to close it.
Assembly
- Step 1Before attaching the Back Panel, decide on eye placement and insert the safety eyes into the Body, securing them from the inside.
- Step 2Pin the Back Panel to the Body, aligning it at the back of the head. Using black yarn and a whipstitch, sew neatly around the entire perimeter.
- Step 3Let the tail edge of the Back Panel extend past the edge of the belly by approximately 3–4 rows to form the bird’s tail.
- Step 4Pin each Wing symmetrically to the Body, relative to the Back Panel and the belly, and whipstitch neatly in place using the yarn tail left from Row 12.
- Step 5Sew the Beak onto the front of the head, centering it below the eyes.
- Step 6Using white yarn, work a few small stitches along the top edge of each eye so it stands out clearly against the black head.
- Step 7Weave in all remaining yarn ends and trim any excess.
Important notes
💡 Keep two hooks handy — the US G-6 (4mm) for the body, back panel, and wings, and the tiny steel 1.5mm for the beak's fine detail rounds — swapping mid-project is much easier if both are already threaded and ready.
💡 Since the body and beak are worked in a continuous spiral with no joining, a stitch marker isn't optional — move it up every single round so you never lose count partway through.
💡 Choose a plush or velvet worsted yarn specifically, since the fuzzy texture is what gives this bullfinch its signature soft, feathery look — a standard smooth acrylic will change the finished feel quite a bit.
💡 Work your stitches on the snugger side throughout, especially on the body, since gauge isn't critical here but a tight tension is essential to keep stuffing from showing through the plush fibers.
💡 Stuff as you go rather than waiting until the round is closed — feeding small amounts of fiberfill in every few rounds keeps the shape even and prevents lumpy pockets.
💡 Save your sewing thread or fine black yarn for final assembly of the back panel, wings, and beak — a finer thread creates nearly invisible seams that let the plush yarn's texture shine.
💡 This pattern is written in US crochet terminology throughout, so double-check your stitch conversions if you're more used to UK terms.
💡 For invisible decreases on the Body, insert your hook into the front loops of the next two stitches only, then pull the yarn through both before completing the single crochet — this keeps decrease rounds smooth rather than bumpy.
Original pattern: https://amigurumicorner.com/bullfinch-amigurumi-pattern/
FAQ
Do I need to know continuous spiral crochet before starting this pattern?
Yes, the body and beak are both worked in continuous spiral rounds without joining or chaining, so you should be comfortable using a stitch marker to track rounds. If you've made a basic amigurumi ball before, you already have the skill needed here.
Why does the pattern call for two different hook sizes?
The US G-6 (4mm) hook is used for the main body, back panel, and wings, while the tiny US steel size 8 (1.5mm) hook is reserved for the beak's fine detail work. This size difference lets the beak stay small and tightly stitched while the rest of the bird stays plush and full.
Can I use regular worsted weight yarn instead of plush or velvet yarn?
You can, but the plush or velvet yarn is really what gives this bullfinch its soft, feathery texture and signature look. Regular worsted will still work up the same shape, just with a smoother, less fluffy finish.
How much stuffing will I need for the body?
The pattern doesn't specify an exact amount since it depends on your tension, but plan to stuff firmly and in small increments as you work through all 18 rounds of the body. Work your stitches tightly enough that the fiberfill doesn't show through the plush yarn.