
Free Pattern
Step-by-Step
Crochet
GarmentsCrochet Heart Cutout Cardigan: Butter Yellow Retro Project
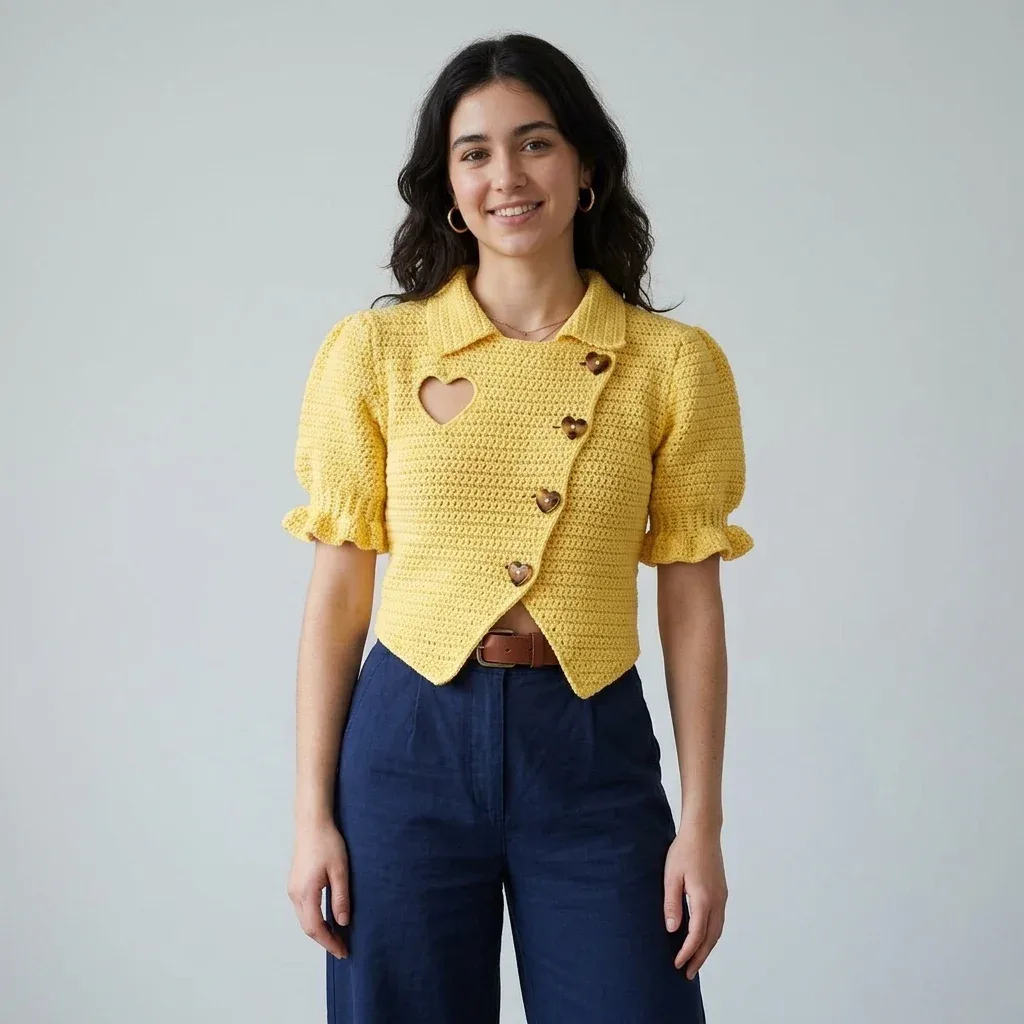
Crochet a butter yellow heart cutout cardigan with a pointed hem and heart buttons. Written pattern with sizing notes, tips, and full construction guidance.
Level IntermediateTime 10-14 HoursHook 4.00 mmYarn Worsted
Pattern highlights
- Work the Back Panel flat from its foundation chain in straight single crochet rows until it reaches the target width and height.
- Introduce decreases at the Back Panel's edges to taper the piece before finishing that section.
- Start the Front Panel from a wider foundation chain, working straight rows first to establish the base width.
- Begin shaping the pointed hem by decreasing at one edge every row, forming a gradual diagonal taper toward a sharp point.
- Partway through the Front Panel, work the designated rows that create the heart-shaped cutout on the upper portion of the piece.
- Continue the Front Panel through its remaining rows until the diagonal point and heart opening are both complete.
- Crochet both sleeves separately, then seam the Back Panel, Front Panel, and sleeves together into the cardigan body.
- Finish with the collar, cuffs, and button bands, then sew on the four heart-shaped buttons to complete the look.
About This Pattern
This cardigan is built entirely from single crochet, yet the finished silhouette feels anything but basic — a soft butter yellow body with a dramatic pointed hem and a heart-shaped cutout peeking through the front panel. It's the kind of piece that turns a simple stitch into something sculptural, perfect for crocheters who want a wearable win without tackling lace or cables. If you love pattern with a story, or you're searching for a statement layer to throw over tees and dresses, this design was made for you.
The whole garment relies on just single crochet and sc2tog decreases, but the magic is in the shaping: gradual diagonal decreases form that sharp pointed hem, while a carefully placed opening on the front panel becomes the heart cutout. Expect to work two large flat panels row by row, watching stitch counts shift as the piece takes shape. Because there's no complicated stitch pattern to memorize, this is approachable for confident beginners, though the shaping and seaming steps make it a satisfying stretch for intermediate makers. Plan on spreading the work over several sittings.
Once seamed, this cardigan reads as a relaxed, open-front layer with an asymmetrical front panel that wraps softly across the body, a tapered point at the hem, and four heart-shaped buttons standing in for closures with charm rather than function. Worked in a warm butter yellow cotton blend, it has an airy, breathable drape that feels perfect for transitional weather. It also makes a genuinely thoughtful handmade gift — sentimental, wearable, and unmistakably one of a kind.
Variations
This design is a wonderful canvas for personalization, starting with color. Swap the butter yellow for a dusty rose or soft sage cotton blend for a completely different mood, or go bold with a rust or terracotta for an autumn-ready version. If you want the heart cutout to really pop, work the Front Panel in your main color but consider a subtly variegated or heathered yarn so the opening catches the eye even more. Button lovers can experiment too — try pearl-style or wooden heart buttons instead of the classic heart-shaped ones for a more rustic or vintage look, or use mismatched vintage buttons for a scrappy, collected feel. For yarn substitutions, any worsted weight cotton or cotton-blend yarn that meets gauge will work beautifully; a cotton-acrylic blend can add a bit more drape and stretch if you want a softer hand, while 100% cotton keeps the structured, crisp point at the hem looking sharp. If you're making this for a different size, remember that both panels are worked flat from a foundation chain, so you can add or subtract multiples of stitches to the starting chain before working the first row, then re-check your row counts against the target measurements listed for the Back Panel and Front Panel as you go. You could also lengthen or shorten the body before the decrease rows begin if you want a cropped or longer silhouette. For an extra-special gift version, consider working the heart cutout panel in a coordinating contrast color peeking through, so the heart shape reads as a color-blocked design element rather than a subtle cutout.
I fell for this cardigan the moment I saw that heart cutout peeking out from the front panel — it's such a clever way to turn plain single crochet into something with personality. There's something so satisfying about watching the pointed hem emerge row by row as you work those decreases; it feels like sculpting fabric instead of just stitching rows. The back and front panels build steadily, so you always know exactly where you are, and the heart-shaped buttons are the kind of detail that makes people stop and ask where you got your cardigan. I also love that it's worked flat in simple single crochet, which means your hands can relax into a rhythm while the shaping does all the visual heavy lifting. By the time you're seaming panels and attaching those buttons, it stops feeling like a project and starts feeling like a wardrobe staple you'll reach for constantly.
Common mistakes
- Losing track of the turning chain and accidentally working into it.
- Remember the ch-1 at the start of each row does not count as a stitch here, so start your first single crochet directly in the first actual stitch, not into the chain space.
- Miscounting stitches during the long straight rows on the Back Panel before shaping begins.
- Place a stitch marker every 10-20 stitches across the row so you can quickly spot-check your count against the 86 sc total without recounting from scratch every time.
- Working the sc2tog decreases inconsistently, causing an uneven or lumpy pointed hem.
- Always insert your hook the same way for both loops of the sc2tog and keep your tension consistent; if the point looks wavy, block the piece firmly with rust-proof pins to straighten the edge.
- Placing the heart cutout in the wrong position on the Front Panel.
- Double-check that the cutout begins at the correct row and sits between the specified stitch range on the upper left as worn, since this determines where the heart appears once the cardigan is on the body.
- Forgetting that the Front Panel wraps asymmetrically and mirroring it like a symmetrical piece.
- Keep track of which side is the right side (RS) throughout, since Row 1 is always RS and the asymmetry only reads correctly if the panel orientation is kept consistent.
- Skipping gauge swatching because the stitch pattern looks simple.
- Since the entire fit depends on straightforward single crochet, even small tension differences compound over 80+ stitches per row, so swatch and adjust your hook size before starting the Back Panel.


Intermediate
Progress Tracker
0 of 0 rounds
Tap a round to tick it off — your place is saved on this device.
Materials
Yarn
- Worsted weight, 100% cotton or a cotton blend works best. You’ll need approximately 800 to 900 yards (730 to 820 meters) in butter yellow.
Some great yarn options include
- Lion Brand 24/7 Cotton in Buttercup (5 skeins)
- Paintbox Yarns Simply DK in Daffodil Yellow (7 skeins)
- Drops Safran in Yellow (5 skeins)
Hook
- US Size G-6 / 4.00 mm. Adjust as needed to meet gauge.
Notions
- Yarn needle for seaming
- At least 6 stitch markers
- 4 heart-shaped buttons, approximately 1 inch (2.5 cm) wide
- Sewing needle and coordinating thread
- Scissors
- Rust-proof pins for blocking
Back Panel
Foundation chain: Ch 87.
After Row 36, the piece should measure approximately 6.5 inches (16.5 cm) tall and 17.2 inches (43.7 cm) wide.
After Row 60, the back should measure approximately 14.5 inches (37 cm) from foundation chain.
Shoulder markers: Place a stitch marker in st 1, st 22, st 51, and st 72 to mark the two shoulder sections (22 sts each) and the neckline center (28 sts).
Fasten off after the Right Shoulder rows, leaving a 12 inch tail for seaming.
Rejoin yarn at st 51 to begin the Left Shoulder section.
Fasten off after the Left Shoulder rows, leaving a 12 inch tail for seaming.
The center 28 sts between the shoulders form the back neckline opening. Do not work these; they will be picked up for the collar.
- Round 1(RS): Sc in 2nd ch from hook and in each ch across. Ch 1, turn. (86 sc)
- Round 2through 36: Sc in each st across. Ch 1, turn. (86 sc each row)(86)
- Round 37(RS): Sl st across first 5 sts, ch 1, sc in same st as last sl st (this is the 5th st), sc across to last 4 sts, leave last 4 sts unworked. Ch 1, turn. (78 sc)
- Round 38Sc2tog, sc across to last 2 sts, sc2tog. Ch 1, turn. (76 sc)
- Round 39Sc2tog, sc across to last 2 sts, sc2tog. Ch 1, turn. (74 sc)
- Round 40Sc2tog, sc across to last 2 sts, sc2tog. Ch 1, turn. (72 sc)
- Round 41Sc across even. Ch 1, turn. (72 sc)
- Round 42through 60: Sc in each st across. Ch 1, turn. (72 sc each row)(72)
- Round 61(Right Shoulder): Sc in first 22 sts only. Ch 1, turn. (22 sc)
- Round 62Sc2tog, sc across. Ch 1, turn. (21 sc)
- Round 63Sc across to last 2 sts, sc2tog. Ch 1, turn. (20 sc)
- Round 61(Left Shoulder): Sc in last 22 sts. Ch 1, turn. (22 sc)
- Round 62Sc across to last 2 sts, sc2tog. Ch 1, turn. (21 sc)
- Round 63Sc2tog, sc across. Ch 1, turn. (20 sc)
Front Panel
Foundation chain: Ch 97.
The pointed hem is created by working decreases at the right edge to form a gradual diagonal ending in a sharp point.
The heart cutout is positioned on the upper left of the front panel (as worn). The cutout begins at Row 37 and sits between sts 58 and 74.
- Round 1(RS): Sc in 2nd ch from hook and in each ch across. Ch 1, turn. (96 sc)
- Round 2through 10: Sc in each st across. Ch 1, turn. (96 sc each row)(96)
- Round 11Sc across to last 2 sts, sc2tog. Ch 1, turn. (95 sc)
- Round 12Sc across to last 2 sts, sc2tog. Ch 1, turn. (94 sc)
- Round 13Sc across to last 2 sts, sc2tog. Ch 1, turn. (93 sc)
- Round 14Sc across to last 2 sts, sc2tog. Ch 1, turn. (92 sc)
- Round 15Sc across to last 2 sts, sc2tog. Ch 1, turn. (91 sc)
- Round 16Sc across to last 2 sts, sc2tog. Ch 1, turn. (90 sc)
- Round 17Sc across to last 2 sts, sc2tog. Ch 1, turn. (89 sc)
- Round 18Sc across to last 2 sts, sc2tog. Ch 1, turn. (88 sc)
- Round 19Sc across to last 2 sts, sc2tog. Ch 1, turn. (87 sc)
- Round 20Sc across to last 2 sts, sc2tog. Ch 1, turn. (86 sc)
- Round 21through 36: Sc in each st across. Ch 1, turn. (86 sc each row)(86)
- Round 37(RS): Sc across first 57 sts. Place marker in st 57. Sc in next 17 sts (sts 58 through 74). Place marker in st 74. Sc in remaining 12 sts. Ch 1, turn. (86 sc)
- Round 38(WS): Sc across first 57 sts to first marker. You will now work only these 57 sts for the right section of the heart. Ch 1, turn. (57 sc working section)
- Round 39(RS): Sc across 57 sts. Ch 1, turn. (57 sc)
- Round 40(WS): Sc across 57 sts. Ch 1, turn. (57 sc)
- Round 41(RS): Sc across 57 sts. Do not fasten off. Place working loop on a stitch m
Assembly
- Step 1Step 1: Block all pieces before seaming. Wet block by soaking in cool water for 10 minutes, pressing out excess water in a towel, and pinning to measurements on a foam mat. Allow to dry completely.
- Step 2Step 2: Seam shoulder seams as described in the collar section.
- Step 3Step 3: Seam side seams with WS together using whipstitch or slip stitch from hem to armhole.
- Step 4Step 4: Seam sleeves by folding each sleeve flat and seaming the side edge to form a tube.
- Step 5Step 5: Set in sleeves with RS facing outward. Pin the sleeve cap around the armhole, gathering slightly at the top for the puff effect. Seam with slip stitch from the RS for a visible seam finish.
- Step 6Step 6: Attach collar to any remaining open neckline edges using slip stitch on WS.
- Step 7Step 7: Sew buttons onto the left front overlap using coordinating thread.
- Step 8Step 8: Weave in all remaining ends securely.
Important notes
Work a gauge swatch in single crochet before starting, since the Back Panel and Front Panel both rely on precise stitch counts across wide rows to reach the finished measurements.
Use stitch markers generously, especially near the heart cutout section on the Front Panel, so you always know exactly where the opening begins and ends.
Block your pieces with rust-proof pins before seaming, particularly the pointed hem areas, to help the diagonal decreases lie flat and crisp rather than curling.
Keep your ch-1 turning chains consistent in tension throughout both panels, since uneven turning chains can distort the straight side edges where seaming will later occur.
Sew on the four heart-shaped buttons only after both panels are fully seamed and the button bands are complete, so placement matches the finished proportions of the cardigan.
Work the Back Panel and Front Panel in the same lighting and seating position when possible, since consistent tension across multiple sittings keeps both large panels uniform in width.
The cardigan body is worked in two separate flat pieces: the Back Panel and the Front Panel. The Front Panel is one continuous piece that wraps asymmetrically when worn.
Construction order: Back Panel, Front Panel (including heart cutout), both Sleeves, seaming, Collar, Cuffs, Button Bands, button attachment.
Right side (RS) of the fabric is the side facing you on all odd-numbered rows. Row 1 is always RS.
Turning chain: Chain 1 at the beginning of every row. This chain 1 does NOT count as a stitch unless specifically noted.
All measurements given are after blocking.
Ruffle Stitch (for sleeve cuffs): Row 1 of ruffle: Work 2 sc in every stitch across, doubling the stitch count. Row 2 of ruffle: Chain 1, turn, work 1 sc in each stitch across. The ruffle waves and flutes naturally because the stitches are doubled.
Heart Cutout technique: split the work into two sections for 4 rows, creating a gap, then rejoin the sections while shaping the curved top of the heart with a few decreases. Full row-by-row instructions are included in the pattern.
Gauge: 20 single crochet stitches and 22 rows = 4 inches (10 cm), worked flat and blocked. Make a swatch at least 6 inches by 6 inches, block it, then measure.
Finished Measurements (Size Small, US 4-6): Bust 34 inches (86.5 cm); Length (center back, excluding collar) 14.5 inches (37 cm); Sleeve length (underarm to ruffle hem) 7 inches (18 cm); Upper arm circumference 13 inches (33 cm); Collar height 2 inches (5 cm).
FAQ
How much yarn do I actually need for this cardigan?
Plan on approximately 800 to 900 yards of worsted weight cotton or cotton-blend yarn in butter yellow. It's a good idea to have a little extra on hand since the Front Panel includes the heart cutout shaping, which can use yarn slightly differently than a plain panel.
Do I need to know any special stitches for the heart cutout?
No special stitches are required — the heart cutout is created through careful placement of your working rows rather than a decorative stitch pattern. You simply work around the designated opening at the correct rows and stitch range on the Front Panel.
Why does the Front Panel have so many more rows than the Back Panel?
The Front Panel is one continuous piece that wraps asymmetrically across the body when worn, which requires more rows to accommodate both the heart cutout and the pointed hem shaping. The Back Panel is simpler and more symmetrical by comparison.
What size buttons should I use if I can't find 1-inch heart-shaped ones?
Any decorative button close to 1 inch (2.5 cm) wide will work well, since the buttons here are primarily a charming detail rather than a functional closure. Just make sure the shank or holes allow for secure sewing with your coordinating thread.
Can I make this cardigan in a solid color without the heart cutout showing as a contrast?
Absolutely — the heart cutout will still show as a shaped opening in the fabric even if you use just one color throughout. Some crocheters do choose a contrast color behind the cutout for extra visual pop, but it's entirely optional.