
Free Pattern
Step-by-Step
Crochet
AmigurumiCarrot bunny amigurumi crochet pattern
A one-piece carrot and bunny amigurumi in plush yarn, worked in a continuous spiral.
- Level
- Intermediate
- Time
- 4-6 hours
- Hook
- 4.0 mm
- Yarn
- Worsted
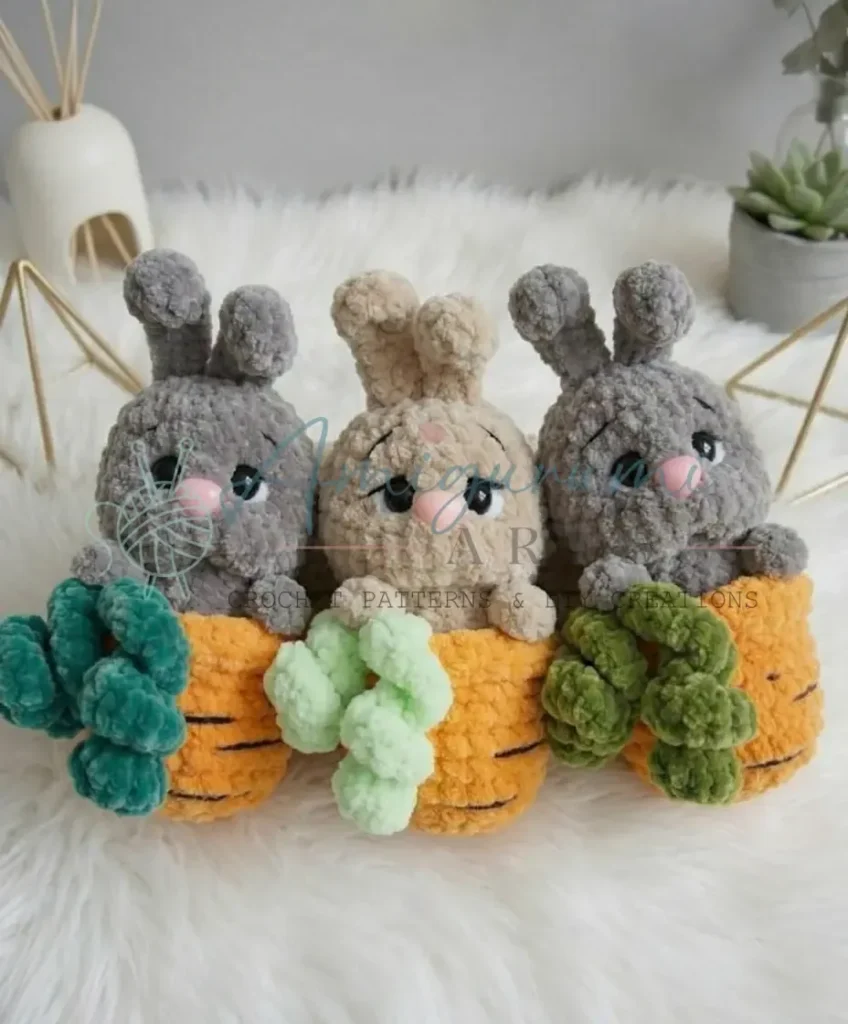
Pattern highlights
- Start the carrot section in contrast yarn, working a tight continuous spiral from a magic ring.
- Keep working rounds straight up through the body into the neck, stuffing firmly as you go.
- Continue into the head, increasing then decreasing to shape it, pausing to insert the safety nose and eyes at their marked rounds.
- Finish the head with final decrease rounds, closing the opening once stuffing is complete.
- Work both ears flat from a short foundation chain and set them aside with long tails for sewing.
- Add a folded-loop edging around the carrot opening, then sew on the two curls and the ears to finish.
About This Pattern
I keep a shelf for the small weird ones — the amigurumi that don't fit neatly into animal or food. This bunny tucked inside a carrot belongs there. It's two color sections worked as a single piece, which means no seam where vegetable meets rabbit. That kind of construction detail is exactly why I file it away.
The techniques are straightforward amigurumi grammar: magic ring start, spiral increases, a color change partway up the body, and safety eyes set between specific rounds. The ears are worked flat from a short foundation chain, then sewn on, which is a nice contrast to the spiral body. Nothing here is unusual on its own — the combination is what's charming.
Finished, it's a palm-sized bunny peeking out of an orange carrot shell, with two curls sewn at the top for garnish. It's plush yarn, so the surface has that soft velvet look rather than sharp stitch definition. It reads as a toy, not a display piece, and I think that's the point.
The finished toy stands approximately 14 cm (5.5 inches) tall — a good size for small hands or a desk companion. Gauge is not critical for this project, but your fabric should be tight enough that stuffing does not show through.
Worth knowing
What I like about this one is the color change built right into the spiral — no cutting the yarn, no second piece to join, just carrot becoming bunny mid-round. The safety eye placement is specific: five single crochets between the posts, nose set a round earlier. That kind of precision matters more in amigurumi than people expect, because a half-round off changes the whole expression. The ears break the pattern of continuous rounds entirely — worked flat off a chain of six, then pinned on and angled outward by hand, which gives you room to make the face your own. And the carrot top gets its own small flourish: two curls, sewn on after the edging round is done. It's a quick make with a few genuinely satisfying decision points.
Common mistakes
- Losing track of the round start Keep a stitch marker in the first stitch of every round and move it up as you go. In a continuous spiral there's no join to tell you where you are.
- Eyes placed without measuring Count five single crochets between the two eye posts before inserting the washers. Eyeballing the gap usually ends up crooked.
- Stuffing too late Start adding fiberfill as soon as the pattern says to, not after the opening is nearly closed. Pushing stuffing through a small gap distorts the stitches.
- Ears sewn on flat and centered Pin the ears angled slightly outward before sewing, not pointing straight up. Symmetry matters more than exact placement.
- Carrot edging worked into both loops Work the edging into the unworked front loops only, left from the earlier round. Picking up both loops skips the detail the pattern is going for.


Intermediate
Progress Tracker
0 of 0 rounds
Tap a round to tick it off — your place is saved on this device.
The kit
Main color yarn
- Plush/velvet yarn, approx. 30 g (bunny body color)
Contrast color yarn
- Plush/velvet yarn, approx. 30 g (carrot — orange recommended)
Hook
- US G-6 / 4.0 mm
Safety eyes
- 10 mm × 2
Safety nose
- 12×10 mm or 10×11 mm × 1
Stuffing
- Fiberfill (polyester fiberfill or similar)
Stitch marker
- To mark the beginning of each round
Tapestry needle
- Large eye, for sewing parts and embroidery
Scissors
- Scissors
Body (Carrot + Bunny — worked as one piece)
Begin with contrast color yarn (carrot section).
Round 16 sc in MR. (6)
Round 2Inc in each st around. (12)
Round 3(3 sc, inc) repeat 3 times. (15)
Round 4(4 sc, inc) repeat 3 times. (18)
Round 5(5 sc, inc) repeat 3 times. (21)
Round 6(6 sc, inc) repeat 3 times. (24)
Rounds 7–9Sc in each st around. (24) (3 rounds)(24)
Round 10Working in BLO for this round only: (4 sc, dec) repeat 4 times. (20)
The unworked front loops of Rnd 10 will be used later to add the carrot edging and curls. Do not fasten off — change to main color yarn.
Round 11Change to main color yarn. Sc in each st around. (20)
Round 129 sc, right paw (worked in FLO of a temporary loop at the base of the paw position: sl st, ch 4, 1 dc in 2nd ch from hook, 1 hdc, 1 sc, sl st into the front wall of the st at the base where you began the paw) , 4 sc, left paw (same as right paw) , 5 sc. (20)
Round 13(2 sc, dec) repeat 5 times. (15)
The carrot-and-body section is now complete. The head is worked directly from here — do not fasten off.
Head (continued from Body)
Round 14Inc in each st around. (30)
Rounds 15–17Sc in each st around. (30) (3 rounds)(30)
Round 18(3 sc, dec) repeat 6 times. (24)
Rounds 19–20Sc in each st around. (24) (2 rounds)After completing Rnd 20: Insert the safety nose between Rnds 18 and 19. Insert safety eyes between Rnds 19 and 20 with 5 sc between the two eye posts (measured post to post). Begin adding fiberfill now and continue stuffing as the opening closes.(24)
Round 21(2 sc, dec) repeat 6 times. (18)
Round 22(1 sc, dec) repeat 6 times. (12)
Round 23Dec 6 times. (6)Fasten off, leaving a short tail. Thread tail through remaining 6 sts, pull tight to close. Weave in end.
Ears (Make 2)
With main color yarn and G-6 / 4.0 mm hook.
Foundation Chain: Ch 6. Starting in the 2nd ch from hook: 3 dc in one st, 1 hdc, 1 sc, 1 sc, 1 sl st.
Leave a long yarn tail for sewing.
Small Carrot Curl (Make 1)
Foundation Chain: Ch 10. Starting in the 2nd ch from hook: (2 sc in same st) repeat 8 times, 1 sc in last st.
Leave a yarn tail for attaching.
Large Carrot Curl (Make 1)
Foundation Chain: Ch 15. Starting in the 2nd ch from hook: (2 sc in same st) repeat 13 times, 1 sc in last st.
Leave a yarn tail for attaching.
Assembly
Step 1Ears: Pin the ears to the top of the head and sew them in place using the long yarn tail and your tapestry needle. Position them symmetrically, angled slightly outward. Secure firmly, weave in end.
Step 2Carrot edging: Turn the finished body upside down so the carrot tip faces up. Insert your hook into the unworked front loops from Rnd 10 and work 24 sc around the entire opening . Then work one more round of 24 sc around. Fasten off, weave in end.
Step 3Carrot curls: Sew the small and large curls between Rnds 10 and 11 of the body (at the color-change line between carrot and bunny) using their yarn tails. Space them attractively at the top center of the carrot.
Step 4Eye tightening (optional but recommended): Thread a needle with a long length of matching yarn. Insert the needle from the underside of the face between Rnds 14 and 15, offset 1 st from center. Bring it out at the lower outer corner of one eye. Re-insert at the lower inner corner of the same eye and return to the starting point, shifted 1 st. Repeat this path once more. Pull both thread ends evenly so the eyes settle downward and look natural. Knot securely and hide the ends inside the head.
Step 5Eye embroidery:
Step 6Using white yarn, embroider small highlights (whites) on the eyes.
Step 7Using black yarn, embroider upper eyeliner flicks on each eye.
Step 8Embroider small eyebrows above each eye in black.
Step 9Carrot vein lines: Using black yarn and your tapestry needle, embroider thin vertical lines along the carrot section to create a realistic carrot texture.
Step 10Weave in all remaining ends.
Finishing
- Insert the safety nose and eyes at their marked rounds before the head closes, spacing the eyes five stitches apart post to post.
- Stuff firmly as the head rounds decrease, packing extra fiberfill into the neck so the head doesn't wobble.
- Work the front-loop edging around the carrot opening, then sew on the ears and both curls with their yarn tails and weave in every end.
Why it works
The body and head are worked as one continuous spiral, with no joins or turning chains, so the color change from carrot to bunny happens mid-round rather than at a seam.
The head's increases and decreases are front-loaded and back-loaded around the safety eye and nose insertion points, which keeps the facial shaping anchored to a fixed round count.
The ears break from the spiral entirely — worked flat from a short foundation chain with a slip stitch closing the row — because a small flat piece sewn on reads better than a tiny tube here.
What it becomes
- A soft toy for a child's basket, paired with other small amigurumi animals on a shelf.
- A desk or windowsill piece for anyone who collects small novelty crochet food-and-animal mashups.
- A handmade gift tucked into a basket of other stitched produce or garden-themed toys.
Original pattern: https://amigurumiarts.com/carrot-bunny-amigurumi-free-crochet-pattern/
FAQ
Can I use regular worsted yarn instead of plush yarn?
Yes, though the finished texture will look different — plush yarn gives that velvety, blurred-stitch surface. Regular worsted will show more stitch definition, which some crocheters prefer.
Do I need both safety eyes and a safety nose?
The pattern calls for both, inserted at specific rounds before the head closes. You could substitute embroidered features, but you'd need to add them at the same stage, before stuffing finishes.
What size hook does this pattern use?
It's worked throughout with a US G-6 / 4.0 mm hook. That size applies to the body, head, and ears alike.