
Free Pattern
Step-by-Step
Crochet
AmigurumiChenille plush bear amigurumi pattern with soft rounds
A chenille yarn bear worked in simple increase rounds, head to arms, no seams to chase.
- Level
- Intermediate
- Time
- 4-6 hours
- Hook
- 4 mm
- Yarn
- Worsted
Pattern highlights
- Start the head with a magic ring and build it outward through a run of increase rounds.
- Let the increases taper off once the head rounds move past their widest point.
- Begin the arm the same way, with its own smaller magic ring and increase sequence.
- Work the arm straight for a couple of rounds once it reaches full width.
- Decrease the arm rounds to close the shape before stuffing.
- Stuff both pieces with fiberfill as you go, firming up the curves as you close them.
- Set the plastic eyes before the head closes fully so you can still reach inside.
About This Pattern
Every notebook needs a plain bear in it. Not a novelty one, not a dressed one. This is that entry — a chenille bear built from a head and a pair of arms, the kind of base pattern I reach for when I want to test a new yarn without committing to anything fussy.
The technique list is short and that is the point. Magic ring starts, increase rounds that double the stitch count in predictable jumps, then a flat stretch worked straight before a decrease closes things down. Nothing here needs a chart.
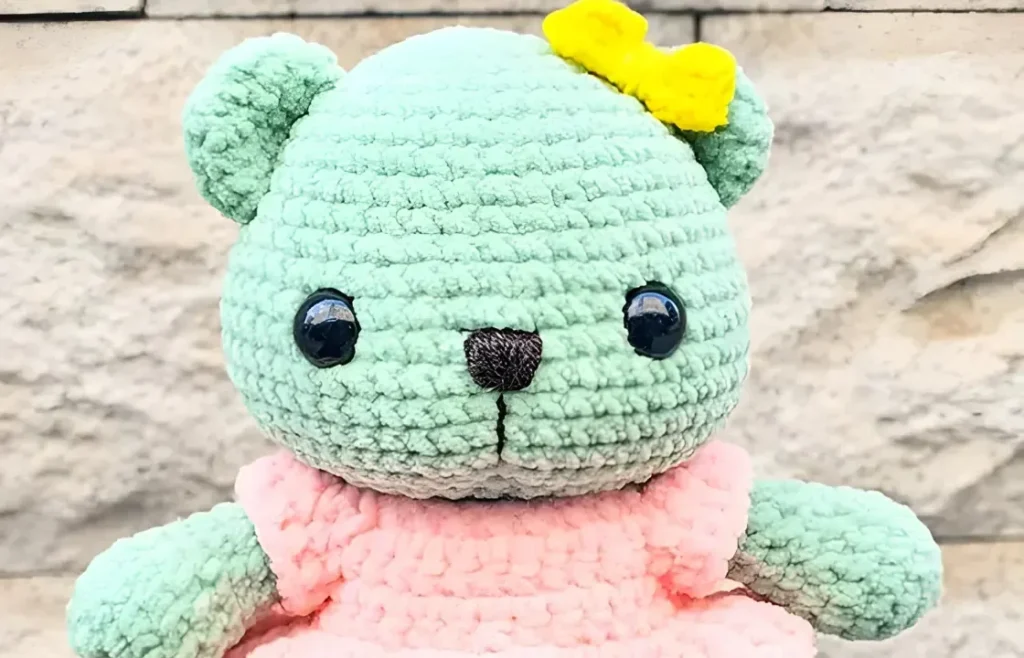
What comes out the other end is a soft, rounded head and a single plush arm, chenille-fuzzed and ready for plastic eyes. It reads as a classic amigurumi shape — the kind collectors call a 'basic bear' and keep making anyway.
Worth knowing
I like a pattern that shows its math. The head goes from a seven-stitch magic ring up through steady increase rounds, each one adding exactly seven stitches, so you can watch the shape grow in your hands. The arm does something similar on a smaller scale, then flattens out for a few rounds before it decreases back down. Chenille yarn changes the texture conversation entirely — it hides unevenness, and it makes a finished bear look plush almost before you stuff it. There is no shaping trick to fight, no color change to track. Just rounds that build on themselves until a head is a head and an arm is an arm. That simplicity is the whole appeal.
Common mistakes
- Losing stitch count in chenille Chenille's fuzzy texture hides stitch definition fast. Count out loud or mark every round with a stitch marker.
- Skipping the magic ring pull A loose magic ring leaves a hole at the center of the head or arm. Tug the tail tight before working the first round.
- Stuffing after closing the piece Stuffing gets harder once the opening shrinks. Add fiberfill gradually as the decrease rounds narrow the gap.
- Placing eyes too late Plastic eyes need access to the inside of the head to attach the backing. Set them before the final closing rounds.
- Uneven increase spacing Increases that bunch up on one side warp the round into an oval. Space each increase evenly before moving to the next stitch.


Intermediate
Progress Tracker
0 of 0 rounds
Tap a round to tick it off — your place is saved on this device.
The kit
- Chenille yarn 4mm
- Hook size 4mm also
- Fiberfill
- Scissors
- Plastic eye accessory
Head
Round 1MR 7sc
Round 2inc x 7 (14)
Round 3sc, inc x 7 (21)
Round 42sc, inc x 7 (28)
Round 53sc, inc x 7 (35)Step by step: Rnd 6-10. 35sc; 3sc, dec x 7 (28); Rnd 12-15. 28sc Fasten off. Leave a long tail for sewing.
Round 64sc, inc x 7 (42)Rnd 7-11. 42sc
Round 125sc, inc x 7 (49)
Round 136sc, inc x 7 (56)Rnd 14-21. 56sc
Round 2228 decRnd 23. 28sc Fasten off
Arms
Round 1MR 5sc
Round 2inc x 5 (10)
Round 3sc, inc x 5 (15)Rnd 4-5. 15sc
Round 6sc, dec x 5 (10)Rnd 7-13. 10sc Fasten off. Leave a long tail for sewing.
Ready to Learn More? Open the next page for Further Guidance!
Pages: 1 2
Finishing
- Weave in the starting tail from each magic ring before it disappears into the stuffing.
- Stuff the head and arm firmly as the rounds close, pushing fiberfill into the curves rather than the center alone.
- Attach the plastic eyes to the head at the point the pattern calls for, then close the last rounds.
Why it works
The head's increase rounds each add exactly seven stitches, matching the seven-stitch magic ring it started from.
The arm is worked flat for two rounds in the middle, holding its width steady before the decrease rounds begin.
Both pieces start from a magic ring, which closes the center hole tight with no gap to sew later.
What it becomes
- A shelf companion for a collection of amigurumi bears, lined up by size.
- A soft first toy for a crib or playroom, paired with other plush chenille makes.
- A gift topper tied onto a wrapped box instead of a bow.
Original pattern: https://onrecip.com/amigurumi-cute-plush-bear-free-pattern/
FAQ
Why does the pattern use chenille yarn instead of regular worsted?
Chenille gives the bear its plush, fuzzy surface right off the hook. It also forgives small tension slips that would show in a smooth yarn.
Do I need to stuff the arm before closing it?
Yes, stuff as the decrease rounds bring the opening smaller. Waiting until it's fully closed makes it much harder to pack fiberfill in evenly.
Can I use safety eyes instead of the plastic eye accessory listed?
Any plastic eye accessory sized to fit the head rounds should work the same way. Just attach it before the head closes, same as the pattern calls for.
Why does the head have so many more rounds than the arm?
The head needs more rounds to reach its full round shape and then taper back down. The arm only needs a brief increase, a flat stretch, and a decrease to finish.