Free Pattern
Step-by-Step
Crochet
BagsCherry blossom braided bucket bag in T-shirt yarn
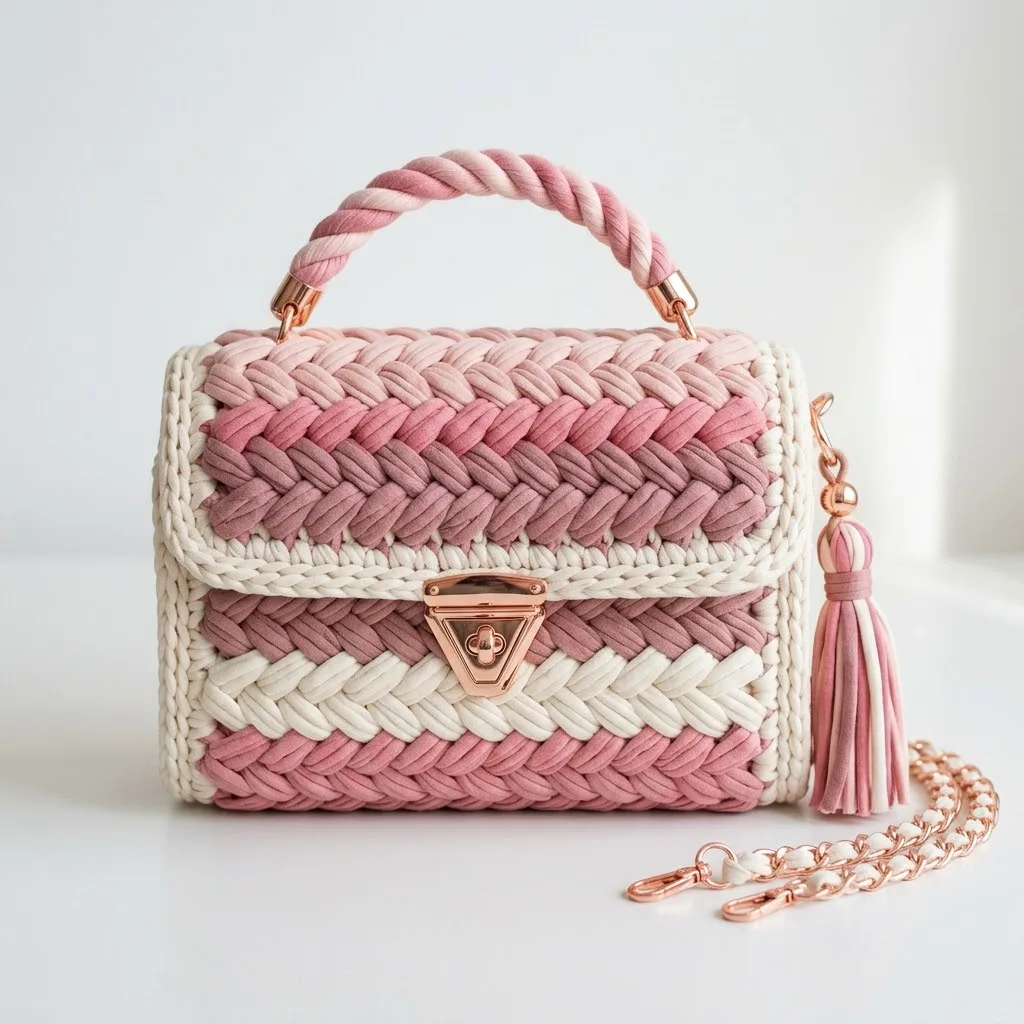
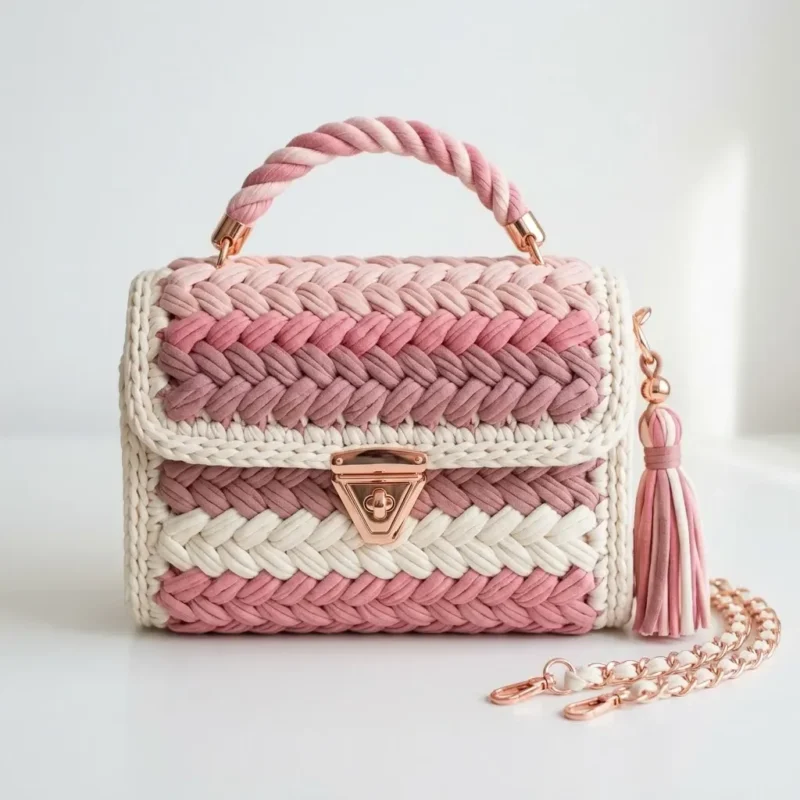
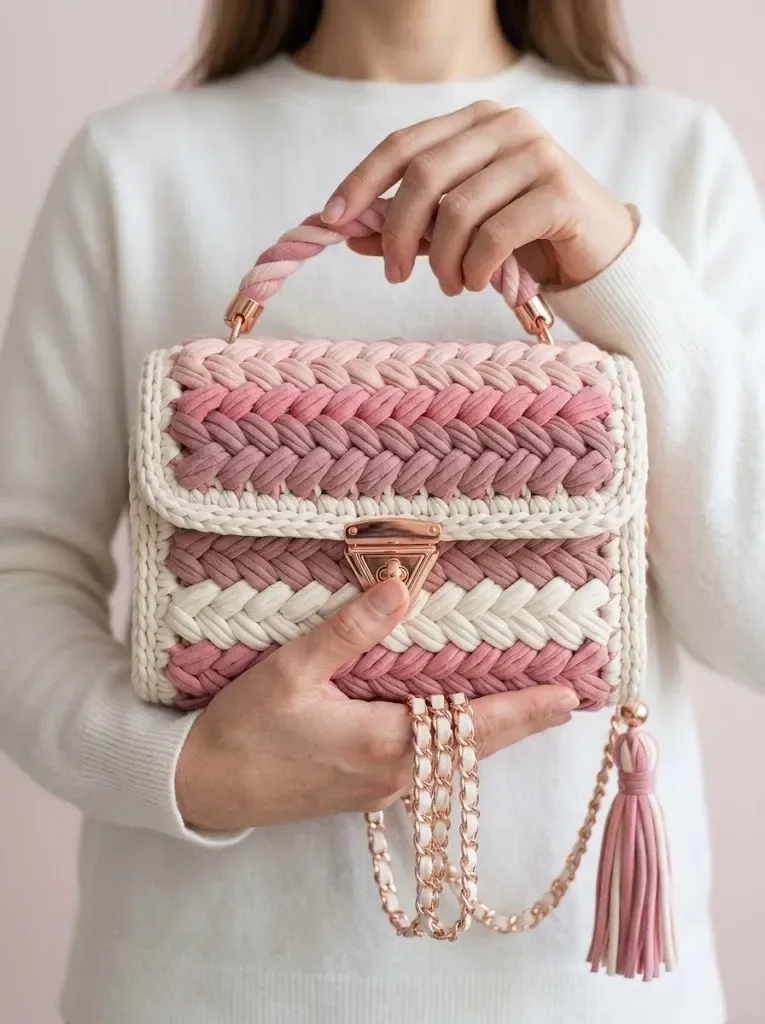
A braided T-shirt yarn bucket bag in blush pink tones, finished with rose gold hardware.
- Level
- Intermediate
- Time
- 4-6 hours
- Hook
- 10 mm
- Yarn
- Super Bulky
Pattern highlights
- Start the base flat in Color A, working plain single crochet rows to set the width.
- Continue alternating colors in braided rounds, fastening off and rejoining as the palette shifts from rose to mauve.
- Join the rounds with a slip stitch each time so the braid stays level rather than spiraling.
- Finish the top edge with a border round before adding the hardware.
- Attach the turn lock clasp, D-rings, and handle with its cord end caps.
- Line the inside with fabric and a base shaper so the bag holds its shape.
About This Pattern
I keep a running list of bag shapes in this notebook, and the bucket keeps reappearing. This one leans into color instead of hardware alone, working cream through mauve in blocked stripes. It sits next to the totes and baskets I've cataloged before, but the braided texture sets it apart. I like collecting patterns that reinvent a familiar silhouette rather than just resizing it.
The technique here is braided half double crochet, worked around the post of a stitch two rows below. It reads oddly on paper and looks like a woven cable once the tension settles. The bag starts flat in Color A, then turns into rounds that continue the braid around each post. Color changes mark the shift from cream to dusty rose to mauve, so the braid doubles as a stripe pattern.
Finished, this bag holds its shape thanks to the base shaper and the T-shirt yarn's own bulk. It measures a modest handful of inches across, small enough for essentials, structured enough to stand on a table. Rose gold hardware, the turn lock, D-rings, cord end caps, ties the palette together. It reads more considered than most chunky-yarn bags I've catalogued.
Common mistakes
- Stitching into the stitch, not the post Braided hdc goes around the post of the stitch two rows below, not into the top of the current stitch. Check you're wrapping the post before pulling up a loop.
- Losing your place after a color change Fastening off and rejoining a new color resets your visual rhythm. Drop a stitch marker at the start of each new-color round.
- Fighting uneven tension early The braid looks lumpy for the first few stitches, and that's normal, not a mistake. Keep going and the tension settles once your hands find the motion.
- Using a hook too small for T-shirt yarn A hook under 10mm makes the braided post stitch hard to work cleanly. Size up to 12mm if your yarn runs thick.
- Skipping the base shaper Without the bag base shaper or plastic canvas, the bottom won't hold its shape under the bulky yarn's weight. Cut it to fit before you line the bag.
Intermediate
Progress Tracker
0 of 0 rounds
Tap a round to tick it off — your place is saved on this device.
The kit
Yarn
- T-shirt yarn (also called tape yarn or ribbon yarn), approximately 200g total
Color A
- Cream or ivory, 80g
Color B
- Dusty rose pink, 50g
Color C
- Medium rose pink, 40g
Color D
- Mauve or dusty plum, 30g
- T-shirt yarn is a super bulky weight yarn made from jersey cotton fabric strips. It creates the chunky braided texture you see in the photos. Brands like Hoooked Zpagetti, Bobilon, or Yarn Art Maccheroni work beautifully.
Hook
- 10mm or 12mm crochet hook (adjust based on your yarn thickness and tension)
Hardware
- 1 rose gold turn lock clasp (also called a twist lock or bag clasp)
- 2 rose gold D-rings
- 2 rose gold cord end caps for the handle
Additional Supplies
- Tapestry needle or large yarn needle
- Scissors
- Stitch markers
Optional
- fabric lining, approximately 30cm x 50cm
Optional
- bag base shaper or plastic canvas
- Finished Dimensions
Width
- approximately 22cm (8.5 inches)
Height
- approximately 15cm (6 inches)
Depth
- approximately 8cm (3 inches)
- Your gauge and yarn brand will affect final size. T-shirt yarns vary in thickness, so don’t stress if your bag comes out slightly different.
- Stitch Abbreviations and Definitions
- ch – chain: Wrap yarn over hook, pull through loop on hook. This creates your foundation.
- sl st – slip stitch: Insert hook into stitch, yarn over, pull through both the stitch and loop on hook in one motion. Used for joining rounds.
- sc – single crochet: Insert hook into stitch, yarn over, pull up a loop (2 loops on hook), yarn over, pull through both loops. Creates a short, tight stitch.
With Color A
Round 1Ch 23. Sc in 2nd ch from hook and across. Turn. (22 sc)
Round 2Ch 1. Sc in each st. Turn. (22 sc)
Round 3Fasten off Color A. Join Color B (dusty rose). Ch 2. Braided hdc across. Turn. (22 braided hdc)
Rounds 4–5Continue braided hdc with Color B. Turn after each row.
Round 6Fasten off Color B. Join Color A. Ch 1. Sc across. Turn. (22 sc)
Round 7Ch 1. Sc across. Fasten off.
The Basic Move
Round 4First Braided Round Ch 2 (counts as hdc). *Yarn over, insert hook from front to back around the post of the sc 2 rows below, yarn over, pull up a loop, yarn over, pull through all 3 loops.* Repeat from * around. Sl st to top of ch-2 to join. (76 braided hdc)If this feels awkward at first, you’re doing it right. The tension settles after a few stitches.
Round 5Ch 2. Continue braided hdc around, working around the posts of Round 3. Sl st to join. (76 braided hdc)
Hook
10mm or 12mm crochet hook (adjust based on your yarn thickness and tension)
Hardware
1 rose gold turn lock clasp (also called a twist lock or bag clasp)
2 rose gold D-rings 1 rose gold chain strap with lobster clasps, approximately 120cm 2 rose gold cord end caps for the handle
Border Round
Fasten off.
Turn Lock Clasp
1. Position the decorative front plate centered on the flap point.
2. Mark where the prongs will go through.
3. Create small holes using scissors or an awl.
4. Push prongs through, fold flat on the inside.
5. Install the turn mechanism on the bag front, centered and aligned with the top plate.
D-Rings for Strap:
Cut two small strips of t-shirt yarn, approximately 8cm each. Fold each through a D-ring and sew the ends to the inside of the bag at each top corner.
Handle Attachment
Attach cord end caps to the D-ring hardware or create loops to connect the twisted handle to the bag sides.
Color Variations
Ocean blues with silver hardware Neutrals: tan, cream, and chocolate brown Sunset palette: coral, peach, and gold
Size Adjustments
For a smaller clutch, reduce foundation chain to 17 and adjust proportionally For a larger tote, increase to 29 and add additional body rounds
This Cherry Blossom Pink Spring Braided Bag crochet pattern adapts beautifully to your personal style. The construction technique stays the same regardless of color choices.
Braided stitches look uneven
Colors don’t transition cleanly:
Weave in your ends on the wrong side immediately after color changes. A few extra minutes now saves frustration later.
Hardware won’t stay secure:
From the collection
Finishing
- Weave in every end left from the color changes between Color A, dusty rose, medium rose, and mauve.
- Insert the bag base shaper and stitch the fabric lining in place before closing up the sides.
- Attach the turn lock clasp, D-rings, and handle with its rose gold cord end caps last.
Why it works
The base starts as a flat panel worked back and forth in rows, not rounds, before the piece turns to work in the round for the braided body.
Braided hdc stitches insert around the post of the stitch two rows below, so each round references the one before it, not the current row.
Every braided round closes with a slip stitch to the top of the starting chain-2, which keeps rounds distinct instead of spiraling continuously.
What it becomes
- A market or errand bag, roomy enough for essentials without swallowing them.
- An everyday tote to carry alongside jeans and a plain sweater, letting the braid be the statement.
- A gift for someone who likes texture over embellishment, paired with simple gold jewelry.
Original pattern: https://crochetwithmia.com/cherry-blossom-pink-spring-braided-bag-free-crochet-pattern/
FAQ
Can I substitute the T-shirt yarn for something else?
You could try another super bulky yarn, but the braided post stitch relies on T-shirt yarn's flat, tape-like structure. A rounder yarn will change the texture and drape.
Do I need to line the bag?
The pattern calls for fabric lining and a base shaper, and I'd keep both. They give the bag structure the T-shirt yarn alone won't provide.
What if I can't find rose gold hardware?
Any turn lock clasp, D-rings, and cord end caps in a finish you like will work. The braid and color palette are the real signature here, not the metal.
Why does my braided round look uneven at first?
That's expected with this stitch; the post stitch reads awkward for the first few repeats. Keep your tension even and it settles within a round or two.