
Free Pattern
Step-by-Step
Crochet
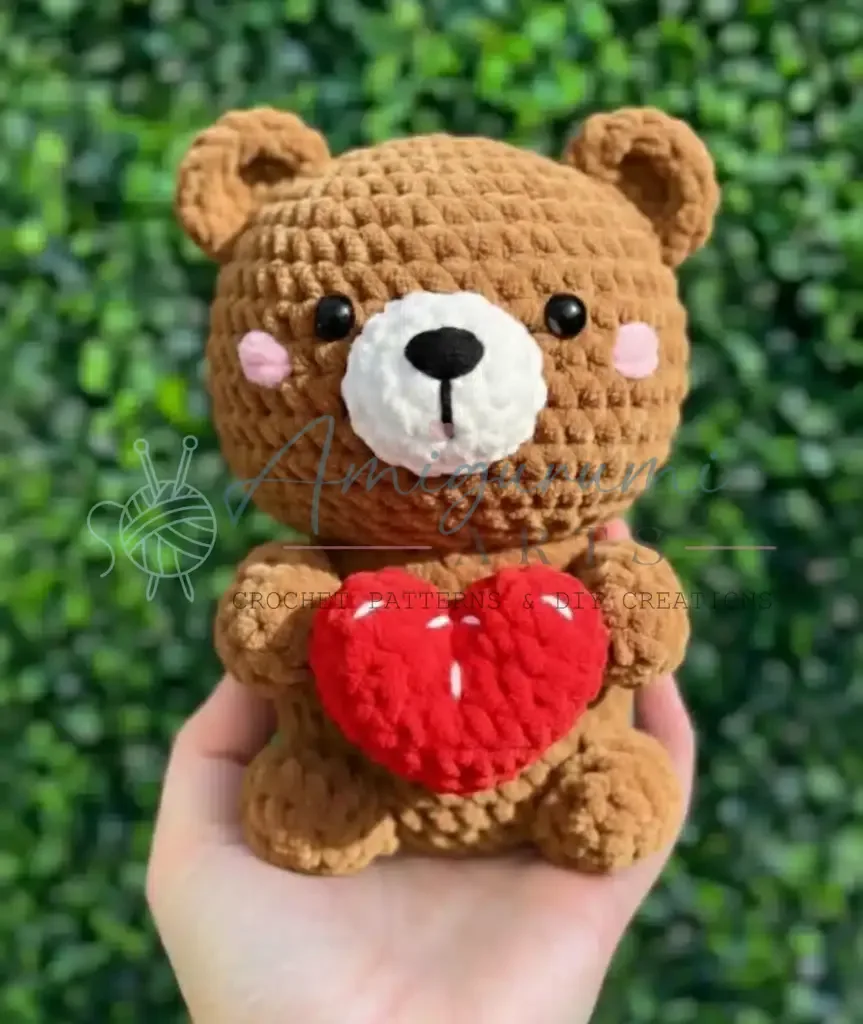
AmigurumiChunky chenille amigurumi teddy bear with a heart
A soft chenille amigurumi bear pattern with a muzzle, ears, limbs, and a stitched heart.
- Level
- Intermediate
- Time
- 6-8 hours
- Hook
- 5 mm
- Yarn
- Chunky
Pattern highlights
- Start with the head, building it from a small ring into a rounded dome of single crochet.
- Shape the muzzle separately in cream or white, then stuff it lightly before setting it aside.
- Work the body with matching increases, leaving the top open so it's easy to stuff later.
- Crochet a matching pair of legs, arms, and ears, each fastened off with a long sewing tail.
- Stuff the head and body firmly, then sew each piece on using the tails you left.
- Embroider the nose and mouth on the muzzle before attaching it to the head.
- Finish with cheeks and a small tail, then stitch on the heart to complete the look.
About This Pattern
This bear sits in the cuddly end of my amigurumi notebook. It belongs next to the other chenille toys I keep returning to. It isn't a fussy stitch pattern. It's built for softness, worked in chunky yarn with a big hook. I file it with pieces meant for gifting, not display. The heart detail makes it feel made with someone specific in mind.
Every piece here starts the same way. A magic ring, then increases that double or jump in eights, shaping a dome. The head, muzzle, body, legs, arms, and ears are each worked separately. Fasten-off tails replace woven ends, because those tails do the sewing later. It's modular construction, small pieces built to a stated round count. Each is joined by hand at the rounds the pattern already names.
What comes out the other end is a plump, huggable teddy. It has a round muzzle, little ears, and stubby limbs. A heart gets sewn on, a small deliberate finishing touch. The chenille yarn does most of the charm here. It's fuzzy, soft, and forgiving of uneven tension. This is the kind of bear that looks hand-loved on day one. It's built to be stuffed firm and squeezed often.
Worth knowing
The satisfaction here is in the repetition that still adds up to something whole. Six separate pieces — head, muzzle, body, legs, arms, ears — each start from a magic ring. They climb through the same increase rounds, so once you've shaped one dome, you understand them all. Chenille yarn forgives a slightly loose stitch, a relief after fussier amigurumi cotton. Every fasten-off tail has a job: sewing the ear, the arm, the leg, each at a stated round. Nothing is left to guesswork. The heart is a nice touch, a small detail that turns a stuffed toy into a gift.
Common mistakes
- Stuffing before shaping the dome Stuff and shape at the same time, as the pattern notes, or the head turns lumpy.
- Trimming sewing tails too short Leave the fasten-off tail long on ears, arms, and legs. You need it to sew the piece on later.
- Losing the round marker Move the stitch marker every round in continuous rounds. It's easy to lose your place in fuzzy chenille.
- Guessing where pieces attach Sew the muzzle, ears, arms, and legs at the exact rounds the pattern states, not by eye.
- Using too small a hook Match a 10-12mm hook to the chenille yarn so stitches stay loose enough to stuff.


Intermediate
Progress Tracker
0 of 0 rounds
Tap a round to tick it off — your place is saved on this device.
The kit
Crochet hook
- 4-5mm for chunky yarn
Yarn
- Himalaya Dolphin Baby or similar chenille yarn in brown (bear body), white or cream (muzzle), red (heart), and pink (optional cheeks)
- Alternative yarn brands: Yarn Art, Premier Parfait (most similar available in the US), or other chenille yarns depending on your location
Safety eyes
- 10-12mm size
Stuffing
- Fiberfill for a soft, huggable finish
Additional tools
- Stitch marker, scissors, yarn needle
Embroidery details
- Black felt or embroidery thread for nose details
Head Pattern (Brown)
The bear's head is rounder with a more spherical shape, which gives it that classic teddy bear appearance.
Round 1Mr 6sc (6)
Round 26inc (12)
Round 3(sc, inc)*6 (18)
Round 4(2sc, inc)*6 (24)
Round 5(3sc, inc)*6 (30)
Round 6(4sc, inc)*6 (36)
Round 7(5sc, inc)*6 (42)
Rounds 8–1442sc (42) – 7 rounds even(42)
Round 15(5sc, dec)*6 (36)
Round 16(4sc, dec)*6 (30)
Round 17(3sc, dec)*6 (24)
Round 18(2sc, dec)*6 (18)Step by step: Fasten off and leave long tail for sewing. Eyes: Insert 10-12mm safety eyes between rounds 10-11, approximately 7-8 stitches apart. Stuffing: Fill firmly and shape into round ball.
Muzzle Pattern (White or Cream)
The muzzle is the distinctive feature that makes this a bear!
Round 1Mr 6sc (6)
Round 26inc (12)
Round 3(sc, inc)*6 (18)
Round 4(2sc, inc)*6 (24)
Round 524sc (24)Step by step: Fasten off and leave long tail for sewing. Assembly: Sew the muzzle centered on the face between rounds 11-15, stuffing lightly before closing. Embroider a black nose (inverted triangle or oval) and a vertical line down to create the classic bear expression.
Body Pattern (Brown)
Round 1Mr 8sc (8)
Round 28inc (16)
Round 3(sc, inc)*8 (24)
Round 4(3sc, inc)*6 (30)
Rounds 5–1130sc (30) – 7 rounds even(30)
Round 12(3sc, dec)*6 (24)
Round 13(2sc, dec)*6 (18)Step by step: Fasten off and leave a long tail for sewing. Important: Stuff the body generously to create that chubby, huggable bear shape!
Legs Pattern (Brown)
Round 1Mr 6sc (6)
Round 26inc (12)
Rounds 3–412sc (12)Fasten off and leave a long tail for sewing between rounds 4-6 of the body.
Arms Pattern (Brown)
Round 1Mr 5sc (5)
Round 25inc (10)
Rounds 3–510sc (10)Fasten off and leave a long tail for sewing on round 12 of the body.
Ears Pattern (Brown)
Bear ears are round and positioned on top of the head.
Round 1Mr 6sc (6)
Round 26inc (12)
Round 3(sc, inc)*6 (18)Step by step: Fasten off and leave a long tail. Do not stuff the ears – keep them flat. Sew between rounds 5-8 of the head, positioning them on top and slightly to the sides. Optional: Add a small pink inner ear detail using pink felt or yarn.
Tail Pattern (Brown)
Bears have small, stubby tails!
Round 1Mr 6sc (6)
Round 26inc (12)
Round 312sc (12)Fasten off and leave long tail. Stuff lightly and sew to the back of the body at round 6-7.
Cheeks (Pink – Optional)
Use pink yarn to add cute rosy cheeks:
Step by step: Make small circles on each side of the muzzle. Position below and slightly to the side of the eyes. You can also use pink felt circles sewn or glued on.
Heart Pattern (Red)
A sweet heart for the bear to hold!
Round 1Mr 6sc (6)
Round 26inc (12)
Round 3(sc, inc)*6 (18)
Round 4(2sc, inc)*6 (24)
Rounds 5–624sc (24)
Round 7(2sc, dec)*6 (18)
Round 8(sc, dec)*6 (12)
Round 96dec (6)Step by step: Fasten off, stuff firmly, and close the opening. Optional decoration: Add white highlights using white yarn or felt to create a glossy heart effect.
Assembly
Step 1Follow these steps to bring your bear to life:
Step 2Start by sewing the head to the body, ensuring it’s centered and secure
Step 3Attach the muzzle to the center front of the head
Step 4Embroider the nose and mouth details on the muzzle using black thread or felt
Step 5Position and sew the ears on top of the head
Step 6Attach the arms to the sides of the body at round 12
Step 7Sew the legs to the bottom front of the body
Step 8Add the small tail to the back
Step 9Sew or embroider pink cheeks on each side of the muzzle
Step 10Finally, position the heart between the bear’s arms and secure with a few stitches
Finishing
- Weave in every fasten-off tail except the ones left long for sewing pieces to the body.
- Stuff the head and body until firm, shaping as you go so the dome stays round.
- Sew the muzzle, ears, arms, legs, and tail at the stated rounds, then embroider the face.
Why it works
The body starts at an eight-stitch magic ring, then jumps to eight increases, doubling to sixteen stitches. A third round alternates single crochet and increase, reaching twenty-four stitches in a classic dome curve.
The arms start at a five-stitch ring, increase once to ten, then work even for several rounds. That flat run after the increase round keeps pieces like the arms narrow rather than ball-shaped.
Each piece fastens off with a long tail instead of a woven end. The pattern names exact rounds for sewing it onto the body, so assembly points are built in, not guessed.
What it becomes
- A nursery shelf companion that pairs well with other soft amigurumi animals.
- A handmade baby gift, paired with a knit blanket or a onesie.
- A craft-fair or shop item, displayed alongside other chenille toys.
Original pattern: https://amigurumiarts.com/crochet-bear-pattern-with-heart-amigurumi/
FAQ
What skill level is required for this crochet bear pattern?
This pattern is suitable for beginner to intermediate crocheters. You should be comfortable with basic stitches like single crochet, increases, and decreases. The pattern takes approximately 3-4 hours to complete depending on your experience level.
Can I use a different type of yarn instead of chenille?
Yes, you can use other yarn types, but the finished texture will differ. Chenille yarn creates the signature soft, plush appearance. If using worsted weight yarn with a 3.5mm hook, your bear will be smaller (approximately 8-10cm). Always adjust your hook size to match your yarn weight.
How do I attach the safety eyes securely?
Insert 10-12mm safety eyes between rounds 10-11 of the head, spacing them approximately 7-8 stitches apart. Push the eye through from the outside, then secure the washer on the inside before stuffing the head completely. Make sure to position them before closing the head, as they cannot be adjusted once secured.
Why won’t my bear stand up on its own?
This bear pattern is designed as a sitting bear with the heart accessory. Make sure you’ve stuffed the body and head very firmly – until you feel like you can’t stuff it anymore. The legs should be sewn to the bottom front of the body, and proper stuffing will help the bear maintain its seated position.