Free Pattern
Step-by-Step
Crochet
WearablesCoastal Lace Fringe Poncho: Boho Crochet Pattern
Make the Coastal Lace Fringe Poncho, an airy openwork crochet poncho with flowing fringe—easy double crochet lace panels for a boho summer layer.
Level Confident BeginnerTime 6-8 HoursHook 5 mmYarn Light/DK
Pattern highlights
- Crochet a small gauge swatch first to confirm your double crochet and chain space tension matches the pattern.
- Work the first rectangular panel in rows starting from the bottom edge, repeating the lace stitch pattern upward.
- Repeat the same four-row lace sequence to complete a second, matching rectangular panel.
- Block both panels gently to open up the chain spaces and even out the openwork texture.
- Position the two panels according to the assembly steps, leaving a neckline opening at the top.
- Sew or seam the panels together along the marked shoulder and side points to form the poncho shape.
- Work the edging round around the lower hem to prepare an even base for fringe.
- Cut and attach fringe strands evenly along the lower edge for the finished bohemian drape.
About This Pattern
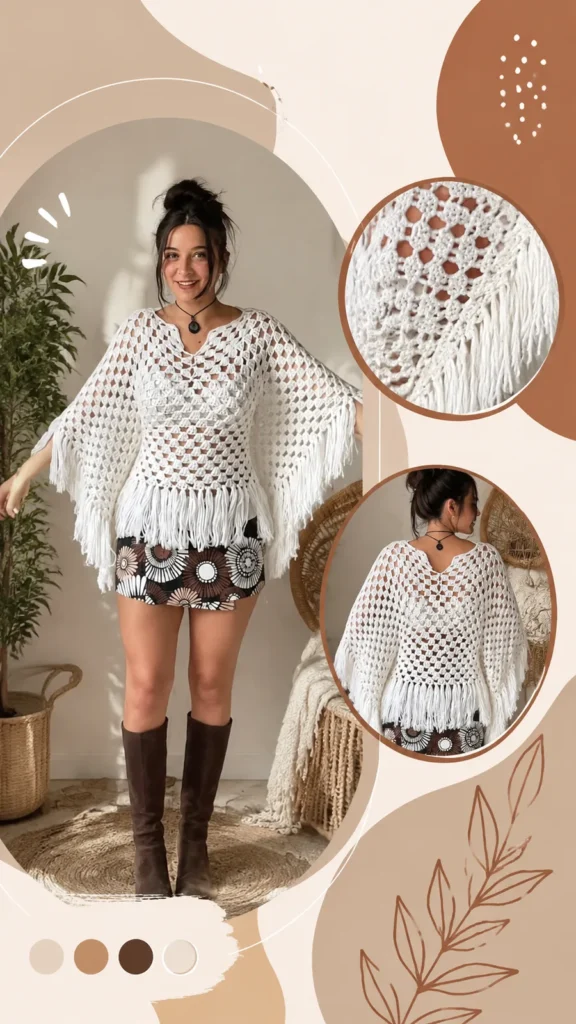
The Coastal Lace Fringe Poncho turns two simple crochet rectangles into a breezy, openwork layer that drapes beautifully over the shoulders. Built from repeating double crochet groups separated by chain spaces, it creates that lacy, sun-dappled texture boho lovers adore. This is the perfect project for anyone craving a wearable that skips fitted sleeves and body measurements but still looks intentional and stylish.
Skill-wise, this pattern sits at a confident beginner level — you're mainly repeating a straightforward lace stitch pattern across four rows per panel, so once you find your rhythm the rows fly by. The trickiest parts are keeping your chain spaces even and attaching the fringe neatly along the lower edge. Expect roughly 6-8 hours total, spread across two matching panels plus a short assembly and fringing session.
Finished, each panel measures about 28 inches wide by 30 inches long, and the two panels join into a relaxed, oversized poncho with a soft white, airy look and movement-rich fringe hem. It's lightweight enough for warm evenings yet substantial enough to feel like a real garment, making it a lovely handmade gift for a beach-loving friend, a bridesmaid, or yourself before your next festival or seaside getaway.
Variations
This poncho is a fantastic canvas for customizing once you've made the base pattern. To create a wider fit, increase the starting chain in multiples of 3 so the lace pattern stays aligned; for a smaller size, reduce the starting chain by 12 to 18 stitches, and for a larger size, add stitches in groups of 3. For extra length, simply keep repeating the lace rows (Rows 3 and 4) until you reach your desired measurement, or remove lace repeats evenly from both panels for a shorter, cropped version. For a warmer version, choose a slightly thicker yarn and adjust your hook size to match. If you'd rather skip the fringe, finish with just the single crochet edging round for a cleaner, more polished silhouette suited to layering over sweaters in cooler months.
I fell for this poncho the moment I saw how the double crochet and chain space combo catches the light — it's simple, but it reads as intricate lace once it's flowing on a body. There's something so satisfying about working two matching panels in straight rows from the bottom up; no fussy shaping, no counting increases, just steady, meditative repeats. And then comes my favorite part: the fringe. Cutting and attaching those long strands around the lower edge feels like the reward round, transforming plain panels into something with real bohemian movement. Because it's made from two rectangles instead of a fitted garment, there's zero anxiety about gauge ruining the fit through the body — though I still always swatch first, because tension changes panel width fast with lace stitches. This is the kind of pattern you can crochet on a porch, at the beach, or during a lazy weekend, and end up with a genuinely wearable, photograph-worthy piece. It's simple construction meeting stylish payoff, and that combination never gets old for me.
Common mistakes
- Inconsistent chain spaces
- Use a stitch marker at the start of each repeat and consciously count your chains before working the next double crochet group so every space matches.
- Skipping the gauge swatch and ending up
- Always crochet a small swatch first with your exact yarn and 5mm hook, measure it, and adjust hook size up or down until your stitch count matches the pattern's gauge.
- Miscounting the turning chain
- Remember this pattern's turning chain does not count as a stitch — work your first double crochet into the actual first stitch, not into the chain.
- Cutting fringe strands unevenly
- Wrap yarn around a piece of cardboard cut to your desired fringe length, then snip along one edge so every strand comes out identical.
- Attaching fringe too sparsely
- Space fringe attachment points evenly using the edging stitches as a guide, and add extra strands in any spot that looks thin once the poncho is laid flat.
- Sewing the two panels together in
- Lay both panels flat and mark the shoulder and side seam points with stitch markers before sewing, checking the neckline opening size against your head before joining completely.
Confident Beginner
Progress Tracker
0 of 0 rounds
Tap a round to tick it off — your place is saved on this device.
Materials
- Lightweight cotton yarn, approximately 1,200 yards (1,097 meters)
- 5 mm US H-8 crochet hook
- Yarn needle
- Scissors
- Measuring tape
- Stitch markers
Main Pattern
This poncho is made from two matching rectangles. Each rectangle measures approximately 28 inches (71 cm) wide and 30 inches (76 cm) long. The turning chain does not count as a stitch.
- Foundation RowCh 113.
- Row 1Dc in fourth ch from hook and in each ch across. Turn. (110 dc)
- Row 2Ch 3, dc in first st, *ch 1, sk next st, dc in next st; repeat from * across. Turn. (56 dc spaces)(56)
- Row 3Ch 3, dc in first st, work lace group across the row, ending with dc in last st. Turn.
- Row 4Ch 3, dc in first st, *ch 1, 3 dc in next ch-1 sp, ch 1; repeat from * across, dc in last st. Turn.Rows 5-60: Repeat Rows 3 and 4 until the panel measures approximately 30 inches (76 cm).Fasten off and weave in ends.
Special Stitch
Lace group: Skip 2 stitches, work 3 dc in next stitch, ch 1.
Edging and Fringe
Attach yarn along the bottom edge and work one round of sc evenly across. Add fringe by cutting yarn strands approximately 14 inches (36 cm) long. Fold each strand in half and attach evenly along the lower border.
Trim the fringe evenly after attaching. Block lightly to open the lace texture and improve the drape.
Assembly
- Step 1Place the two panels together with the right sides facing outward.
- Step 2Join the top edges using a whip stitch or slip stitch seam, leaving approximately 12 inches (30 cm) open in the center for the neckline.
- Step 3Sew the side edges together from the bottom upward, leaving approximately 12 inches (30 cm) open for arm openings.
- Step 4Turn the poncho right side out.
- Step 5Blocking helps the crochet poncho reach its intended shape by relaxing the lace stitches. Place the finished garment on a flat surface, gently stretch the panels into shape, and allow them to dry completely.
- Step 6For best results, hand wash handmade crochet garments with mild detergent and reshape while damp. Store the poncho folded to help maintain the fringe and fabric structure.
Important notes
💡 Always crochet a gauge swatch before starting — with lace stitch patterns, tension shifts can change your panel width by several inches.
💡 Use stitch markers to mark the beginning of each double crochet and chain space repeat so you don't lose your place across four rows.
💡 Buy an extra skein of cotton yarn beyond the estimated 1,200 yards if you plan to add generous fringe, since fringe uses more yarn than expected.
💡 Block your finished panels before assembly — lightweight cotton lace opens up beautifully with a gentle wet block, evening out the chain spaces.
💡 When cutting fringe, always cut strands slightly longer than your target length, since trimming after attaching gives you a cleaner, more even hem.
💡 Try on the joined panels before weaving in all your ends, so you can adjust the neckline or shoulder seam placement while it's still easy to unpick.
💡 Gauge: 16 dc stitches and 8 rows = 4 inches (10 cm) in lace pattern. Check your gauge before starting, since finished size depends on yarn choice and personal tension.
Original pattern: https://duniarecipe.com/boho-crochet-outfit-ideas-handmade-ponchos-sweaters-summer-style-inspiration/
FAQ
How much yarn do I actually need for the fringe versus the panels?
The panels use the bulk of the 1,200 yards, but generous fringe can add 15-20% more yarn usage. It's smart to buy one extra skein if you want long, full fringe strands.
Can I make this poncho without the fringe?
Absolutely — simply finish with the edging round and skip the fringe strands for a cleaner, more streamlined look. This works especially well if you want a more polished, less bohemian silhouette.
What hook size should I use if my gauge doesn't match?
Start with the recommended 5mm H-8 hook, but size up to 5.5mm if your panel comes out narrower than 28 inches, or down to 4.5mm if it's too wide. Always re-swatch after changing hook size.
Is this pattern good for a first-ever crochet garment?
Yes, it's an excellent choice because it avoids sleeve shaping and fitted measurements entirely. As long as you're comfortable with double crochet and basic chain spaces, you can confidently tackle this poncho.
How do I know where to sew the two panels together for the neckline?
Lay the panels flat, overlap the top edges as directed in the assembly steps, and leave an opening sized to comfortably fit over your head. Try it on before finishing your seams to double-check the fit.