Free Pattern
Step-by-Step
Crochet
Baby AccessoriesColorful crochet baby booties for tiny feet
A step-by-step guide to crocheting soft, multi-colored baby booties with a ribbed cuff.
- Level
- Intermediate
- Time
- 3-4 hours
- Hook
- 3.5 mm
- Yarn
- DK
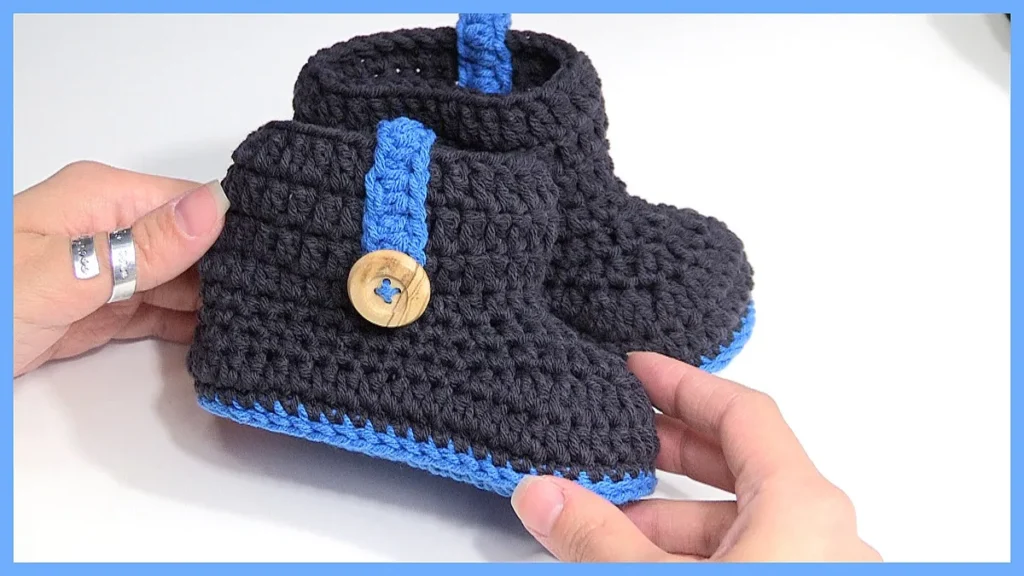
Pattern highlights
- Chain a short foundation and work single crochet rounds around it to build an oval sole.
- Increase at both ends of the sole so it curves into a heel and a rounded toe.
- Attach a new color and work single crochet rounds straight up from the sole's edge for the upper.
- Shape the toe section next, still working in rounds, to close in the front of the foot.
- Finish with a neat slip stitch or single crochet edge, then weave in every loose end.
About This Pattern
What comes off the hook is a pair of small, colorful booties, light enough for a newborn's foot. The mixed colors make each pair a little different, even with the same yarn on hand. They're soft, quick to finish, and easy to match to whatever colors are left in the basket. I like that they skip stuffing or wire — just stitches, holding their own shape.
This pattern is simple and versatile, allowing you to experiment with color changes throughout the bootie. These instructions are for a baby 0-6 months old, but you can easily adjust the length by increasing the foundation chain.
Common mistakes
- Jogs at color-change joins Carry the new color through the last stitch of the old round before joining. Keep the join point consistent from round to round.
- Increases drifting off-center Count stitches between the increase points on the sole. A drifted increase skews the oval instead of curving it evenly.
- Tight foundation chain Work the foundation chain a little looser than usual. A tight chain makes it hard to work back down the opposite side.
- Missing the back loop on the cuff Check the first stitch of each cuff round before starting. Working into both loops flattens the ribbing you're after.
- Losing track of the round start Drop a stitch marker into the first stitch of each round. The join point shifts as colors change, which makes it easy to lose.


Intermediate
Progress Tracker
0 of 0 rounds
Tap a round to tick it off — your place is saved on this device.
The kit
Yarn
- Choose soft, baby-friendly yarn in multiple colors. Light worsted-weight yarn or DK yarn is a great choice, as it’s soft and not too bulky.
Crochet Hook
- A 3.5mm or 4mm hook generally works well for baby booties, but adjust according to your yarn choice.
Tapestry Needle
- For weaving in ends and attaching different color sections.
Scissors
- For trimming yarn ends.
1. Start with the Sole
The sole provides the base for the bootie and gives it structure.
Foundation Chain: Chain 10 stitches.
Round 1Single crochet (sc) in the second chain from the hook and in each chain across. Work 3 sc in the last chain. Continue down the opposite side, working sc in each stitch and 3 sc in the last stitch. Join with a slip stitch. (22 stitches)(22)
Round 2Chain 1, 2 sc in the first stitch, sc in the next 7 stitches, 2 sc in each of the next 3 stitches, sc in the next 7 stitches, 2 sc in the last stitch. Join with a slip stitch. (28 stitches)(28)
Round 3Change colors and repeat the previous step, increasing as needed to create a sole that matches the baby’s foot length.Pro Tip: Keep the tension even to ensure the sole is smooth and flat. Adjust the number of rounds based on your desired sole size.
2. Create the Bootie Upper
The upper part forms the main body of the bootie and can be done in one or multiple colors.
Round 1Attach your new color, chain 1, and work one sc in each stitch around the sole’s edge. Slip stitch to join.
Rounds 2–4Continue with sc stitches in each stitch around, joining at the end of each row. Change colors as desired to create stripes or blocks of color.Creative Idea: Experiment with color blocking by switching colors every row or by creating wide bands in contrasting colors for a bold look.
3. Form the Toe Section
The toe section requires some decrease stitches to create the shape, giving the bootie a snug fit.
Round 5Sc in each stitch around until you reach the front of the bootie. Sc2tog (single crochet two together) in the next 5 stitches for a rounded toe.
Round 6Sc in each stitch around, working an additional color change if desired. Continue decreasing as needed until you reach the preferred toe shape.
4. Add the Cuff
The cuff adds style and helps keep the booties snug on the baby’s feet.
Cuff Foundation: Attach a new color and chain 1, then work one half-double crochet (hdc) in each stitch around.
Rounds 1–3Work in back loops only (BLO) for each stitch to create a ribbed texture. Slip stitch to join.Final Round: If desired, add one last row of slip stitches or sc for a neat, finished edge.
Enjoy!
Finishing
- Weave in the final cuff ends and trim any tails close to the stitches.
- Give the finished booties a light steam so the sole and cuff sit flat.
Why it works
The sole increases at each end, in the last stitch of every side. That's what curves a straight foundation chain into an oval base.
The upper is worked directly into the sole's edge, in rounds. That join means no seaming between sole and upper.
What it becomes
- A gift for a new baby, paired with a matching hat or blanket in the same colors.
- A soft first pair of shoes for a baby just starting to kick around indoors.
- A small prop for newborn photos, since the bright colors show up well in pictures.
Original pattern: https://crochetblog.net/crochet-multi-colored-baby-booties/
FAQ
Can I make these booties bigger for an older baby?
Yes — increase the foundation chain length before starting the sole. The rest of the pattern follows the same shaping, just on a larger base.
Do I need a specific yarn weight for this pattern?
Light worsted or DK yarn works best, since it's soft without adding bulk. Stick to a similar weight if you swap yarns, so the gauge stays consistent.
Do these booties need stuffing to hold their shape?
No — the stitches themselves give the booties their shape. There's no stuffing or wire involved anywhere in the pattern.