
Free Pattern
Step-by-Step
Crochet
AmigurumiCrochet an amigurumi chicken with an egg-shaped body
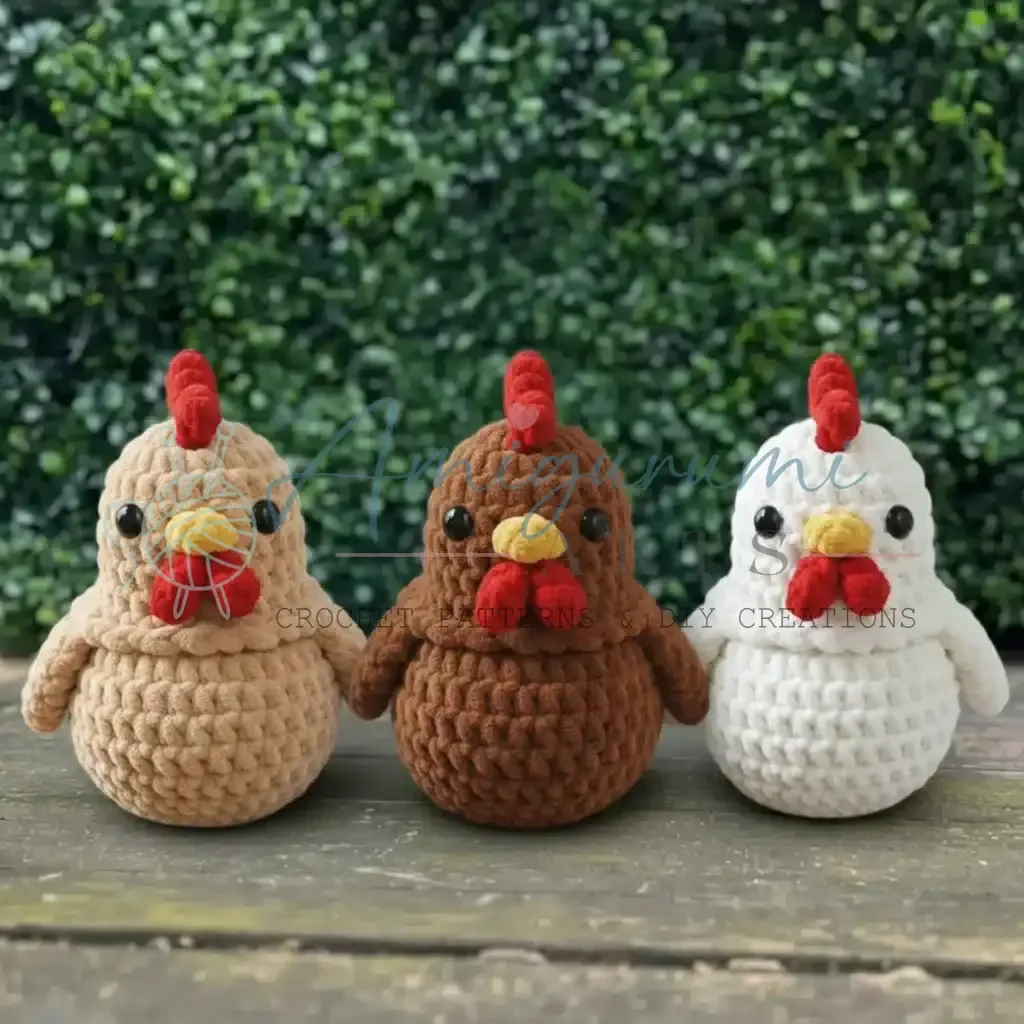
A no-legs amigurumi chicken with oval body, 3D beak option, and wavy comb.
- Level
- Intermediate
- Time
- 4-6 hours
- Hook
- 4.5 mm
- Yarn
- Bulky
Pattern highlights
- Start the head with a magic ring and increase steadily until the dome reaches its full width.
- Decide between the simple flat beak or the three-round 3D beak worked separately and pressed closed.
- Attach the beak between the eyes, positioned at the rounds specified on the face.
- Work the oval body separately, widening through the middle rounds before tapering toward the base.
- Crochet the comb, wattles, wings, and tail feathers as their own small flat or shaped pieces.
- Attach the comb upright on the head and let the wattles hang below the beak.
- Finish with embroidery details once every piece is sewn into place.
About This Pattern
Every collection needs a barnyard shelf, and this chicken earns its spot there. It is not a generic round blob with a beak glued on. The body is deliberately egg-shaped, which sounds obvious for a chicken but takes real shaping to pull off in bulky yarn. I like a pattern that commits to a silhouette instead of defaulting to a sphere.
The techniques here are the amigurumi basics done with intention: magic ring starts, single crochet increases spaced to build a dome, and a flat piece worked for the comb. There are two beak options, one quick and flat, one worked in the round and folded closed. That choice alone tells me the designer wanted room for a crocheter's preference, not just one correct answer.
What comes out the other end is a tabletop chicken with no legs, sitting flush on its tapered oval base. The comb stands up in four wavy sections, the wattles hang below the beak, and the wings sit flat against the sides. It reads as sturdy and a little comic, which is exactly what a good farmyard amigurumi should do.
This pattern sits at a 4-out-of-5 difficulty, best suited to intermediate-to-advanced crocheters, and uses Bernat #5 Bulky yarn with a 4.5mm hook. Finished, the chicken measures approximately 19 cm (7.5 inches) tall — actual size will vary slightly with your tension.
The classic colorway works the body in White with a Red comb and wattles and a Yellow beak, though the same pattern takes well to a Yellow body with an Orange beak, or a Brown body with a Yellow or Orange beak.
Finish every round with a slip stitch and a chain one instead of working in a continuous spiral — without that join, some of this chicken's shaped sections can drift out of alignment.
Worth knowing
The satisfaction is in the shaping. Twelve rounds take the head from a six-stitch magic ring to a full dome, and the increase rounds are spaced so the curve stays smooth, not lumpy. Then there's the beak decision: a flat two-row version attached with a single chain-and-slip-stitch edge, or a three-round 3D version worked in the round and pressed flat before closing with two single crochets. I like having both to compare. The comb's wavy sections and the wattles hanging free add personality without extra bulk. And because the body tapers into its own base, there's no separate leg assembly to fuss over — the whole thing just sits.
Common mistakes
- Uneven head increases Count stitches at the end of each increase round so the dome stays symmetrical. A missed increase shows up as a flat spot later.
- Beak placed off-center Center the beak between the eyes before attaching, checking from the front, not just from above.
- 3D beak won't lie flat Press the two edges together firmly before closing with single crochet, so the seam sits flush rather than puckered.
- Body losing its oval shape Stuff gradually as you work the tapering rounds instead of cramming filling in at the end.
- Comb lying flat instead of standing Sew the comb's base securely along the top of the head so the wavy sections stand upright, not sag sideways.


Intermediate
Progress Tracker
0 of 0 rounds
Tap a round to tick it off — your place is saved on this device.
The kit
- Bernat #5 Bulky yarn in White, Red, and Yellow
- 4.5mm crochet hook (size 7)
- Plastic safety eyes (12mm) – 2 pieces
- Stitch marker
- Sewing needle
- Scissors
- Fiberfill stuffing
Head Section
Round 16SC in a MR (6)
Round 26INC (12)
Round 3(SC, INC) 6 times (18)
Round 4(SC, INC) 9 times (27)
Round 527SC (27)
Round 6(8SC, INC) 3 times (30)
Round 730SC (30)
Round 87SC, 3INC, 10SC, 3INC, 7SC (36)
Round 936SC (36)Mark the position for the eyes between rounds 8 and 9, the first eye between the 14th and 15th stitches, and the second eye between the 22nd and 23rd stitches.
Round 10(2SC, DEC) 9 times (27)
Round 11(SC, DEC) 9 times (18)
Stuffing
Round 123SC, 2DEC, 4SC, 2DEC, 3SC (14)Attach the safety eyes between R8-9 at the marked positions.
Body Section (Oval/Egg-Shaped)
Round 13FLO for all sts: (SC, INC) 7 times (21)
Round 1421SC (21)
Round 15(INC, 2SC) 7 times (28)
Round 1628SC (28)
Round 17(3SC, INC) 7 times (35)
Round 1835SC (35)
Round 19(4SC, INC) 7 times (42)
Round 2042SC (42)
Round 2142SC (42)
Round 2242SC (42)Rows 20-22 create the wide oval body shape.
Round 23(4SC, DEC) 7 times (35)
Round 24(3SC, DEC) 7 times (28)
Round 25(2SC, DEC) 7 times (21)Stuff firmly to maintain oval shape
Round 26(SC, DEC) 7 times (14)
Round 277DEC (7)Cut the yarn and use a yarn needle to close the gap.
Comb Instructions (Red)
The distinctive red comb gives your chicken authentic farmyard character. Attach Red yarn at the top center of the head in the R1-R2 area.
Section 1Chain 4, begin at the second chain from hook: 3SC, SLST to next st on head
Section 2Chain 5, begin at the second chain from hook: 4SC, SLST to next st on head
Section 3Chain 5, begin at the second chain from hook: 4SC, SLST to next st on head
Section 4Chain 4, begin at the second chain from hook: 3SC, SLST to next st on headCut the yarn and weave in ends.The comb should have 4 sections creating a wavy crown on top of the head.
Option 1 – Simple Beak
Attach Yellow yarn between R8-9, centered below the eyes
Round 1Chain 1 and crochet SC in same st, 2SC, SC in the same spot, chain 1 and SLST in next st (5)Cut yarn and weave in ends.
Option 2 – 3D Beak
Round 14SC in MR (4)
Round 24INC (8)
Round 3BLO 4DEC (4)Press the two edges together and close with 2SC. Attach to the face between the eyes at R8-9.Cut yarn and weave in ends.
Wattles Instructions (Red)
The wattles are the distinctive hanging parts under the beak that give chickens their characteristic appearance.
Attach Red yarn just below and to the right of the beak (R9-10 area)
Right WattleChain 5, begin at the second chain from hook: 4SC, SLST to next st on headAttach Red yarn just below and to the left of the beak (R9-10 area)
Left WattleChain 5, begin at the second chain from hook: 4SC, SLST to next st on headCut yarn and weave in ends.
Wings Instructions (Make 2)
Create two identical wings using White yarn. These will be attached flat to the body sides.
Round 16SC in MR (6)
Round 26INC (12)
Round 3(SC, INC) 6 times (18)
Round 418SC (18)
Round 5(SC, DEC) 6 times (12)Do NOT stuff. Press flat and close with 6SC through both sides.Attach wings to sides of body at R14-15, angled slightly upward.
Tail Feathers Instructions
The tail feathers add playful texture and dimension to your finished chicken. Attach White yarn to the back bottom of the body (R25-26 area).
Center FeatherChain 8, begin at the second chain from hook: 7SC, SLST to next st on body
Left FeatherChain 7, begin at the second chain from hook: 6SC, SLST to next st on body
Right FeatherChain 7, begin at the second chain from hook: 6SC, SLST to next st on bodyOptional: Add 2 more shorter feathers (Chain 5-6) for fuller tailCut yarn and weave in ends.
Assembly
Step 1Follow these guidelines to achieve the perfect chicken shape and proportions:
Step 2Body Shape: The body should be noticeably oval/egg-shaped – wider in the middle (R19-22), tapered at bottom (R23-27)
Step 3No Legs: The chicken has NO legs or feet. The body sits directly on the surface with the oval bottom as the base
Step 4Comb Position: The red comb should stand upright on top of the head, creating 4 wavy sections
Step 5Wattles Position: The red wattles hang down from below the beak on both sides
Step 6Wings Position: Attach wings flat to the sides of the body at rows 14-15
Step 7Tail Position: Tail feathers should fan out at the back, creating a layered effect
Finishing
- Weave in every cut end as each small piece — comb, beak, wattles, wings, tail feathers — is finished.
- Stuff the head and body firmly before closing, keeping the egg shape even rather than lopsided.
- Attach safety eyes first, then sew the comb, beak, wattles, wings, and tail feathers in their marked positions.
- Eyelashes: embroider small curved lines above the eyes using black yarn.
- Cheeks (optional): add small circular stitches in pink or blush yarn on the sides of the face for rosy cheeks.
- Shape the body by gently molding it so it keeps its oval/egg form, then weave in and trim any remaining ends.
Why it works
The head's increase rounds step up gradually — from 6 to 12 to 18 to 27 stitches — spreading the shaping so the dome curves rather than peaks.
The oval body widens through its middle rounds and tapers at the bottom rounds, which replaces the need for legs entirely; the tapered base becomes the surface it stands on.
The 3D beak option is worked in the round and then flattened by pressing its two edges together and closing with single crochet, turning a tube into a wedge shape.
What it becomes
- A shelf piece for a farmyard or barn-themed amigurumi collection, paired with other animal makes.
- A soft toy for a child's room, sturdy enough to sit upright without legs for balance.
- A desk or windowsill companion, small enough to tuck beside other handmade figures.
Original pattern: https://amigurumiarts.com/crochet-a-cuddly-chicken-free-amigurumi-pattern-tutorial/
FAQ
Which beak option should I pick?
The simple beak is a one-round chain-and-slip-stitch edge, faster and flatter against the face. The 3D beak takes three rounds and some pressing but gives a more sculpted, lifelike shape.
Why doesn't this chicken have legs?
The body is shaped as a tapered oval specifically so it can sit flush on the surface. The bottom rounds narrow into a stable base instead of leaving room for separate legs.
What yarn weight does this call for?
The pattern uses bulky yarn with a 4.5 mm hook, which keeps the stitches large and the finished chicken quick to work up. Stick with bulky for the proportions to come out as written.
How do I keep the comb standing upright?
Sew its base firmly along the top of the head rather than tacking just the center. A secure seam across the whole base keeps the four wavy sections from flopping over.