
Free Pattern
Step-by-Step
Crochet
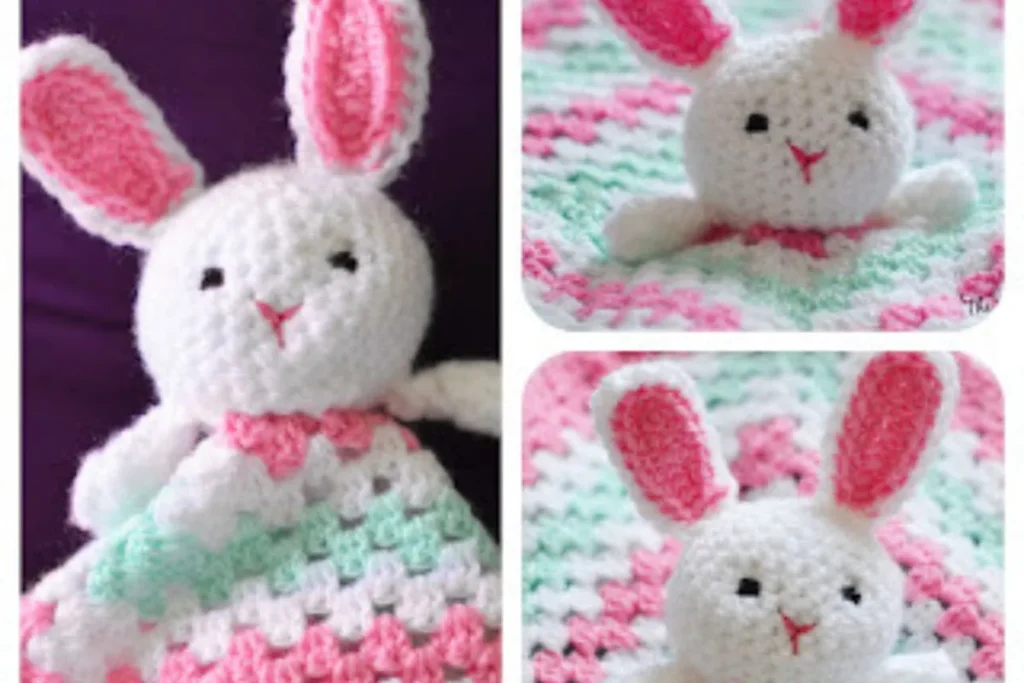
AmigurumiCrochet bunny lovey with an attached security blanket
A soft crocheted bunny head sewn onto a flat blanket, worked in single and double crochet.
- Level
- Beginner
- Time
- 30 minutes-1 hour
- Hook
- 4.0 mm
- Yarn
- Worsted
Pattern highlights
- Start the bunny head in a magic ring and build it up in rounds of single crochet.
- Increase steadily so the rounds widen into a rough sphere shape.
- Add safety eyes before closing the head, then stuff it firmly with polyester filling.
- Set the head aside and chain a foundation row for the blanket.
- Work the blanket flat in double crochet, turning at the end of every row.
- Keep repeating rows until the blanket panel reaches the length you want.
- Sew the finished bunny head onto the center of the blanket to join the two pieces.
About This Pattern
A lovey occupies an odd corner of a crochet collection - half toy, half blanket, made to be gripped rather than displayed. This bunny version pairs a stuffed amigurumi head with a flat panel, the kind of hybrid that shows up when someone wants a comfort object, not a shelf piece. It's a small project on paper, but it borrows from two different crochet traditions at once, which is part of why I like it.
What comes out the other end is a round bunny head with safety eyes, stitched to the center of a rectangular blanket sized to whatever length feels right. It's soft, it's washable in the sense that acrylic yarn usually is, and it's built to survive being dragged around by a toddler. That's the whole design brief, really.
Common mistakes
- Loose magic ring at the start Pull the tail firm before working round 1 so no gap shows at the very center of the bunny's head.
- Increases landing unevenly Use a stitch marker at the start of each round so the increase pattern in rounds 2 and 3 stays lined up rather than spiraling off.
- Forgetting the turning chain on the blanket Chain 3 at the start of every row after the first; skipping it pulls the edge in and warps the panel.
- Under-stuffing before closing the head Add fiberfill gradually and press it toward the edges, checking firmness before the final rounds close the gap.
- Sewing the head off-center Fold the blanket in half both ways first to find the true center, then pin the head there before stitching.


Beginner
Progress Tracker
0 of 0 rounds
Tap a round to tick it off — your place is saved on this device.
The kit
- A size G/6 (4.0 mm) crochet hook is best for the Free Crochet Bunny Lovey Pattern . It makes tight stitches for a cute bunny head and lovey blanket. Beginners should test their gauge and adjust hook sizes to get the right stitches.
You'll also need some extra materials
- Polyester stuffing for the bunny head
- Stitch markers to keep track of rounds
- Tapestry needle for weaving in ends and stitching
Main Pattern
Round 1Make a magic ring, ch 1, and work 6 sc into the ring. Pull tight to close. (6)
Round 22 sc in each st around. (12)
Round 3*1 sc, 2 sc in next st* repeat around. (18)
Rounds 4–6Sc in each st around. (18)
Round 7*1 sc, sc2tog* repeat around. (12)Round 8: Sc2tog around. (6). Fasten off and leave a long tail for sewing. Stuff the head firmly with fiberfill before closing the last 6 stitches. Now, crochet the ears and attach them to the head.
Next, it's time to crochet the lovey blanket part:
Blanket Part
Round 1Ch 33. In the 3rd ch from hook, dc. Dc in each remaining ch. (32)
Round 2Ch 3 (counts as first dc), turn. Dc in each st across. (32)Repeat Row 2 until the blanket measures approximately 12 inches. Feel free to customize the size.
Joining the Bunny to Lovey: With the long tail remaining on the bunny head, sew neatly onto the center of the blanket. Ensure the head is securely fastened.
Creating the Bunny Head
Start with a magic ring and six single crochets. Increase stitches in each round to form a sphere. Add safety eyes before closing the circle and filling it with fiberfill.
Make the ears separately and attach them well. Follow Crochet Bunny Lovey Instructions for details like the nose and mouth.
Crocheting the Lovey Blanket
Begin with a granny square for the lovey blanket. Use soft, baby-safe yarn in pastel colors. Make sure the blanket fits the bunny head well, following a Crochet Bunny Lovey Step by Step guide.
Crochet until the blanket is 12 to 15 inches across.
Attaching the Bunny to the Lovey
Finally, sew the bunny head to the lovey blanket's center. The sewing should be tight to last. This completes your Crochet Bunny Lovey Instructions with a sturdy finish.
Finishing
- Weave in loose ends on the head and blanket separately before joining them, so nothing pulls loose later.
- Stuff the bunny head firmly with polyester filling before the final round closes, checking it's even on all sides.
- Sew the head to the center of the blanket with its long tail, tacking it down securely so it won't shift.
Why it works
The head increases twice in the early rounds (round 2, round 3), which is what pushes a flat disc into a rounded sphere before the plain rounds take over.
The blanket is worked flat, not in the round, because a lovey blanket needs two even, open edges rather than a closed tube.
The join isn't a crochet stitch at all - it's a sewn seam using the head's own tail, anchoring the toy at the blanket's center so it stays put in small hands.
What it becomes
- A baby shower gift, paired with a onesie or a soft board book in similar pastel colors.
- A stroller or crib companion toy, small enough to clip on and easy to wash.
- A nursery shelf accent alongside other amigurumi pieces from the same yarn family.
Original pattern: https://crochetblog.net/crochet-bunny-lovey-free-pattern/
FAQ
What yarn works best for this lovey?
Soft acrylic yarns like Soft or Bernat Baby Blanket hold up well and stay gentle against skin. Both come in the pastel pink, blue, and white shades commonly used for this piece.
Can I make the blanket bigger or smaller?
Yes, the blanket rows repeat until you reach the length you want, so it's easy to adjust. Just keep working Row 2 longer or stopping it sooner than the suggested size.
What size hook do I need?
A size G/6 (4.0 mm) hook is recommended for tight, even stitches on both the head and blanket. Beginners should still swatch first and adjust hook size if their gauge runs loose.
Do I need safety eyes or can I embroider them instead?
The pattern calls for safety eyes, added before the head closes and is stuffed. If the lovey is for a very young baby, embroidered features are a safer swap since they can't detach.