
Free Pattern
Step-by-Step
Crochet
AmigurumiCrochet Chick Pattern: Easy Egg-Shaped Amigurumi Guide
Make an adorable egg-shaped crochet chick amigurumi with wings, feet, and a cute beak. Step-by-step guide with tips for a perfect baby chick shape.
Level IntermediateTime 4-6 HoursHook 4.5 mmYarn Worsted
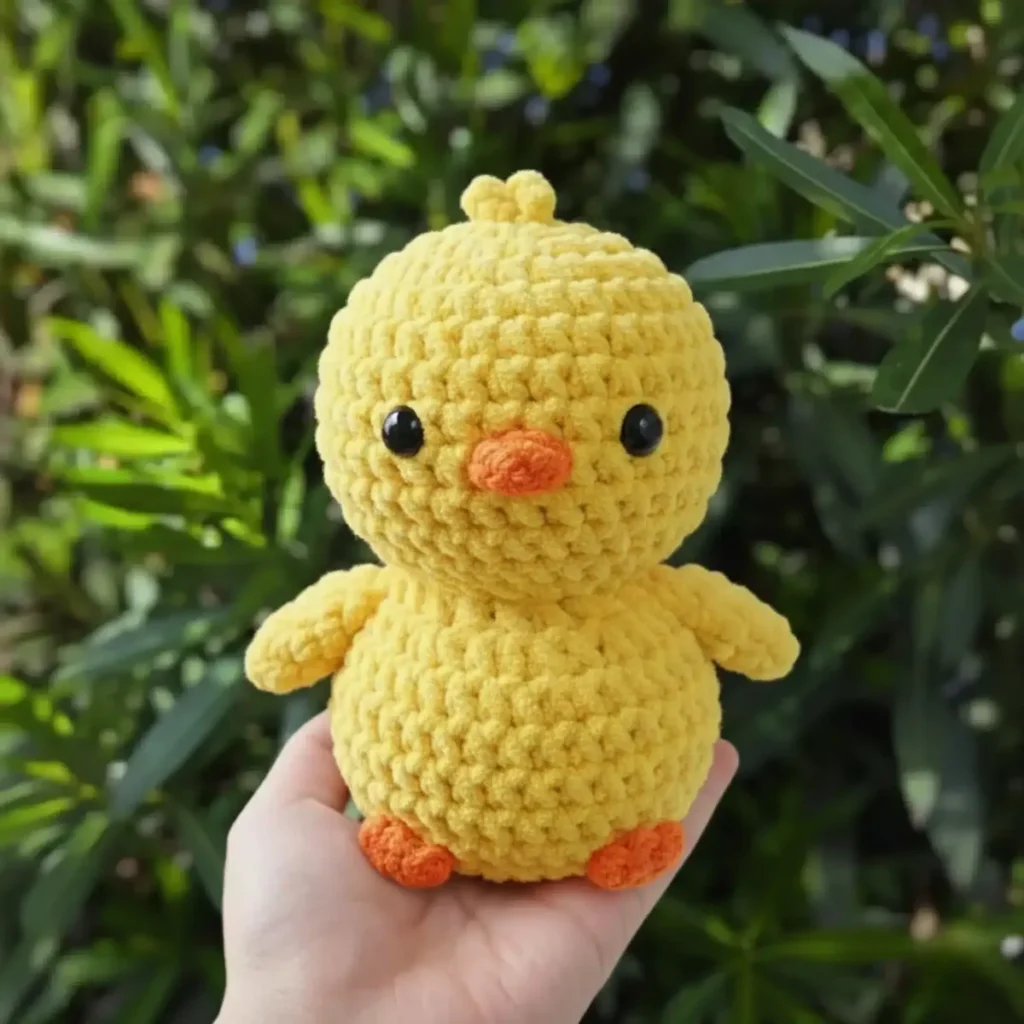
Pattern highlights
- Begin the head and body as one continuous piece, working in a spiral with yellow yarn throughout.
- Increase steadily through the main pattern rounds to build up to the widest point of the egg shape.
- Pause partway through to sculpt the eye sockets before inserting the safety eyes for a dimensional face.
- Continue shaping the body downward, following the decrease rounds to taper toward the base.
- Stuff the body firmly, paying extra attention to the widest section to preserve the egg silhouette.
- Crochet the wings separately, then attach them to each side of the body for texture and dimension.
- Work the small beak and feet pieces, stuffing lightly before sewing them securely into place.
- Weave in all loose ends and give your chick a final shape check before it's ready to display.
About This Pattern
The head and body are worked as one continuous seamless piece in yellow yarn, so you'll get comfortable with continuous rounds, strategic increases, and the eye socket sculpting technique that gives this chick its lifelike, dimensional face before you ever pick up the safety eyes. Beyond the body, you'll shape textured wing flaps, a tiny pointed beak, and sculpted feet, layering in just enough variety to keep things interesting without overwhelming an intermediate-level crocheter. Expect to spend roughly 4-6 hours from first magic ring to final stitch, depending on your tension and how many coffee breaks you take.
Variations
This chick is begging for color experiments — try a soft pastel palette Vanna's Choice in Butter or Bernat Softee Baby in Yellow for a gentler nursery look, or go bold Super Saver in Bright Yellow paired with an orange felt beak for a classic farmyard vibe. For a fun flock, crochet three or four in slightly different shades — pale yellow, golden yellow, and even a soft peach — using the same 42-stitch widest-point shaping so they all share that signature egg silhouette. Want a mini version? Drop to a smaller hook (like a 3.0mm instead of a standard amigurumi hook) and use a lighter worsted or DK-weight yarn to shrink the whole piece by roughly 20-25%, perfect for keychains or ornament-sized chicks. For a bigger, huggable version, size up to a bulky yarn with a 5.5mm hook, which will naturally increase your gauge and produce a squeezable, pillow-sized chick. Seasonal spins are easy too: swap the plain yellow for a spring theme with tiny flower embroidery near the wings, or add a small knit-look scarf for a fall farmhouse display. You could also experiment with the wing shaping by adding a few extra rounds for slightly larger, more dramatic flaps, or embroider simple feather lines onto the wings with contrasting thread for added texture. If you want a fluffier, more dimensional finish, try a plush or chenille-style yarn for the body while keeping regular worsted weight for the beak and feet so the contrasting textures really pop.
I adore this pattern because it proves amigurumi doesn't have to be a plain round ball to be simple — the egg-shaped body is achieved through a clear, deliberate increase pattern that builds up to 42 stitches at the widest point, and watching that shape emerge round by round is so satisfying. The eye socket sculpting technique is my favorite part; it gives the face real dimension before the safety eyes even go in, so your chick looks expressive instead of flat. I also love that the head and body are worked as one continuous piece in yellow yarn, which means fewer seams and a cleaner finish. The wings, beak, and feet each get their own mini sections, so you're never bored — you're constantly building a new little feature. By the time you attach those tiny feet, you'll feel like a proper amigurumi sculptor, not just someone following rounds. It's the kind of project that teaches real shaping skills while still feeling like a fun, fast weekend make.
Common mistakes
- Losing track of the continuous rounds
- Place a stitch marker in the first stitch of every round and move it up each time; this keeps you oriented even through a long, uninterrupted stretch of stitching.
- Skipping or rushing the eye socket
- Work this section slowly and check the dimension by holding the piece up periodically; the sculpted indentation should be visible even before the eyes go in.
- Overstuffing or understuffing
- Stuff firmly but in small handfuls, checking the shape against a real egg or picture reference as you go so the widest point stays proportional.
- Attaching the wings or feet
- Finish stuffing and closing the body first, then use pins or stitch markers to test wing and foot placement on both sides before sewing anything permanently.
- Miscounting stitches
- Count your stitches at the end of every round listed in the pattern notes, and use a row counter or tally to confirm you've hit the target stitch count before moving on.
- Using yarn that's too slippery or thin
- Stick with a sturdy worsted-weight yarn for these small structural pieces and stuff them just enough to hold form without overfilling, which can stretch the stitches.


Intermediate
Progress Tracker
0 of 0 rounds
Tap a round to tick it off — your place is saved on this device.
Materials
- Bernat #5 Bulky Yarn in Yellow and Orange
- Crochet hook, 4.5mm (US size 7)
- Stitch marker
- Sewing needle
- Scissors
- Fiberfill stuffing
- Plastic safety eyes (12mm – black)
Main Pattern
The head and body are worked as one continuous piece, creating a seamless construction. Use yellow yarn throughout this section.
- Round 16SC in a MR (6)
- Round 26INC (12)
- Round 3(SC, INC) 6 times (18)
- Round 4(SC, INC) 9 times (27)
- Round 527SC (27)
- Round 6(8SC, INC) 3 times (30)
- Round 730SC (30)
- Round 87SC, 3INC, 10SC, 3INC, 7SC (36)
- Round 936SC (36)Use a different colored yarn to mark the position for the eyes between rounds 8 and 9, the first eye between the 14th and 15th stitches, and the second eye between the 21st and 22nd stitches.
- Round 10(2SC, DEC) 9 times (27)
- Round 11(SC, DEC) 9 times (18) Stuffing
Eye Socket Sculpting Technique
This professional technique adds dimension to your chick’s face:
Thread a piece of yarn from the neck through point A to C, and from point B to D, then back down to the neck. Pull the yarn tight and tie a knot to create the eye sockets. Hide the excess yarn inside the head.
Attach the eyes between R8-9 at the two points where you’ve created the eye sockets.
Main Pattern
- Round 123SC, 2DEC, 4SC, 2DEC, 3SC (14)
- Round 13FLO for all sts: (SC, INC) 7 times (21)
- Round 1421SC (21)
- Round 15(INC, 2SC) 7 times (28)
- Round 1628SC (28)
- Round 17(INC, 3SC) 7 times (35) ← Start of oval body shape
- Round 1835SC (35)
- Round 19(INC, 4SC) 7 times (42) ← Widest point (egg shape)
- Round 2042SC (42)
- Round 21(4SC, DEC) 7 times (35)
- Round 22(3SC, DEC) 7 times (28)
- Round 23BLO for all sts, (2SC, DEC) 7 times (21) Stuffing
- Round 24(SC, DEC) 7 times (14)
- Round 257DEC (7)Cut the yarn and use a yarn needle to close the gap.
Understanding the Egg-Shaped Body
Rows 17-20 are crucial for creating the distinctive oval, egg-shaped body of the chick. The body reaches its widest point at 42 stitches (Row 19-20), creating that bottom-heavy, authentic chick silhouette that makes this pattern so special. This careful shaping creates the characteristic waddle-ready stance of a baby chick.
Creating the Wings
The wings are worked directly onto the body, creating a secure attachment. Make two wings, one on each side.
Attach Yellow yarn to the side of the body between R16-17.
- Round 1Chain 1 and SC in same stitch, 2SC (3)
- Round 2Chain 1, turn, 3SC (3)
- Round 3Chain 1, turn, DEC, SC (2)
- Round 4Chain 1, turn, DEC (1)Cut the yarn and hide the excess yarn.Make the second wing on the opposite side of the body.
Making the Beak
Switch to orange yarn for this adorable detail.
- Round 14SC in a MR (4)
- Round 24SC (4)
- Round 3DEC, 2SC (3)Cut the yarn and leave a long tail for sewing.Sew the beak between the eyes on the front of the head (between R9-10).
Do NOT stuff the beak.
Crafting the Feet
These sturdy little feet help your chick stand proudly. Make two feet using orange yarn.
- Round 16SC in a MR (6)
- Round 26INC (12)
- Round 312SC (12)
- Round 4(2SC, DEC) 3 times (9)
- Round 5(SC, DEC) 3 times (6)Stuff lightly.Press the two edges together and close with 3SC. Cut the yarn and leave a long tail for sewing.Sew the feet to the bottom of the body (R24-25), positioned slightly forward so the chick can “stand”.
Adding the Head Tuft
This charming detail adds personality to your chick.
Attach Yellow yarn to the top of the head (R1).
- Head TuftMake 3 small tufts: Chain 3, SLST in second chain from hook, SLST in next chain, SLST to next stitch on head. Repeat 2 more times in adjacent stitches.Cut the yarn and hide the excess yarn.
Body Shape Breakdown
Understanding how the body shape develops will help you achieve the perfect silhouette:
- Round 13-16Gradual increase from 21 to 28 stitches begins the body expansion
- Round 17-18First major expansion to 35 stitches starts the oval shape
- Round 19-20Widest point at 42 stitches creates the distinctive egg shape
- Round 21-25Gradual decrease creates the bottom-heavy silhouette
The body reaches 42 stitches to create the distinctive oval, egg-like bottom that makes this chick authentic and adorable. This careful shaping is what transforms a simple amigurumi into a characterful baby chick.
Assembly
- Step 1Optional Embroidery Details: Eyebrows: Use black yarn to embroider small curved lines above each eye for a cute, expressive face.
- Step 2Rosy Cheeks: Use pink yarn or embroidery thread to make small French knots or straight stitches on either side of the beak for that sweet, blushing look.
- Step 3Body Texture: The oval shape of the body naturally creates an authentic chick silhouette that’s wider at the bottom, giving it a realistic appearance.
- Step 4Professional Assembly Tips: Follow these guidelines for the best results: ✅ Make sure the beak is centered between the eyes for a balanced face
- Step 5✅ Position feet slightly forward so the chick can “stand” properly
- Step 6✅ Adjust stuffing to maintain the distinctive oval body shape
- Step 7✅ The widest part of the body should be at rows 19-20 for that authentic egg shape
Important notes
💡 Use a hook one size smaller than the yarn label recommends to keep your stitches tight enough that stuffing won't peek through, especially important on the egg-shaped body.
💡 Since the head and body are one continuous piece, place a locking stitch marker at the start of round one and move it up every round so you never lose your place.
💡 Insert the 12mm safety eyes after completing the eye socket sculpting technique but before you finish stuffing the head, since it's much easier to adjust eye placement while the piece is still soft.
💡 Stuff the widest point of the body (the 42-stitch section) a little more firmly than the neck area to help the egg shape hold its characteristic bottom-heavy silhouette.
💡 Keep a small scrap of yellow yarn nearby to whip-stitch the wings and feet on securely, and pin them in place first to double-check symmetry before committing to stitches.
💡 Weave in ends as you finish each small piece (wings, beak, feet) rather than saving them all for the end, since these tiny pieces are much easier to manage individually.
This pattern follows standard US crochet terminology.
The designer finishes each round with a slip stitch and chain one to ensure the best shape and form.
Your finished size may vary based on yarn choice and individual stitch tension.
This pattern is for personal use only, but you're welcome to sell your finished items.
The approximate finished size is 19 cm (7.5 inches).
FAQ
What yarn weight works best for this chick pattern?
This pattern is designed for #5 bulky weight yarn, specifically Bernat bulky yarn. Using bulky yarn helps the project work up quickly and creates a sturdy, cuddly finished chick approximately 19 cm (7.5 inches) tall. If you substitute with a different yarn weight, your finished size will vary, and you may need to adjust your hook size accordingly.
Do I need to stuff the entire chick, including all parts?
You should stuff the head and body firmly to maintain the egg shape, and stuff the feet lightly so they can support the chick. However, do NOT stuff the beak – leaving it unstuffed keeps it properly shaped and prevents it from looking bulky. Add stuffing at the points indicated in the pattern (Row 11 and Row 23) for best results.