
Free Pattern
Step-by-Step
Crochet
AmigurumiCrochet cloud doll keychain with a pink cone hat
A soft cloud keychain worked in rounds, with a pink hat and simple face details.
- Level
- Intermediate
- Time
- 4-6 hours
- Yarn
- Worsted
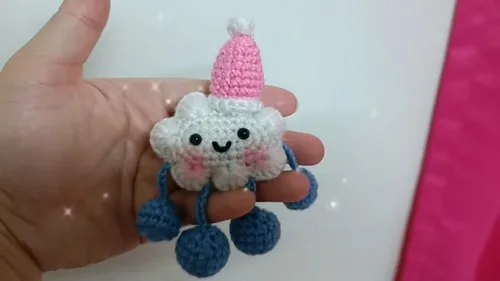
Pattern highlights
- Crochet the pink hat first, shaping it in rounds from a small closed top down to its base.
- Work the two main body pieces separately, since they'll be joined later around the stuffing.
- Make the arms in blue yarn, stuffing them lightly before closing each one with a chain loop.
- Crochet the legs in blue yarn, following the same rounded shaping as the arms but longer.
- Sew the two body pieces together, adding stuffing before the seam is fully closed.
- Attach the arms, legs, and hat to the finished body with a yarn needle.
- Add the safety eyes, embroider the mouth, and blush the cheeks to finish the face.
About This Pattern
This is the kind of small amigurumi I keep a drawer for. Not a display piece, not a blanket — a doll built to travel on a zipper pull. Two body pieces, a hat, four tiny limbs. Nothing here takes more than an evening, which is exactly the point of a keychain pattern.
The techniques are the usual amigurumi toolkit: single crochet worked in the round, a handful of double crochet stitches to shape the increases, and a short chain for the hat's attachment loop. Nothing exotic. It's the kind of project where the stitches themselves fade into the background and the shaping does the talking.
What comes out the other end is a soft, lightly rounded cloud with a jaunty pink hat, blue limbs, and a face you build yourself with safety eyes and pastel blush. Small enough to clip anywhere. Sturdy enough to survive a bag full of keys.
Worth knowing
I like a pattern that fits in a coat pocket while I make it. This one is mostly single crochet, which means the rhythm sets in fast and stays there — round after round without much to second-guess. The double crochet stitches show up right where the shape needs to swell, so you feel the piece rounding out under your hands instead of just trusting the instructions. Two body pieces mean you get to watch the whole thing take form twice before joining. And the finishing is where the personality shows up: safety eyes, a stitched mouth, blush on the cheeks. Four small parts, one quick assembly, and a keychain that looks far more deliberate than the time it actually took.
Common mistakes
- Losing the round marker this many short rounds across four parts, mark the start of each one. Otherwise the increases drift and the hat stops sitting straight.
- Overstuffing the limbs Arms and legs are small, and too much stuffing pulls the single crochet stitches apart. Add stuffing gradually and check the shape as you go.
- Closing the body before stuffing enough It's easy to seam up faster than you stuff. Add cotton as the seam closes, not all at once at the end.
- Gluing safety eyes off-center Pin both eyes in place and step back before applying glue. Symmetry matters more on a face this small.
- Skipping the chain loop on the arms That short chain sets how the arm hangs once sewn on. Leave it out and the arm sits too close to the body.


Intermediate
Progress Tracker
0 of 0 rounds
Tap a round to tick it off — your place is saved on this device.
The kit
- White, blue, and pink yarn
- Safety eyes
- Crochet hook
- Yarn needle
- Scissors
- Stuffing cotton
Optional
- black yarn (for mouth), blush/pastels (for cheeks)
Hat
Use pink yarn
Round 16 single crochet
Round 23 single crochet, 1 double crochet
Round 33 single crochet, 2 double crochet
Round 412 single crochet
Round 53 single crochet, 1 double crochet
Rounds 6–815 single crochet Switch to white yarn
Rounds 9–1115 single crochet Stuff with cotton Close top with needle
Arms (Make 2)
Use blue yarn
Round 16 single crochet
Round 26 double crochet
Rounds 3–412 single crochet Stuff with cotton
Round 56 single crochet decreases Close with needle Chain 8 and attach to arms
Legs (Make 2)
Use blue yarn
Round 16 single crochet
Round 26 double crochet
Round 34 single crochet, 2 double crochet
Rounds 4–516 single crochet
Round 64 single crochet, 2 single crochet decreases Stuff with cotton
Round 76 single crochet decreases Close with needle Chain 10 and attach to legs
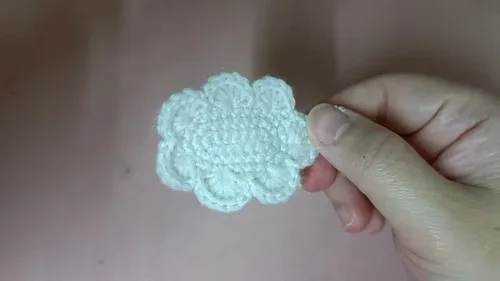
Main Body (Make 2 Pieces)
Make 2Use white yarn Chain 8
Round 26 single crochet, 1 triple crochet, 5 single crochet, 1 double crochet
Round 31 double crochet, 5 single crochet, 3 double crochet, 5 single crochet, 2 double crochet
Round 41 single crochet, 1 double crochet, 5 single crochet, 3 double crochet, 5 single crochet, 2 single crochet, 1 double crochet
Round 57 slip stitches, 1 single crochet, 7 triple crochet, 1 single crochet Cut yarn and secure with needleMake another identical cloud piece
Assembly
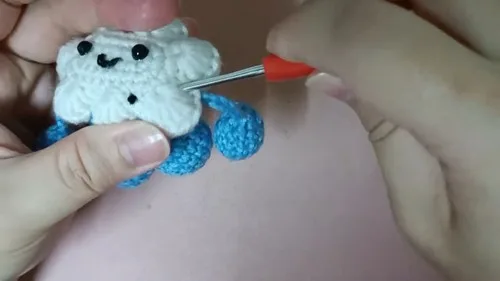
Step 1Sew the two cloud body pieces together, stuffing before fully closing
Step 2Sew arms and legs onto the cloud body
Step 3Sew the hat to the top of the cloud
Step 4Attach safety eyes with glue
Step 5Embroider mouth with black yarn
Step 6Apply pink blush to cheeks using pastels
From the collection
Finishing
- Weave in loose ends on the hat, arms, and legs before assembly, so nothing pokes through the stuffing later.
- Stuff each body piece and the arms before closing the final rounds, packing corners so the shape stays round rather than lumpy.
- Sew the pieces together last — body seam first, then hat, arms, and legs — followed by the safety eyes, embroidered mouth, and blushed cheeks.
Why it works
The hat's shaping happens fast: single crochet dominates the first round, then double crochet stitches enter early to flare the cone before it settles into an even round count.
The chain attached to each arm isn't decorative — it's the connector that lets the limb be sewn onto the body at a set distance rather than flush against it.
What it becomes
- Clip it to a backpack or bag alongside a set of keys for something soft in the everyday clutter.
- Give it as a small handmade gift on its own, no wrapping paper required.
- Set it on a shelf with other small amigurumi as a low-effort addition to a growing collection.
Original pattern: https://crocheteverything.com/crochet-cloud-doll-keychain-pattern-thats-too-cute-to-handle/
FAQ
Can I change the yarn colors from the pattern?
Yes, the pattern is built around white, blue, and pink, but any worsted yarn will hold the same shaping. Swap colors freely since nothing about the stitches depends on them.
Do I need safety eyes, or can I embroider the eyes instead?
Safety eyes are listed in the materials and give a cleaner, store-bought look. Embroidered eyes would work too, though the pattern as written assumes the safety eye attachment step.
Why does the body call for two pieces instead of one continuous round?
Two pieces let you stuff and shape each half before joining them, which keeps a small round shape from collapsing. It's a common approach for pieces this compact.
How long does this keychain take to finish start to finish?
Between the hat, two body pieces, two arms, and two legs, expect a few focused sessions rather than one sitting. The individual parts are quick; the count of parts is what adds up.