
Free Pattern
Step-by-Step
Crochet
AmigurumiCrochet fox amigurumi pattern with color-change body
A crochet fox amigurumi with two-tone body shaping, tidy ears, and a full tail.
- Level
- Intermediate
- Time
- 4-6 hours
- Hook
- 2 mm
- Yarn
- DK
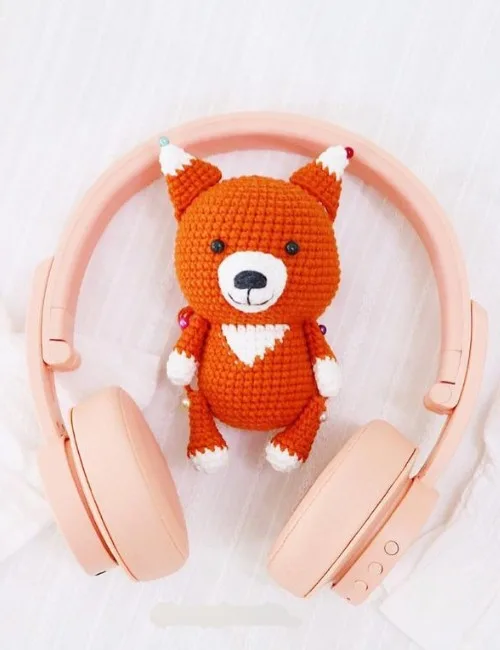
Pattern highlights
- Start the head with a magic ring and increase steadily until it reaches its widest point.
- Work a front loop only round on the head to leave a ridge for the body to meet.
- Continue the head in back loops, shaping and decreasing toward the top before stuffing.
- Insert the hook into the head's back loop round to begin the body in two colors.
- Make the ears, nose, and tail as separate pieces, working some in the round and some flat.
- Sew the finished pieces to the head and body once every part is stuffed and closed.
About This Pattern
Every collection needs a fox eventually. Mine sat as a sketch for a while before I worked out the color changes. This one earns its spot with a body that actually reads as a fox, not a generic blob with ears sewn on.
The techniques here are the usual amigurumi toolkit, but stacked with intent: magic ring starts, front loop only rounds for a visible ridge, invisible decreases, and a two-color body worked in the round with yarn carried, not cut, between orange and white.
The finished fox is small, dense, and stands on its own once stuffed. Head, body, nose, and tail all join into one solid shape, the kind that survives a shelf, a bag, or a curious toddler.
Worth knowing
What I like about this one is the color work. You're not intarsia-ing anything fussy, just tracking orange and white stitch counts across a round while the shape narrows and widens under you. The FLO round on the head gives a clean seam line for the body to sit against later, which is oddly satisfying to discover. The ears are worked flat in two colors with a color change mid-round, small enough to finish in one sitting. And the tail, at ten rounds, is the longest single piece besides the body, so it gives you a stretch of plain single crochet to get into a rhythm before the fiddly finishing work starts.
Common mistakes
- Losing the color-change count Count orange and white stitches against the round's written total before moving on. A single stitch drift shows up fast in a two-color body.
- Working the wrong loop on round 4 Check you're catching only the front loop on the head's FLO round. The back loops need to stay free for the body to attach.
- Skipping the yarn carry between colors Carry the unused color loosely inside the stitches instead of cutting it each round. Cutting and rejoining leaves extra ends to weave later.
- Under-stuffing before closing Add fiberfill in small amounts as you decrease the last rounds, not all at once at the end. It's harder to pack firmly through a nearly closed opening.
- Placing safety eyes before checking spacing Hold the eyes against the head with the backs unattached first. Once they're locked in, repositioning means unpicking stitches.


Intermediate
Progress Tracker
0 of 0 rounds
Tap a round to tick it off — your place is saved on this device.
The kit
Yarn
- sport or DK light
- weight yarn. (I used Yarnart Jeans)
Crochet hook
- 2mm-2.5mm
- Black embroidery thread
- Abbreviation
- MR – magic ring
- sc- single crochet
- hdc – half double crochet
- dc – double crochet
- inc- increase (2 single crochet in 1 stitch)
- dec – decrease (invisible decrease)
- FLO-front loop only
- slst – slip stitch
- Step by step Pattern
Tools
- Safety eyes size 5mm
- Fiberfill
- Yarn needles
Head
Round 18sc in MR (8)
Round 28-inc (16)
Round 3(sc, inc) * 8 (24)
Round 4BLO 24sc (24)
Round 5(2sc, inc) * 8 (32)
Round 6(3sc, inc) * 8 (40)
Round 7(9sc, inc) * 4 (44)
Rounds 8–12(5 rnds) 44sc (44)
Round 13(9sc, dec) * 4 (40)
Rounds 14–15(2 rnds) 40sc (40)
Round 16(8sc, dec) * 4 (36)
Round 1736sc (36)
Round 18(4sc, dec) * 6 (30)
Round 19(3sc, dec) * 6 (24)
Round 20(2sc, dec) * 6 (18)
Round 21(sc, dec) * 6 (12)
Round 226-dec (6)Cut the yarn and weave in the end
Body
Insert the hook to BLO round on head (rnd 4)
Round 1Orange (3sc, inc) * 2, 2sc, (white) sc, inc, 3sc, inc, 2sc, (orange) sc, inc, 3sc, inc (30)
Round 2Orange 13sc, (white) 8sc, (orange) 9sc (30)
Round 3Orange 14sc, (white) 6sc, (orange) 10sc (30)
Round 4Orange 15sc, (white) 4sc, (orange) 11sc (30)
Round 5Orange (4sc, inc) * 3, sc, (white) 2sc, (orange) sc, (inc, 4sc) * 2, inc (36)
Rounds 6–8(3 rnds) 36sc (36)
Round 9(4sc, dec) * 6 (30)
Rounds 10–11(2 rnds) 30sc (30) Rnd 12. (3sc, dec) * 6 (24)
Round 13(2sc, dec) * 6 (18)
Round 14(sc, dec) * 6 (12)
Round 156-dec (6)Cut the yarn and weave in the end Arm * 2 Start with white
Part 3
Round 16sc in MR (6)Rnd 2-3. (2 rnds) 6sc (6)change to orange
Rounds 4–8(5 rnds) 6sc (6)Cut the yarn, leave the long tail for sewing Ear * 2 Start with white
Part 4
Round 14sc in MR (4)
Round 2(sc, inc) * 2 (6) change to orange
Round 3(2sc inc) * 2 (8)
Round 4(3sc, inc) * 2 (10)
Round 5(4sc, inc) * 2 (12), slst Cut the yarn, leave a long tail for sewing Leg* 2 Start with white
Part 5
Round 16sc in MR (6)
Round 26-inc (12)change to orange
Round 3BLO 12sc (12)
Round 43sc, 3dec, 3sc (9)
Round 53sc, 2dec, 2sc (7)
Rounds 6–9(4 rnds) 7sc (7)Cut the yarn, leave a long tail for sewing
Nose
Round 16sc in MR (6)
Round 2(sc, inc) * 3 (9)
Round 3(2sc, inc) * 3 (12)
Round 412sc (12)
Round 5(3sc, inc) * 3 (15), slst Cut the yarn and weave in the end.
Tail
Start with white
Round 14sc in MR (4)
Round 2(sc, inc) * 2 (6)
Round 3(sc, inc) *3 (9)
Round 49sc (9)
Round 5(2sc, inc) * 3 (12)change to orange
Rounds 6–7(2 rnds) 12sc (12)
Round 8(2sc, dec) * 3 (9)
Round 99sc (9)
Round 10(sc, dec) * 3 (6)
Round 116sc, slst Cut the yarn, leave a long tail for sewing
Finishing
- Weave in every color-change tail as you go, since orange and white ends multiply fast on the body.
- Stuff the head and body firmly before closing, checking the fox stands upright once the fiberfill settles.
- Sew the ears, nose, and tail onto the head and body using the long tails left for that purpose.
Why it works
The head's front loop only round at round 4 isn't decorative; it marks the exact spot where the body's first round attaches later.
The body starts by picking up stitches from that same back loop round on the head, joining the two pieces before any body shaping begins.
Part 3's flat two-round, then five-round structure with a color change mid-piece keeps the ear small and quick, worked in the round rather than flat despite its short length.
What it becomes
- A shelf piece for a small amigurumi collection, sitting alongside other stuffed animals in similar yarn weight.
- A handmade gift for someone who collects small crochet figures rather than large stuffed toys.
- A quiet-play toy for a child who likes something soft and fox-sized to carry around.
FAQ
Why does the body start with a back loop pickup?
The head's round 4 was worked in front loops only, leaving the back loops free. Picking up there gives the body a seamless join instead of a sewn seam.
Do I need safety eyes, or can I embroider them?
The materials list calls for 5mm safety eyes, and they're worth using for security on a toy that gets handled. Black embroidery thread is already on the list for other face details, so it's there if you want to supplement.
How long does the whole fox take to make?
Between the head, body, and five smaller parts, expect a few sittings rather than one. The color-tracked body rounds slow you down more than the plain single crochet parts like the tail.