
Free Pattern
Step-by-Step
Crochet
Wearable Tech AccessoriesCrochet headphone covers with a soft cream and pink finish
A removable crochet cover set that dresses up headphones with a headband sleeve and two ear cup covers.
- Level
- Easy to Intermediate
- Time
- 3-4 hours
- Hook
- 3.5 mm
- Yarn
- DK
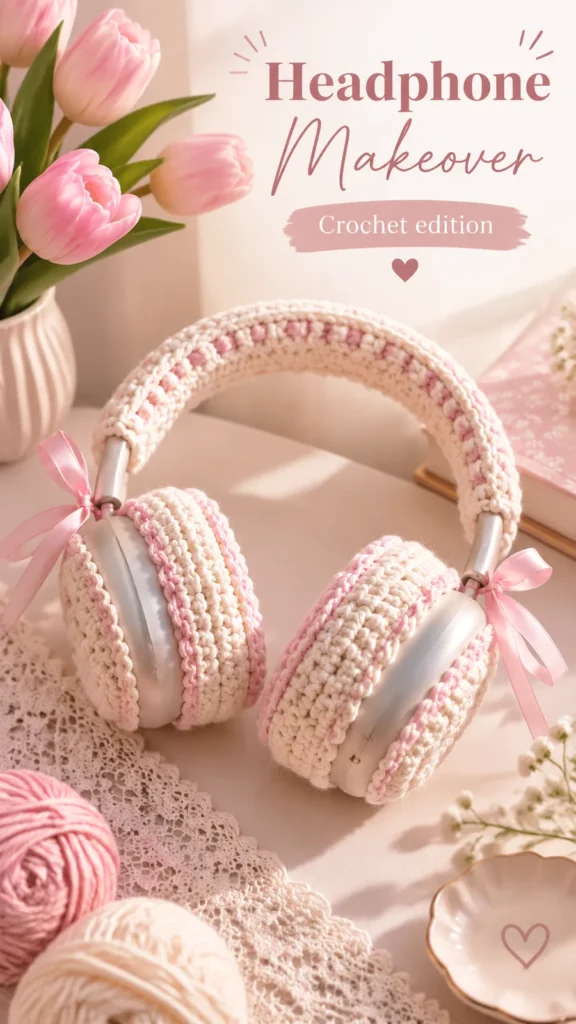
Pattern highlights
- Chain a long foundation and work single crochet rows through the back loop to build the headband sleeve.
- Wrap the finished rectangle around the headphone band and seam the long edges together.
- Start each ear cover with a magic ring, then work joined rounds that increase steadily until the circle lies flat.
- Repeat the second ear cover so the pair matches before adding any trim.
- Attach pink yarn and work a short contrasting border around each ear cover's edge.
- Finish with an optional ribbon tie for a softer, more decorative look.
About This Pattern
This one lands in the odd little corner of my notebook marked 'accessories for other objects.' Not a hat, not a scarf — a cover for a headset. I like projects that dress up something you already own instead of replacing it. The headband sleeve and the two ear cup covers belong together as a set, built separately, then fitted on. It is a small, practical project, the kind that fits into an evening and still leaves you with something to show for it.
Finished, it is a soft cream shell with pink trim, somewhere between a knit headband and a tea cozy. The sleeve wraps the band and seams shut; the ear covers slip over the cushions and can carry a ribbon tie if you want something a little precious. It is removable, washable in theory, and easy to personalize with different colors. A small object, but one that makes a plain headset look handmade.
Worth knowing
What I like here is the contrast in techniques living in one small set. Rows of single crochet through the back loop only give the headband sleeve a clean, ribbed grain — the kind of detail you only notice up close. Then the ear covers flip the method entirely, working in joined rounds with increases placed on a schedule that keeps the circle flat, not bowled. Seaming the rectangle into a tube with mattress stitch is a satisfying, almost sculptural step — flat fabric becomes a sleeve in one seam. The pink border at the end, worked in contrasting rounds, is the reward round: fast, decorative, done. It teaches flat panels and joined rounds side by side, in under a skein of yarn each.
Common mistakes
- Cover feels too tight Use a larger hook or add an increase round to the ear covers.
- Fabric curls Check your tension and consider blocking the pieces before assembly.
- Uneven circles Place a stitch marker at the beginning of each round to track increases accurately.
- Headband sleeve slides Reduce the rectangle width slightly or add a hidden elastic thread inside the seam.


Easy to Intermediate
Progress Tracker
0 of 0 rounds
Tap a round to tick it off — your place is saved on this device.
The kit
- DK weight yarn in cream or ivory, approximately 80 yards (73 meters)
- DK weight yarn in pink or accent color, approximately 40 yards (37 meters)
- 3.5 mm crochet hook (US E-4)
- Yarn needle
- Scissors
Optional
- narrow satin ribbon for decoration
- Stitch marker for keeping track of rounds
Headband Sleeve
The headband sleeve is created first. The ear covers are worked afterward in joined rounds. Turning chains do not count as stitches. Slip stitches are only used for joining rounds and are not counted as stitches.
With cream yarn, ch 42.
Row 1Sc in second ch from hook and across. Turn. (41 sts)
Row 2Ch 1, sc BLO across. Turn. (41 sts)
Rows 3–22Repeat Row 2. Fasten off.The rectangle should measure approximately 8 inches (20 cm) long and 2 inches (5 cm) wide. Wrap the piece around the headphone band and seam the long edges together using mattress stitch or whip stitch.
Ear Cup Covers (Make 2)
Use cream yarn. Work in joined rounds.
Round 1Make a magic ring. Ch 1, work 8 sc into ring. Join with sl st. (8 sts)
Round 2Ch 1, inc in each stitch around. Join. (16 sts)
Round 3Ch 1, sc in first stitch, inc in next stitch. Repeat around. Join. (24 sts)
Round 4Ch 1, sc in next 2 stitches, inc in next stitch. Repeat around. Join. (32 sts)
Round 5Ch 1, sc in next 3 stitches, inc in next stitch. Repeat around. Join. (40 sts)
Round 6Ch 1, sc in each stitch around. Join. (40 sts)Fasten off after the final round. Make a second matching circle.
Decorative Border
Attach pink yarn to the edge of one ear cover.
Round 1Ch 1, sc evenly around the edge. Join.
Round 2Ch 1, hdc in each stitch around. Join and fasten off.
Special Stitch
Ribbed single crochet: Work single crochet stitches through the back loop only. This creates horizontal ridges and a flexible fabric that wraps comfortably around the headphone band.
Assembly
Step 1Place each crochet ear cover over the outside of the headphone ear cups.
Step 2Use small whip stitches to attach the cover around the outer edge, leaving enough flexibility for removal.
Step 3Attach optional ribbon bows near the top sides of each ear cover.
Step 4Check that all stitches are secure and that no yarn ends remain loose.
Finishing
- Weave in all yarn tails using a yarn needle.
- Lightly steam block the crochet pieces or gently shape them with your hands. Avoid excessive heat because synthetic fibers may change shape.
- Handmade crochet accessories stay beautiful when cared for gently. Spot cleaning is recommended for most headset covers because the electronics underneath should not be exposed to moisture.
- Remove the crochet pieces before cleaning your headphones.
- Wash crochet covers gently by hand if needed.
- Lay flat to dry and reshape while damp.
- Store away from direct sunlight to protect delicate colors.
Why it works
The headband sleeve stays a flat rectangle of 41 stitches across every row, since a tube needs no shaping before it's seamed.
The ear covers increase by eight stitches every round — 8, 16, 24, 32 — spacing the increases evenly so the circle lies flat instead of cupping.
Joining each ear cover round with a slip stitch keeps the increase points stacked in the same spot round after round, instead of spiraling.
Finished size: the headband sleeve measures about 8 x 2 inches (20 x 5 cm), and each ear cover measures about 4 inches (10 cm) in diameter. Gauge: approximately 20 single crochet stitches by 22 rows = 4 x 4 inches (10 x 10 cm).
Choose a smooth, soft yarn with good recovery — very fuzzy yarn can hide the stitch definition and make the covers harder to fit neatly.
What it becomes
- A soft wrap for a headset used during long study or work sessions at a desk.
- A personalized gift for a music lover, paired with a matching coaster or mug cozy.
- A decorative touch for a creative workspace setup, alongside other small handmade accessories.
Original pattern: https://duniarecipe.com/crochet-headphone-accessories-cute-diy-earphone-cover-ideas-for-cozy-style/
FAQ
Will this cover fit any headphones?
It's sized for standard over-ear headphones with a padded band and round ear cushions. Very large or oddly shaped headsets may need a longer sleeve or wider ear covers.
Can I skip the pink border?
Yes, the border is decorative and the ear covers are complete without it. Leaving it off just gives a plainer, single-color finish.
Do I need to remove the covers before cleaning my headphones?
Yes, the pieces are designed to come off so you can clean the headset itself. Spot clean the crochet pieces separately since the electronics underneath shouldn't get wet.
What if my ear cover circle doesn't lie flat?
It usually means an increase round was skipped or doubled somewhere. Count stitches at the end of each round against the pattern before continuing.