
Free Pattern
Step-by-Step
Crochet
AmigurumiCrochet Hello Kitty keychain: a small amigurumi charm
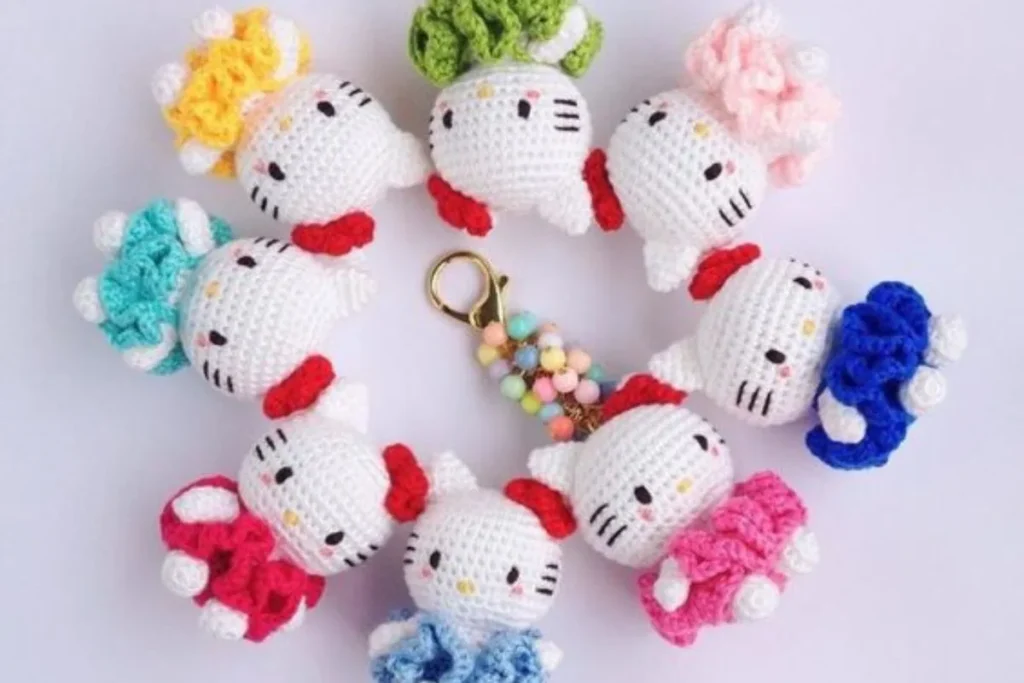
A small amigurumi Hello Kitty keychain worked in head, ear, body, and skirt pieces with tidy increase rounds.
- Level
- Beginner
- Time
- 2-3 hours
- Hook
- 3.75 mm
- Yarn
- Worsted
Pattern highlights
- Start the head with a chain of six, worked into both sides to build an oval base.
- Increase evenly around each round so the head grows from that oval into a rounded shape, then work even rounds before decreasing to close the top.
- Crochet two ears from a magic ring, increasing evenly until each one is complete.
- Work the body from a magic ring, increasing then decreasing to taper it toward the neck.
- Add the ruffled skirt by working into the back posts of the body's round 7 and increasing into a wide ruffle.
- Stuff the head and body firmly as you near their final rounds so each piece holds its shape.
- Weave in your ends once all of the pieces are finished.
- Sew the ears and body together beneath the head, then add a loop or clasp so the charm hangs from your keys or bag.
About This Pattern
A Hello Kitty keychain fits neatly among my smaller amigurumi projects. It's the kind of make I reach for between bigger projects, when I want something finished fast. Keychains like this one sit between toy and accessory. They travel well in a bag and hold up against jangling keys. I keep a shelf of these small character heads. This one earns its spot for how quickly the shape reads as recognizable.
The head starts from a simple chain instead of the usual magic ring. That chain gets worked on both sides, which builds an oval rather than a circle. From there, single crochet and evenly spaced increases shape the head into a rounded form. It's a steady, repetitive rhythm: work a few stitches, increase, repeat around. Twenty-one rounds carry the whole head from that flat little oval to full shape. Nothing fancy, just careful counting and consistent tension.
What comes out of all that counting is a small, round Hello Kitty face, finished off with two ears, a body, and a ruffled skirt. Worked in worsted weight yarn, it holds its shape without feeling stiff. Stuffed firmly, the head has enough weight to hang properly from a bag or keyring. It's compact, it's portable, and it reads as Hello Kitty at a glance. For a project built from four pieces, that's a good return.
Worth knowing
What I like about this piece is how much shape comes from so little instruction. The head starts with a plain chain instead of a magic ring—no fuss there—while the ears and body each begin from a tidy magic ring. Working both sides of that starting chain forms an oval shape for the head. That's a detail that separates amigurumi from plainer crochet. The increases are honest: six stitches added, evenly, every round. The shape grows predictably instead of lurching or puckering. There's real satisfaction in watching a flat oval turn into a dome, then adding ears, a body, and a ruffled skirt to complete the charm. Stitch markers earn their keep here, since a spiral this small drifts fast. It's a quick, contained project with a real payoff at the end.
Common mistakes
- Skipping the second side of the chain Round two works into both sides of the starting chain, not just one. Miss that and the oval never forms.
- Losing count on the six-stitch increases Each round after the oval adds exactly six stitches. Use a stitch marker at the round's start to catch mistakes early.
- Chain worked too tight at the start A snug chain of six is hard to work into on the return side. Keep tension relaxed for that first row.
- Uneven stuffing inside the head Thin patches show through single crochet more than you'd expect. Add fiberfill in small amounts and check the shape as you go.
- Forgetting where each round begins no sewing breaks between rounds, this pattern's rounds can blur together across the head, ears, body, and skirt. A stitch marker moved each round keeps your place.


Beginner
Progress Tracker
0 of 0 rounds
Tap a round to tick it off — your place is saved on this device.
The kit
- 3.75mm crochet hook
- Worsted weight yarn in the colors of your choice
- Fiber fill
- Stitch markers
- Yarn needle
- Scissors
Head
Round 1Chain 6 stitches [6](6)
Round 2Starting in the second stitch from your hook, sc 4, inc,(start on other side of chain), sc 4, inc [12](12)
Round 3(sc 1, inc)x6 [18](18)
Round 4(sc 2, inc)x6 [24](24)
Round 5(sc 3, inc)x6 [30](30)
Round 6(sc 4, inc)x6 [36](36)
Round 7(sc 5, inc)x6 [42](42)
Rounds 8–15sc around
Round 16(sc 5, dec)x6 [36](36)
Round 17(sc 4, dec)x6 [30](30)
Round 18(sc 3, dec)x6 [24](24)
Round 19(sc 2, dec)x6 [18](18)
Round 20(sc 1, dec)x6 [12](12)
Round 21dec x6 [6](6)
Ears
Make 2Round 1mr4 [4](4)
Round 2inc x4 [8](8)
Round 3sc around [8](8)
Round 4(sc 1, inc)x4 [12](12)
Round 5sc around [12](12)
Body
Round 1mr 6 [6](6)
Round 2inc x6 [12](12)
Round 3(sc 1, inc)x6 [18](18)
Round 4(sc 2, inc)x6 [24](24)
Rounds 5–6sc around [24]Switch to your main color here(24)
Round 7sc around [24](24)
Round 8(sc 2, dec)x6 [18](18)
Round 9sc around [18](18)
Round 10(sc 1, dec)x6 [12](12)
Round 11sc around
Skirt
Round 1Go back to round 7 of body and ss into back post of any stitch. Sc in every back post of this round (24)
Round 2sc x3 in each stitch around [72](72)
Round 3sc around [72](72)
From the collection
Finishing
- Weave in the starting tail left from the head's opening chain of six.
- Stuff the head and body firmly before their final rounds close each piece.
- Sew the two ears to the top of the head, then attach the body (with its skirt) beneath the head.
- Attach a keyring or clasp through the closed top so the charm hangs properly.
Why it works
The head starts as a six-stitch chain, worked on both sides into an oval.
round three on, each round adds six stitches through evenly spaced increases.
One extra plain stitch appears between increases each round, the classic way amigurumi spheres widen smoothly.
The skirt is added by working into the back posts of the body's seventh round, then tripling stitches into each one to flare it out into a ruffle.
What it becomes
- Clip it to a backpack zipper for a small pop of character on the way to class or work.
- Attach it to your house keys so they're easy to spot in a bag.
- Give it as a small handmade gift alongside a card, no wrapping paper required.
Original pattern: https://crochetblog.net/crochet-hello-kitty-keychain/
FAQ
Why does this pattern start with a chain instead of a magic ring?
A chain of six worked on both sides builds a flat oval base instead of a round one. It's a common start for small amigurumi heads that need a slightly elongated shape.
What size hook and yarn does this call for?
A 3.75mm hook paired with worsted weight yarn. That combination keeps stitches tight enough that fiberfill won't peek through.
Why are stitch markers listed if the pattern doesn't mention placing one?
Working in continuous rounds without a join makes it easy to lose track of where each round starts. A marker moved up each round keeps your count honest.
The pattern lists zero sewing steps between pieces. Does that mean I just crochet each part on its own?
Yes — the pattern gives worked instructions for the head, ears, body, and skirt as separate pieces. Joining them together with a needle and thread is left up to you.