Free Pattern
Step-by-Step
Crochet
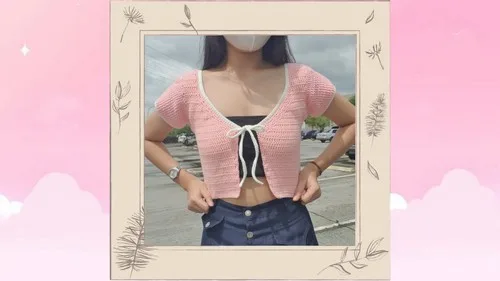
WearablesCrochet Jules Front Tie Top: A Breezy Weekend Wearable Pattern
Crochet the Jules Front Tie Top with this detailed pattern featuring a flattering tie-front, simple dc stitches, and a customizable fit for any season.
Level IntermediateTime 4-6 HoursHook 5.00 mmYarn Worsted
Pattern highlights
- Chain a long foundation row and work double crochet across to build the flat back panel base.
- Continue working even double crochet rows on the back panel until it reaches the pattern's intended width.
- Attach fresh yarn at the edge of the next row to begin shaping one side into a narrower section.
- Work several short rows over just a handful of stitches to form the sleeve opening on that side.
- Repeat the narrowing rows a few times to build up the shaped side section, then fasten off.
- Mirror the same narrowing process on the opposite side of the back panel for symmetry.
- Start a second foundation chain to begin the additional companion piece that completes the top's construction.
- Finish by adding the edging and crocheting the tie, then thread it through the front for an adjustable, flattering fit.
About This Pattern
The Jules Front Tie Top is a gorgeous, flirty wearable that combines simple double crochet stitching with a show-stopping tie-front detail. Built from a flat back panel and shaped sides, this top has that effortlessly chic look that turns a basic silhouette into something special. It's perfect for crocheters who want to expand beyond amigurumi and blankets into wearable fashion, and for anyone craving a handmade piece they'll actually reach for all season long.
This pattern relies almost entirely on straightforward double crochet stitches worked back and forth in rows, making it approachable for confident beginners while still offering enough construction interest to keep intermediate crocheters engaged. You'll practice turning chains, working even rows, and narrowing your stitch count to shape the sleeve and side sections. Expect to spend a relaxed afternoon or two on this one — it's the kind of project you can pick up and set down without losing your place.
When finished, you'll have a top with a fitted back panel, shaped sleeve sections, and a soft, adjustable tie closure at the front that lets you customize the fit to your body. The fabric has a substantial, structured drape thanks to the worsted weight yarn and 5.00 mm hook combination. It's a fantastic handmade gift for a crochet-loving friend who wants to wear their craft, not just display it.
Variations
I adore this pattern because it proves crochet wearables don't have to be intimidating! The back panel starts with a simple foundation chain and builds up in easy double crochet rows, so you get into a satisfying rhythm almost immediately. What really sets the Jules Top apart is that tie-front detail — it's such a small addition, but it completely transforms the garment from 'basic crochet square' to 'boutique-worthy top.' I also love how the pattern narrows the stitch count for the sleeve and side sections, giving you just enough shaping practice without overwhelming you with complicated increases or decreases. Working the additional rows on each side of the back panel feels almost meditative once you get the hang of the repeat. And because you're using two colors — a main and a contrasting shade — you get to make fun creative decisions about where those colors show up. This is the kind of pattern that makes you feel like a real clothing designer by the time you tie that final knot at the front. It's simple enough to enjoy, but detailed enough to feel proud of wearing out in public.
Common mistakes
- Miscounting the starting chain of 67, leading to an incorrect 66 dc stitch count in the first row.
- Count your chains in groups of 10 with a stitch marker every 10th chain before you begin working double crochets, so you can quickly verify you have exactly 67 chains.
- Forgetting to skip the first chain before working the first double crochet, which throws off your total stitch count.
- Always treat the first chain as a 'skip' chain and place your first dc into the second chain from the hook — mark this chain with a stitch marker if you tend to forget.
- Losing track of the turning chain height (ch 2) between rows, resulting in uneven row heights or an accidentally added stitch.
- Make the ch 2 turning chain count as your first dc consistently throughout, or consciously decide not to count it and stick with that choice for the entire piece.
- Not attaching the new yarn at the correct stitch when starting the narrower rows (dc in next 8 sts), causing the shaped side sections to be off-center.
- Lay your work flat and count stitches carefully from the edge before attaching yarn, using a stitch marker to flag the exact starting stitch for the narrower section.
- Skipping or miscounting the repeat instruction ('rep last two rows 2 more times'), resulting in a side section that's too short or too long.
- Keep a small tally — tally marks on paper or a row counter — each time you complete the two-row repeat so you know exactly when you've hit three total repeats.
- Working the second side's additional rows as a mirror image incorrectly, so the two sides of the back panel don't match.
- Complete one side fully, lay the piece flat, and literally count stitches from the opposite edge before starting the second side to ensure both sides mirror perfectly.
Intermediate
Progress Tracker
0 of 0 rounds
Tap a round to tick it off — your place is saved on this device.
Materials
- Worsted weight yarn (two colors: main color and contrasting color)
- 5.00 mm crochet hook
- Yarn needle
- Scissors
Back Panel
Foundation Chain: Ch 67.
- Round 1Skip first ch, dc in next 66 chs. Turn. (66 dcs)(66)
- Round 232 Ch 2, turn, dc in each st across. Turn. (66 dcs in each row)(66)
Additional Rows
Attach yarn to first st of the next row. Ch 2, turn, dc in next 8 sts. Turn.
Ch 2, turn, dc in next 8 sts. Turn.
Rep last two rows 2 more times.
Ch 1, cut yarn.
Repeat steps 4 on the other side of the back panel.
Front Panels (Make 2): Foundation Chain: Ch 34.
- Round 1Skip first ch, dc in next 33 chs. Turn. (33 dcs)(33)
- Round 2-16Ch 2, turn, dc in each st across. Turn. (33 dcs in each row) For Rows 17-18: Ch 2, turn, (dc2tog) twice, dc in remaining sts. Turn. (31 dcs)(31)
- Round 19-20Ch 2, turn, dc in each st until 5 sts remain, (dc2tog) twice, dc in last st. Turn. (29 dcs)(29)
- Round 21-28Rep Rows 17-18 alternately. After Rows 29-32: Ch 2, turn, dc in each st across. Turn. (8 dcs in each row)(8)
Sleeves
Attach yarn to the side seam of the top. Ch 2, dc in each st around. Sl st to first dc.
- Round 2Ch 2, (dc2tog, dc) 3 times, dc in next 17 sts, (dc2tog, dc) 8 times, dc in remaining sts, (dc2tog, dc) 4 times. Sl st to first dc. Ch 3.
- Round 3Dc in each st until 2 sts before the 5th decrease from the previous round, (dc2tog), dc in next st, rep (dc2tog, dc) 5 more times, dc in remaining sts.Sl st to first dc. Ch 2.For Round 4: (Dc2tog, dc) 2 times, dc in remaining sts, (dc2tog, dc) 2 times. Sl st to first dc. Ch 2.
- Round 5-9Ch 2, dc in each st around. Sl st to first dc. Ch 2.
- Round 10Ch 1, sc in each st around. Sl st to next 2 sts, ch 1, cut yarn. Repeat steps 1-10 for the other sleeve.
Additional Rows
Attach yarn to first st of the next row. Ch 2, turn, dc in next 8 sts. Turn.
Ch 2, turn, dc in next 8 sts. Turn.
Rep last two rows 2 more times.
Ch 1, cut yarn.
Repeat steps 1-8 for the second front panel.
Edging
Attach yarn to the corner of the front panel. Ch 1, 2 sc in each row of dcs along the front panel.
Join with a sl st to the next corner. Ch 1, turn, 1 sc in each st along the side of the front panel.
Join with a sl st to the next corner. Ch 1, turn, 2 sc in each row of dcs along the back panel.
Join with a sl st to the next corner. Ch 1, turn, 1 sc in each st along the side of the back panel.
Join with a sl st to the starting point.
Connecting Front and Back Panels:
Attach yarn to the corner of the front panel. Ch 1, sc through the back loop of the front panel and the front loop of the back panel.
Continue sc along the sides, connecting the front and back panels.
Join with a sl st to the starting point. Ch 1, cut yarn.
Repeat steps 1-3 for the other side.
For the tie
Ch 80 (or desired length), sl st to second ch from hook, sc in each ch across.
Turn, sc in each st back to the beginning.
Repeat steps 2-3 for the second tie.
Attach ties to the corners of the top.
Fasten off and weave in ends.
Assembly
- Step 1Block your top to the desired size and shape.
Important notes
💡 Since this pattern uses two yarn colors, keep both balls untangled by winding them into separate yarn cakes or bowls before you start, especially before working the contrasting sections.
💡 Place a stitch marker in the very first stitch of every row so you never accidentally skip it or work an extra stitch into the turning chain space.
💡 When you cut yarn after the narrower rows (ch 1, cut yarn), leave at least a 6-inch tail so you have plenty of length for weaving in ends or attaching pieces later.
💡 Lay your back panel flat on a table periodically to check that both sides being shaped for the additional rows are symmetrical before you commit to attaching yarn on the second side.
💡 Block your finished back panel and side pieces with a light steam before assembly — worsted weight double crochet fabric can curl slightly at the edges, and blocking helps it lay flatter for the tie-front finish.
Original pattern: https://crocheteverything.com/crochet-the-jules-front-tie-top-tutorial-you-next-weekend-project/
FAQ
What size does the Jules Front Tie Top come in?
The pattern as written creates a back panel from a 67-chain foundation, which yields a standard adult size; you can adjust the initial chain length in multiples of stitches to size up or down. Always swatch first to confirm your gauge matches the intended fit.
Can I use a single color instead of two colors for this top?
Absolutely — the two-color design is a style choice, not a structural requirement, so you can work the entire piece in one main color for a more subtle, monochromatic look. Some crocheters also like using two colors from the same family, like sage and moss green, for a tonal effect.
How do I know when to start the narrower rows for the sleeve sections?
You'll attach new yarn to the first stitch of the next row after completing the wider back panel section, then work dc in only the next 8 stitches to begin narrowing. This creates the shaped sleeve opening on each side of the back panel.
What yarn weight and hook size work best for this pattern?
This pattern is designed for worsted weight (medium, #4) yarn paired with a 5.00 mm crochet hook, which gives the fabric enough structure to hold its shape as a wearable top. If you substitute yarn weights, be sure to adjust your hook size accordingly and swatch first.
How does the tie-front closure actually work?
The tie is worked separately after the main pieces are assembled and threads through the front opening created by the shaped side sections, allowing you to cinch and knot the top to your desired fit. This adjustable feature means the top can flatter multiple body shapes without needing an exact size match.