
Free Pattern
Step-by-Step
Crochet
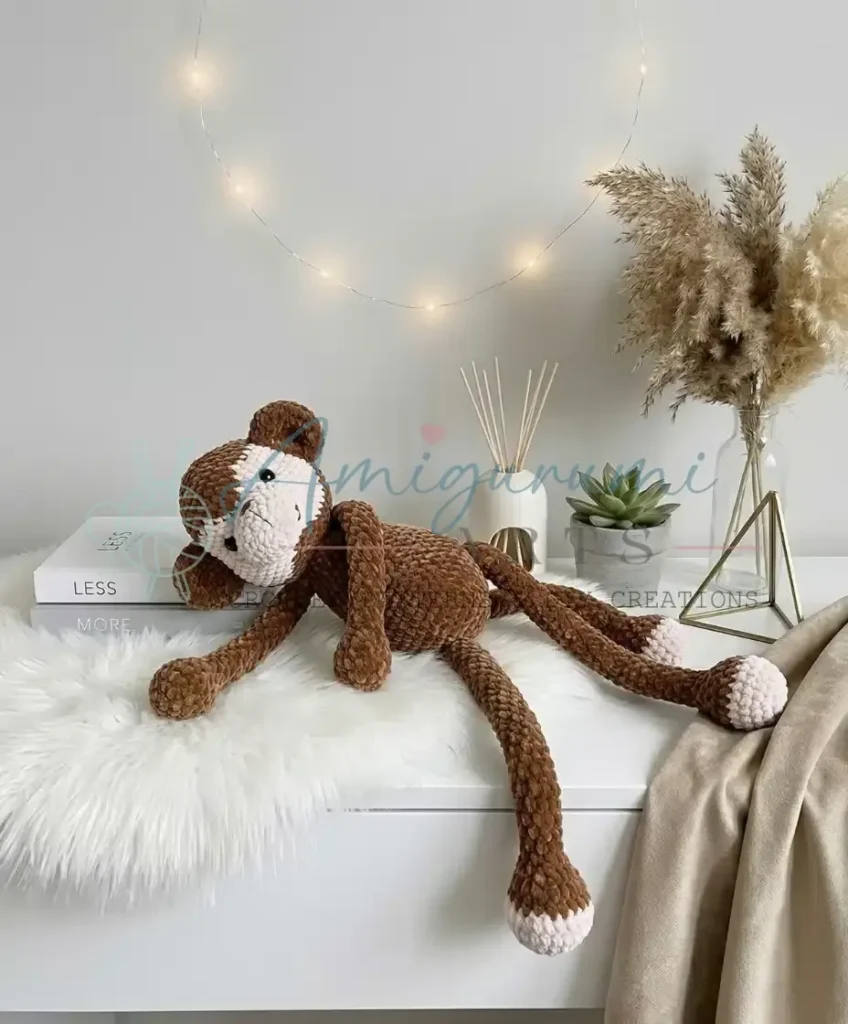
AmigurumiCrochet monkey comforter toy: a 60 cm plush amigurumi pattern
A 60 cm plush monkey amigurumi with muzzle, paw fingers, and a continuous body.
- Level
- Intermediate
- Time
- 4-6 hours
- Hook
- 5 mm
- Yarn
- Worsted
Pattern highlights
- Work each arm from a tiny starting ring, increasing into hdc and shaping paw fingers by round four.
- Crochet the legs and body as one continuous piece rather than assembling separate parts later.
- Embroider the eyelashes, nose, smile, and eyebrows onto the finished head before anything else gets sewn on.
- Sew the muzzle onto the head just below round twelve, then handle all face cinching afterward.
- Attach ears, arms, and tail once the head and body pieces are stuffed and ready.
About This Pattern
Every collection needs an oversized softie, and this monkey earns that spot. It's the kind of piece I'd set apart from smaller amigurumi shelf-sitters — this one is meant to be hauled around, leaned on, slept next to. At 60 cm it reads more nursery companion than desk ornament.
What comes out the other end is a plush, velvety monkey sized for real hugging. The contrast color does quiet work on the muzzle and tail tip, and the fiberfill has to earn its keep across a head this size. It's a toy built to survive being loved hard.
Common mistakes
- Losing track of the round start Move the stitch marker only when instructed, not every round, or you'll misplace increases. Check it against the stitch count before moving on.
- Muzzle sewn at the wrong height Line the muzzle's top edge up just below round 12 on the head before stitching. Sewing it too high or low throws off the whole face.
- Paw fingers facing inward The four hdc worked to a single top should point outward, not tuck against the arm. Check orientation before continuing to the next round.
- Under-stuffing the head A head this size needs firm, even fiberfill or it will look lumpy under velvet yarn. Stuff as you go rather than all at once at the end.
- Cinching before the muzzle is sewn Face cinching happens only after the muzzle is fully attached, per the pattern notes. Doing it early distorts the muzzle's shape.


Intermediate
Progress Tracker
0 of 0 rounds
Tap a round to tick it off — your place is saved on this device.
The kit
- Yarn (Main Color — MC): Plush/velvet weight yarn; approximately 2 skeins in your main color (e.g., warm brown)
- Yarn (Contrast Color — CC): Plush/velvet weight yarn; approximately ½ skein in a lighter accent color (e.g., cream/beige)
Hook
- Size 5 mm (H-8) — or whichever hook gives you a comfortable, dense fabric with your chosen yarn
Safety eyes
- 14 mm black, x2
Stuffing
- Polyester fiberfill / polyfill — enough to firmly stuff the head and body
- Stitch marker
- Yarn needle / tapestry needle
- Scissors
Head
Begin with MC.
Round 16 sc in MR. (6)
Round 2Inc in each st around. (12)
Round 3(1 sc, inc) × 6. (18)
Round 4(2 sc, inc) × 6. (24)
Round 5(3 sc, inc) × 6. (30)
Round 6(4 sc, inc) × 6. (36)
Round 7(5 sc, inc) × 6. (42)
Round 8Sc in each st around. (42)
Round 9Color change round begins here. Complete each last stitch of a color section using the next color. MC — 12 sc, CC — 6 sc, MC — 6 sc, CC — 6 sc, MC — 12 sc. (42)
Round 10MC — 11 sc, CC — 8 sc, MC — 4 sc, CC — 8 sc, MC — 11 sc. (42)
Round 11MC — 10 sc, CC — 10 sc, MC — 2 sc, CC — 10 sc, MC — 10 sc. (42)
Round 12MC — 10 sc, CC — 22 sc, MC — 10 sc. (42)
Round 13MC — 6 sc, inc, 3 sc; CC — 3 sc, inc, (6 sc, inc) × 2, 4 sc; MC — 2 sc, inc, 6 sc, inc. (48)
Rounds 14–17MC — 11 sc, CC — 25 sc, MC — 12 sc. (48)
Round 18MC — 12 sc, CC — 23 sc, MC — 13 sc. (48)
Round 19MC — 6 sc, dec, 5 sc; CC — 1 sc, dec, (6 sc, dec) × 2, 2 sc; MC — 4 sc, dec, 6 sc, dec. (42)
Round 20MC — (5 sc, dec) × 2; CC — (5 sc, dec) × 2, 1 sc; MC — 4 sc, dec, 5 sc, dec. (36)Insert safety eyes now, positioned between Rounds 12 and 13 — 3 sc from the color boundary on each outer side, 8 sc between the eyes. Begin the first stage of stuffing.
Round 21Working in MC only, no color changes. (4 sc, dec) × 6. (30)
Round 22(3 sc, dec) × 6. (24)
Round 23(2 sc, dec) × 6. (18)
Round 24(1 sc, dec) × 6, sl st. (12)Stuff firmly, adding more fiberfill and shaping as you close the opening. Finish stuffing and close.
Muzzle
Work with CC throughout.
Round 16 sc in MR. (6)
Round 2Inc in each st around. (12)
Round 3(1 sc, inc) × 6. (18)
Round 43 sc, inc, inc, 7 sc, inc, inc, 4 sc. (22)
Round 53 sc, (1 sc, inc) × 2, 7 sc, (1 sc, inc) × 2, 4 sc. (26)
Round 626 sc, sl st. Leave a long yarn tail for sewing.The top edge of the Muzzle sits just below Round 12 of the Head when sewn on.(26)
After the Muzzle is sewn on, create the face shaping (cinching) using a yarn needle and CC yarn. Insert your needle at point T1 (between Rounds 20–21), then travel to T2–T3, return to T1, then travel to T4 (1 sc over from T1), then T5–T6, return to T4. Points T2, T3, T5, and T6 sit below Round 13, at the outer and inner corners of each eye. Secure with a knot and hide the yarn ends inside the head opening. Add a second cinch from the head opening, drawing the needle through the inside of the head near the left eye, then across to the right eye, and back out at the opening — pulling gently to give the muzzle its characteristic dimpled depth. All cinching is done after the Muzzle is sewn on.
Ears (Make 2)
Work with MC throughout.
Round 16 sc in MR. (6)
Round 2Inc in each st around. (12)
Round 3(1 sc, inc) × 6. (18)
Round 4(2 sc, inc) × 6. (24)
Rounds 5–6Sc in each st around. (24)
Round 7(2 dec, 8 sc) × 2. (20)
Round 8(dec, 8 sc) × 2, sl st. (18)Leave a long yarn tail for sewing. Sew the Ears onto the Head along the color-change line, between Rounds 8 and 17.
Tail
Begin with CC.
Round 15 sc in MR. (5)
Round 2Inc in each st around using hdc. (10)
Rounds 3–410 hdc. (10)Switch to MC.
Round 510 hdc. (10)
Round 6(3 hdc, dec) × 2. (8)
Rounds 7–268 hdc. Close the end of the tail with 4 sc. The Tail is crocheted directly into the Body — do not sew it on separately.
Arms (Make 2)
Round 16 sc in MR. (6)
Round 2Inc in each st around using hdc. (12)
Round 312 hdc. (12)
Round 44 hdc joined to a single top (fingers), 11 hdc. (12)The 4 hdc worked to a single top create the paw fingers — these should face outward.
Round 512 hdc. (12)
Round 6(1 hdc, dec) × 4. (8)
Rounds 7–268 hdc. Close with 4 sc so that the finger detail faces forward and outward.
Legs & Body (Worked as one continuous piece)
Round 1CC. 6 sc in MR. (6)
Round 2Inc in each st around using hdc. (12)
Round 3(1 hdc, inc) × 6. (18)
Round 4(2 hdc, inc) × 6. (24)
Round 524 hdc. Switch to MC at end of round. (24)
Round 6(2 hdc, dec) × 6. (18)
Round 718 hdc. (18)
Round 8(1 hdc, dec) × 6. (12)
Round 9(1 hdc, dec) × 4. (8)
Rounds 10–308 hdc. (8)
Round 31Inc in each st around using hdc. (16)
Round 32(1 hdc, inc) × 8. (24)
Round 3324 hdc. (24)First Leg only: work 1 additional sc, sl st. Cut yarn and secure. Do NOT cut yarn on the Second Leg — keep the working loop live.To join the Legs: Insert your hook under a stitch of the First Leg and draw the live working loop from the Second Leg through it. The join sits on the inside of the legs. Continue working on the right side.
Round 3424 hdc across Second Leg, 24 hdc across First Leg. (48)
Round 3548 hdc. (48)
Round 3610 hdc, dec, dec, 20 hdc, dec, dec, 10 hdc. (44)
Round 3710 hdc, dec, 20 hdc, dec, 10 hdc. (42)
Note: For decreases to fall correctly at the sides, your stitch marker should sit exactly at the center back at this point.
Round 3841 hdc, 1 hdc incorporating the Tail. (42)
Round 393 hdc incorporating the Tail, 2 hdc, dec, (5 hdc, dec) × 5. (36)
Round 4036 hdc. (36)
Round 41(4 hdc, dec) × 6. (30)
Round 4230 hdc. (30)
Round 43(3 hdc, dec) × 6. (24)
Round 4424 hdc. (24)
Round 45(2 hdc, dec) × 6. (18)
Round 46Stitch marker at center back. 3 hdc, 4 hdc incorporating Left Arm, 6 hdc, 4 hdc incorporating Right Arm, 1 hdc. (18)
Round 47(1 hdc, dec) × 6. (12)
Round 4812 sc, sl st. Leave a long yarn tail for attaching the Head.
Assembly
Step 1Embroider the facial features — eyelashes, nose, smile, and eyebrows — onto the Head before final assembly. Use a contrasting yarn in a color of your choice for the eyebrows; a smooth yarn works best for clean embroidery lines.
Step 2Sew the Muzzle onto the Head, positioning its top edge just below Round 12. Use the yarn tail and a whipstitch or mattress stitch around the outer edge.
Step 3Perform all face cinching (as described in the Muzzle section) after the Muzzle is fully sewn on.
Step 4Sew the Ears onto the Head along the MC/CC color boundary, between Rounds 8 and 17, one on each side.
Step 5Attach the Head to the Body using the long yarn tail left at the end of Rnd 48. Sew around the full opening, stitching securely through both layers. Add any final stuffing to the Body before closing completely.
Step 6Weave in all remaining yarn ends.
Finishing
- Weave in every color-change end from the head, tail, and arms before assembly starts.
- Stuff the head and body firmly with polyfill so the plush yarn holds its shape.
- Embroider the face, sew the muzzle in place, cinch as directed, then attach ears, arms, and tail.
Why it works
The head's early rounds increase steadily from a 6-stitch ring, the usual way amigurumi domes get their curve before leveling off.
The tail changes stitch type partway through, moving from sc to hdc, which is what gives it a firmer, less floppy feel.
The paw fingers come from working four hdc to a single top within round 4 of the arm, splitting the round instead of keeping it uniform.
Legs and body are worked as one continuous piece, avoiding a waist seam that would otherwise need sewing later.
The pattern is written in US crochet terminology throughout, so hdc, sc, inc, and dec all follow standard US stitch conventions.
What it becomes
- A large floor companion for a kid's room, sized to lean against pillows or a bookshelf.
- A comforting bedtime toy meant for actual hugging, not just display.
- A handmade gift for a nursery, paired with a knit blanket in a matching cream or brown.
Original pattern: https://amigurumiarts.com/crochet-monkey-comforter-toy-pattern/
FAQ
Do I need to join rounds with a slip stitch?
No — the whole toy works in a continuous spiral. Only use a slip stitch or chain if a step specifically tells you to.
Why are the legs and body one piece?
Working them continuously avoids a seam at the waist and keeps the stuffing from shifting between two separate parts. It also means less sewing at assembly.
What yarn gives the best texture for this monkey?
Plush or velvet weight yarn is what the pattern calls for, and it's what gives the finished toy its soft, huggable surface. A smooth yarn also embroiders more cleanly for the eyebrows.