
Free Pattern
Step-by-Step
Crochet
AmigurumiCrochet otter amigurumi pattern with sculpted belly patch
A written otter amigurumi pattern with a sculpted muzzle, sewn belly patch, and shaped limbs.
- Level
- Intermediate
- Time
- 4-6 hours
- Hook
- 5.0 mm
- Yarn
- Bulky
Pattern highlights
- Start each limb and the ears from a small foundation, then build outward in continuous rounds.
- Shape the upper arms loosely with a softer yarn so they're easy to bend and sew later.
- Work the lower legs with quicker increases so they flare into a stable base.
- Crochet the ears flat in a single short row, leaving long tails for sewing later.
- Build the head and body separately in spiral rounds, shaping the face as you go.
- Stitch the belly patch on last, sewing it in a circle around its edge.
- Sew the head, arms, legs, and ears on using sewing thread instead of yarn.
About This Pattern
This otter joins the small stack of animal amigurumi patterns I keep coming back to. These are the ones with a face that needs real shaping, not just two dots and a smile. Otters ask for a rounder muzzle and a paler belly. This pattern leans on separate yarns for those details instead of embroidery alone. It sits closer to the sculpted-face end of my collection than the simple round-head end.
The build relies on a few core moves. Magic ring starts open every limb, and continuous spiral rounds shape the head and body. Each ear is a single flat row worked straight from a foundation chain. Increases round out the arms gently, and the legs more aggressively, since legs carry the figure's stance. YarnArt Jeans in two colors handles the muzzle shaping and face embroidery. Both are worked once the main pieces are stuffed and closed.
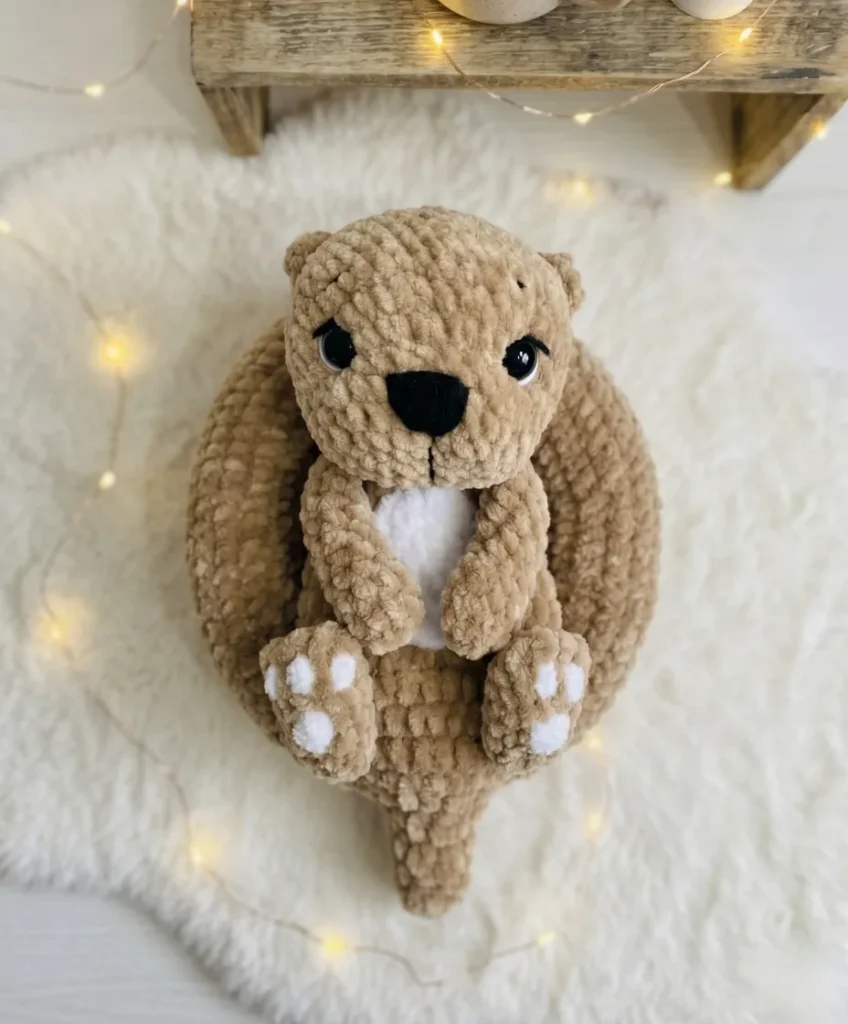
Finished, the otter sits with sculpted upper arms and lower legs. The head carries eye indentations tucked toward the body, and a distinct belly patch is stitched on last. The plush weight of Himalaya Dolphin Baby gives it a soft, rounded finish. The Alize Softy patch and paw pads add a visible texture change on the front. It reads as a desk companion, not a toy for rough handling.
Worth knowing
What I like about this one is the muzzle. Working the shaping in a second yarn color, YarnArt Jeans 53 and 01, changes the face. It reads as sculpted rather than embroidered onto flat fabric. The belly patch is its own small satisfaction too. It's a separate piece in Alize Softy, worked loosely so it keeps a soft, open weave that's easier to shape and sew than a tight round. I stitch it on in a circle once the body is done, so it sits proud. The lower legs increase every round through round four, building a wider stance than the arms. That's what lets the otter sit up rather than slump. Small choices, but they add up.
Common mistakes
- Working the belly patch too tightly Alize Softy is meant to be worked loosely for this piece so it stays soft and easy to shape. Keep tension relaxed rather than tight.
- Eye dimples facing the wrong way The eye indentations should face the body interior once the head is attached. Check this before sewing, since it can't be fixed after stuffing.
- Using yarn instead of sewing thread The pattern calls for sewing thread matching the main yarn to attach limbs, ears, and head. Yarn adds bulk and shows more at the seams.
- Rushing the belly patch placement Stitch it on in a full circle around its edge, not just tacked at a few points. A partial seam leaves gaps that show stuffing.
- Skipping long tails on the ears Leave a long tail on each end of the ears as instructed. Thread both tails to the inside of the head to hide the join.
- Working the fabric too loosely Keep tension firm throughout, especially in plush yarn — loose stitches let fiberfill show through the gaps. If the fabric feels too open, drop down to a US G-6 / 4.0 mm hook.
- Using a standard decrease Work an invisible decrease instead: insert the hook under the front loops only of the next two stitches, yarn over, and pull through. This avoids the visible bump a standard decrease leaves, especially noticeable in plush yarn.
- Stuffing the head all at once Add fiberfill gradually starting at Round 10, pressing it into the muzzle and forehead as you go, rather than waiting until Round 13 to stuff everything at once.


Intermediate
Progress Tracker
0 of 0 rounds
Tap a round to tick it off — your place is saved on this device.
The kit
Main yarn
- Himalaya Dolphin Baby, plush/bulky weight — color 80317 (1 skein)
Accent yarn
- Alize Softy — color 55 (for the belly patch and paw pads)
Detail yarn
- YarnArt Jeans — colors 53 and 01 (for face embroidery and muzzle shaping)
Hook
- US H-8 / 5.0 mm
Safety eyes
- 13–14 mm, 1 pair
Stuffing
- Fiberfill (polyester fiberfill recommended)
- Stitch markers
- Yarn needle / tapestry needle
- Sewing thread in a color matching the main yarn (for attaching limbs, ears, and head)
- Scissors
Upper Arms (make 2)
Round 16 sc in MR. (6)
Round 21 sc, inc repeat 3 times. (9)
Round 3-4sc in each st around. (9)
Round 51 sc, dec repeat 3 times. (6)
Round 6-12sc in each st around. (6)Do not stuff. Fold the piece flat and close the opening by working 3 sc through both layers. Cut yarn and weave in ends.
Lower Legs (make 2)
Round 16 sc in MR. (6)
Round 22 sc, inc repeat 2 times. (8)
Round 33 sc, inc repeat 2 times. (10)
Round 44 sc, inc repeat 2 times. (12)
Round 5sc in each st around. (12)
Round 6sc in each st around. (12)Stuff firmly. Fold flat and close by working (1 dc, 1 sl st) × 3 through both layers. Cut yarn and weave in ends.
Ears (make 2)
Foundation: ch 4. Starting in the 2nd ch from hook:
Round 11 sc, 1 hdc, 1 sc. (3)Cut yarn, leaving a long tail on each end. When sewing the ears to the head, thread both tails through to the inside of the head to hide them.
Head
Foundation: ch 8. Starting in the 2nd ch from hook:
Round 1inc, 5 sc, 3 sc in last st, 6 sc along opposite side of chain. (16)
Round 2inc × 2, 5 sc, inc × 3, 5 sc, inc × 1. (22)
Round 3(1 sc, inc) × 2, 5 sc, (1 sc, inc) × 3, 5 sc, (1 sc, inc) × 1. (28)
Round 4sc in each st around. (28)
Round 53 sc, then work 12 inc in Back Loop Only (BLO) , 13 sc. (40)
Round 6-9sc in each st around. (40)After Round 9, insert safety eyes between Rounds 5 and 6, spaced 14 sts (or 7 increases) apart.
Round 106 sc, dec repeat 5 times. (35)
Round 115 sc, dec repeat 5 times. (30)
Round 12sc in each st around. (30)Begin stuffing the head evenly, starting from the muzzle area.
Round 134 sc, dec repeat 5 times. (25)
Round 143 sc, dec repeat 5 times. (20)
Round 152 sc, dec repeat 5 times. (15)
Round 161 sc, dec repeat 5 times. (10)
Round 17dec 5 times. (5)Finish stuffing, then pull the remaining sts closed. Fasten off and weave in end.Using a needle threaded with sewing thread or a length of matching yarn, perform the following sequence — then repeat the entire sequence a second time for deeper definition:Thread the needle in at point 1 (base of head), bring it out at point 2 (below one eye). Insert at point 3 (the thread between points 2 and 3 should sit beneath the eye) and bring out at point 4 (base of head). Pull both thread ends to create an indent and knot twice — do not cut.Continue from point 4 to point 5 (below the second eye). Insert at point 6 (thread between 5 and 6 sits beneath the second eye) and bring out at point 7 (same hole as point 1). Pull and knot twice.Repeat the full sequence one more time for a pronounced, natural-looking indent under each eye.Using black yarn doubled (YarnArt Jeans color 53), embroider the nose using 2 passes of the needle through designated points — the bottom point sits between Rows 1 and 2, the upper points between Rows 3 and 4 of the muzzle area.Sew ears between Rounds 10 and 11. Embroider brow stitches between Rounds 7 and 8. Add eyelashes and a small mouth. Outline the safety eyes with white yarn (YarnArt Jeans color 01) using small stitches around the outer edge.
Eye Sculpting (worked twice): Note: Points 1, 4, and 7 share a single entry hole at the base of the head.
Face Embroidery:
Body
The body is crocheted as one piece, beginning at the tail.
Round 16 hdc in MR. (6)
Round 2hdc in each st around. (6)
Round 31 hdc, inc repeat 3 times. (9)
Round 42 hdc, inc repeat 3 times. (12)
Round 53 hdc, inc repeat 3 times. (15)
Round 64 hdc, inc repeat 3 times. (18)
Round 7inc in each st around. (36)
Round 88 hdc, inc repeat 4 times. (40)
Round 9hdc in each st around. (40)
Round 106 hdc, dec repeat 5 times. (35)
Round 11hdc in each st around. (35)
Round 125 hdc, dec repeat 5 times. (30)
Round 13hdc in each st around. (30)
Round 144 hdc, dec repeat 5 times. (25)
Round 15hdc in each st around. (25)
Round 163 hdc, dec repeat 5 times. (20)
Round 17hdc in each st around. (20)
Round 182 hdc, dec repeat 5 times. (15)
Round 191 hdc, dec repeat 5 times. (10)Work 1–2 additional hdc to reach a clean edge, then sl st to close. Cut yarn and weave the end inside.
Belly Patch
Work loosely with Alize Softy yarn and a US H-8 / 5.0 mm hook. The resulting circle will be soft and slightly open-weave, which makes it easy to shape when sewn on.
Round 16 hdc in MR. (6)
Round 21 hdc, inc repeat 3 times. (9)
Round 32 hdc, inc repeat 3 times. (12)Finish with a sl st. Cut yarn, leaving a long tail for sewing.
Assembly
Step 1Attach the upper arms using sewing thread, positioning them at the top edge of the body, approximately 3 hdc apart from each other.
Step 2Attach the lower legs vertically using sewing thread, sewing through Rounds 6–8 of the body.
Step 3Attach the head using sewing thread, making sure the eye indentation dimples face toward the body interior — they should not be visible from the front once attached.
Step 4Sew on the belly patch using the long yarn tail, stitching it in a circle around the edge. If you’d like a slightly dimensional belly, add a small pinch of fiberfill underneath before closing.
Step 5Embroider paw pads on the lower legs using Alize Softy yarn doubled, with 2 stitches per pad. Each pad measures approximately 1 hdc in size; the heel pad is approximately 2 hdc wide.
Step 6Weave in all remaining ends securely.
Finishing
- Weave in every tail as each piece is finished, especially the long tails left on the ears.
- Stuff the head and body firmly before closing. Check the eye indentations sit correctly before sewing them shut.
- Sew the belly patch on last, once the body is fully assembled, using its own long yarn tail.
Why it works
The lower legs increase every round through round four, building a wider base than the arms need.
The upper arms increase only in round two, then work even for two more rounds before finishing.
The ears are worked flat in a single row from a four-chain foundation. A small flat shape doesn't need the shaping a spiral round would add.
What it becomes
- A shelf piece next to other amigurumi animals, especially ones with a similar plush finish.
- A gift for someone who collects handmade animals rather than mass-produced toys.
- A quiet desk companion, sized for sitting rather than active play.
FAQ
Can I substitute the yarn brands used here?
Yes, as long as you match the weight. Use plush/bulky for the body and a lighter weight for the belly patch and face details. Gauge isn't critical for amigurumi, so a slightly different size won't affect construction.
Why use two different YarnArt Jeans colors?
Color 53 and color 01 work together for the muzzle shaping and face embroidery. That gives the face contrast without extra embroidery floss. It also keeps the whole project within one yarn family.
What size safety eyes does this pattern need?
The materials list calls for a 13–14 mm pair. That size suits the head's proportions once it's stuffed.
Why sew pieces on with thread instead of yarn?
Sewing thread matching the main yarn color keeps the seams less bulky and nearly invisible. It's specified for attaching the upper arms, lower legs, ears, and head.