
Free Pattern
Step-by-Step
Crochet
AmigurumiCrochet Plush Rat Amigurumi Pattern
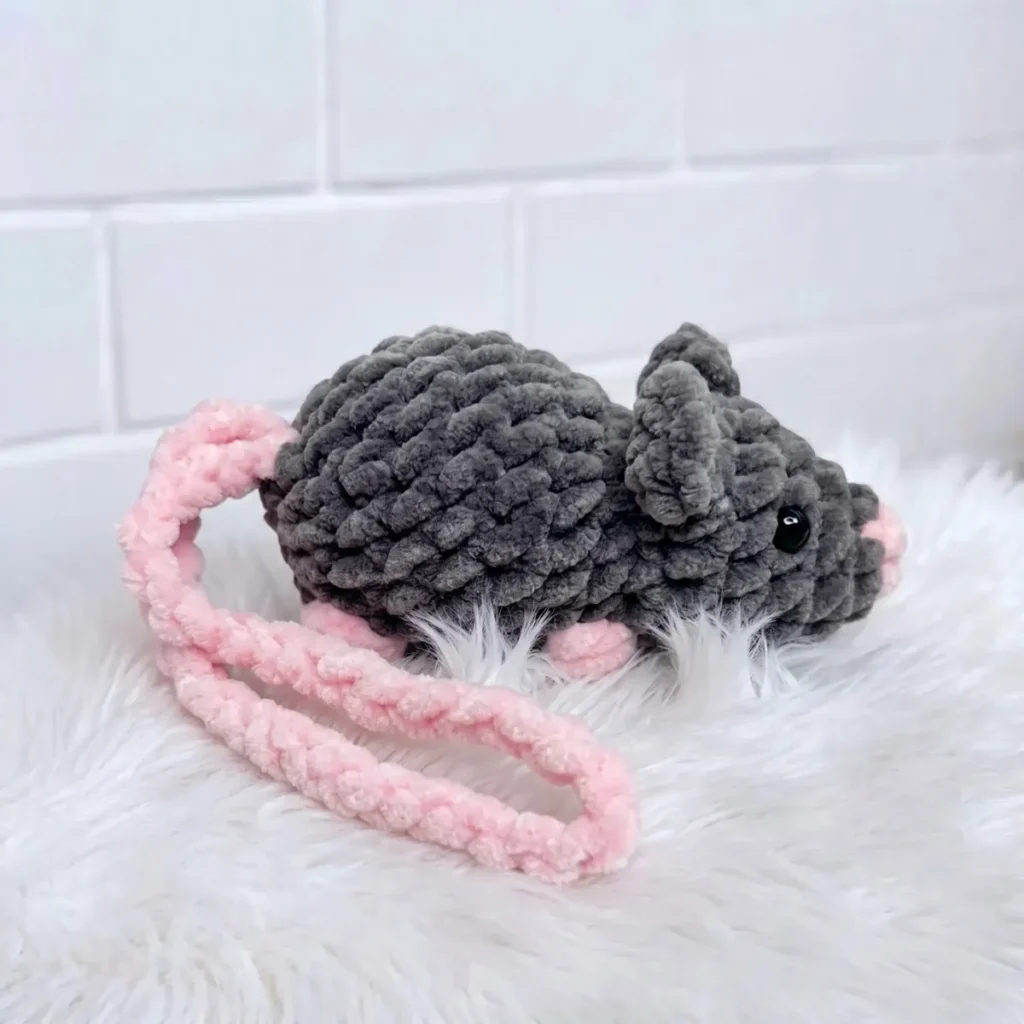
Make an adorable crochet plush rat amigurumi with this detailed pattern featuring bobble stitches, optional muzzle and leg variations, and easy assembly.
Level IntermediateTime 4-6 HoursHook 4 mmYarn Bulky
Pattern highlights
- Start at the nose end and crochet the head and body as a single continuous spiral piece across sixteen rounds.
- Work single crochet increases early on to shape the rounded head before transitioning smoothly into the body.
- Add the 4-double-crochet bobble stitches where indicated to give the piece subtle raised texture and detail.
- If desired, work the optional longer muzzle variation for a more elongated, realistic snout shape.
- Stuff the head and body firmly in stages as you close up the rounds toward the tail end.
- Crochet the ears and tail separately, keeping stitch counts consistent with the main piece for proportion.
- Optionally rework the front legs using the lighter rat variant for a repositioned, alternate stance.
- Assemble everything by attaching safety eyes, then sewing the ears and tail securely onto the finished body.
About This Pattern
This crochet plush rat amigurumi is a delightfully squishy critter worked entirely in one continuous piece for the head and body, giving you a seamless silhouette without a ton of sewing. What makes this pattern special is the plush yarn itself — it creates an irresistibly soft, velvety texture that feels like a real stuffed animal rather than a typical yarn toy. It's perfect for anyone who loves quirky, characterful amigurumi and wants to make a huggable little rodent friend that stands out from the usual bunny-and-bear crowd.
You'll work primarily in continuous spiral rounds using a 4mm hook and bulky plush yarn, practicing single crochet increases and decreases along with the pattern's signature 4-double-crochet bobble stitch for textured details. This is an intermediate-friendly project — comfortable for confident beginners who've made at least one or two amigurumi before — and most crocheters finish the 16-round head-and-body piece, ears, and tail in about one to two hours, since the head and body are worked as a single piece with no seaming required. The optional muzzle and leg repositioning variations let you customize the difficulty and final look.
The finished rat comes out plump, round-bodied, and endearingly proportioned, with a soft plush finish that begs to be squeezed. Whether you keep the classic pose or try the lighter rat variant with repositioned front legs, the end result is a charming shelf sitter or cuddle buddy with a personality all its own. It makes a wonderfully unexpected handmade gift — ideal for rat lovers, pet-themed nurseries, quirky home decor, or anyone who appreciates amigurumi that dares to be a little different.
Variations
This pattern is a fantastic playground for customization. For a color-story rat, try a soft gray body (like Bernat Baby Blanket in 'Vapor Gray') with pale pink accents on the ears and nose for that classic pet-shop look, or go bold with a caramel-and-cream two-tone body for a hamster-adjacent vibe. If you want a sleeker, more realistic rodent, work the optional longer muzzle variation and use a fingering or worsted weight yarn instead of bulky plush — just remember you'll need to adjust your hook down to a 2.5mm-3.5mm and expect a smaller, more detailed finished piece since stitch counts will pack tighter. For a snugglier giant version, size up to a super bulky yarn with a 6mm hook, which will naturally inflate the whole body without changing a single stitch count in the pattern — just watch your gauge and stuffing needs increase accordingly. Try the front leg repositioning variant in a contrasting yarn color to make the paws pop as a design feature rather than a hidden detail. Seasonal fans can lean into themed accessories after the base rat is finished: a tiny crocheted bandana, a knit-look scarf, or embroidered flower details on the ears for a springtime rat. For texture play, swap the bobble stitch detail yarn for a subtle sparkle or eyelash yarn accent on just the tail tip for a whimsical touch. And if you're making a set, work multiple rats in a rainbow of solid colors using leftover plush yarn scraps — since the pattern uses one main color throughout, it's an excellent stash-buster for using up partial skeins from other projects.
I adore this pattern because the head and body come together as one continuous spiral piece — no awkward seaming to fuss over, just smooth, satisfying rounds that build a perfectly plump little rat right before your eyes. The 4-double-crochet bobble stitch adds just the right amount of textured charm without slowing you down, and working with plush yarn makes every stitch feel indulgently soft under your hands. I love that this pattern gives you choices too: try the optional longer muzzle for a more realistic snout, or swap to the lighter rat variant with repositioned front legs for a totally different stance and personality. The ears and tail come together quickly, so you get that thrilling moment where a pile of parts suddenly becomes a full, adorable creature. There's something deeply satisfying about placing those safety eyes and watching the rat's expression click into place. This is the kind of pattern that keeps you hooked (pun intended) because every round brings a visible payoff, and the plush finish means your finished rat looks and feels genuinely huggable, not just handmade.
Common mistakes
- Losing track of stitch counts
- Slow down and physically count each stitch with your hook tip at the end of every round, and consider using a contrasting stitch marker color that's easy to spot against the fuzzy fibers.
- Forgetting to move the stitch marker up
- Make it a habit to move your marker into the first stitch of the new round immediately after completing the last stitch of the previous round, before you get distracted.
- Working the 4-double-crochet bobble
- Pull your working yarn slightly snug after each of the four double crochets in the bobble, and give the completed bobble a gentle tug from the back to pop it forward before continuing.
- Stuffing the head and body unevenly
- Stuff in small pinches as you go rather than cramming it all in at the end, and periodically squeeze the piece to check for firm, even distribution before closing up.
- Attaching safety eyes before confirming
- Insert the eye posts without locking the washers first, hold the piece up at a distance to check symmetry, and only secure them once you're happy with the placement.
- Skipping or misreading the optional
- Read through the entire pattern once before starting, and clearly decide upfront whether you're making the standard version, the longer muzzle variation, or the lighter rat variant so you don't mix instructions mid-project.


Intermediate
Progress Tracker
0 of 0 rounds
Tap a round to tick it off — your place is saved on this device.
Materials
- Plush yarn in your chosen color (any brand, bulky/chunky weight)
- 4mm crochet hook
- Yarn needle
- Scissors
- 8mm or 10mm safety eyes
- Embroidery thread (for stitching the nose, optional)
- Polyfill stuffing
Head & Body (worked as one piece)
- Round 1Start with a magic ring, work 4 sc into the ring. (4)
- Round 2Inc in each st around. (8)
- Round 32 sc, inc, inc, inc, 3 sc. (11)
- Round 45 sc, inc, 5 sc. (12)Place safety eyes on Rnd 4, with 5 stitches between them — note that an increase counts as 2 stitches.
- Round 52 sc, \[sc, inc\] × 4, 2 sc. (16)
- Round 616 sc. (16)
- Round 73 sc, dec × 5, 3 sc. (11)
- Round 84 sc, inc × 5, sc, Bobble. (16)
The Bobble represents a front foot/paw.
- Round 92 sc, Bobble, sc, \[sc, inc\] × 4, 4 sc. (20)
- Round 10-1220 sc each round. (20) (3 rounds total)
- Round 135 sc, \[sc, dec\] × 4, 3 sc. (16)
- Round 14Bobble, 3 sc, Bobble, 9 sc, dec. (15)
The two Bobbles here represent the hind feet.
- Round 15\[sc, dec\] × 5. (10)
- Round 16dec × 5. (5)Fasten off, leaving a long tail. Close the remaining stitches by threading the yarn through each front loop and pulling tight. Weave in end.
Optional — Front Leg Repositioning (Lighter Rat Variant)
If you prefer the front legs positioned closer to the muzzle, replace Rnds 7–9 with the following:
- Round 7(alt): 3 sc, dec × 5, 2 sc, Bobble. (8 + bobble)
- Round 8(alt): 2 sc, Bobble, sc, inc × 5, 2 sc. (15 + bobble)
- Round 9(alt): 4 sc, \[sc, inc\] × 4, 4 sc. (20)
Then continue from Rnd 10 of the main pattern as written.
Optional — Longer Muzzle Variation
If you prefer a longer, more pronounced snout, insert these two additional rounds after Rnd 1 before continuing with the standard pattern:
Extra Rnd A: \[sc, inc\] × 2. (6)
Extra Rnd B: \[2 sc, inc\] × 2. (8)
Then continue from Rnd 3 of the main pattern as written.
Ears
Ears are attached at Rnds 6–7 of the finished head, regardless of which muzzle variation you chose.
Darker rat (larger ear): Join yarn to the head at your chosen attachment point. Work 5 hdc all into that same stitch. Sl st into that same stitch to close. Fasten off and weave in ends.
Lighter rat (smaller ear): Join yarn to the head at your chosen attachment point. Work 3 hdc all into that same stitch. Sl st into that same stitch to close. Fasten off and weave in ends.
Make 2 ears total — one on each side of the head.
Tail
Join yarn at the base of the body (the closing point at Rnd 16). Chain 40. Sl st back into the very first chain (the one adjacent to the body join point) to form a loop.
Fasten off and weave in ends.
Assembly
- Step 1The head and body are worked as a single continuous piece, so no joining of those parts is required.
- Step 2Stuff the head and body firmly before closing Rnd 16.
- Step 3Attach the ears to either side of the head between Rnds 6–7, using the slip stitch already in place from working the ear as your anchor. If needed, use a yarn needle and a length of matching yarn to secure them more firmly.
- Step 4If embroidering the nose , use embroidery thread to stitch a small triangle or oval shape onto the tip of the snout (around Rnds 1–2).
- Step 5Confirm safety eyes are secure and locked behind the backing washers before closing the body completely.
- Step 6The tail is added last — join at the rear base and complete the chain loop as described.
Important notes
💡 Keep a stitch marker in the first stitch of every round from start to finish; it's easy to lose your place in continuous spiral rounds, especially with plush yarn's dense texture.
💡 Stuff the head and body firmly but in stages — add a bit, shape it with your fingers, then add more, so you avoid weak spots or overstuffed bulges near the increases.
💡 When working the optional bobble stitches, pause and check your round count before and after — bobbles can visually distort your row so it's easy to miscount surrounding stitches.
💡 If trying the optional longer muzzle or leg repositioning variations, complete a swatch or test round first to make sure you're comfortable with the technique before committing to the full piece.
💡 Save a little extra plush yarn for the tail and ears before starting the head and body, since plush yarn dye lots can vary slightly between skeins.
💡 This pattern uses US crochet terminology throughout, so double-check your stitch conversions if you're more familiar with UK terms.
💡 Gauge isn't critical for this amigurumi, but your fabric should be worked firmly enough that the stuffing doesn't show through between stitches.
Original pattern: https://amigurumicorner.com/crochet-plush-rat-amigurumi-full-pattern/
FAQ
What weight yarn should I use for this crochet rat pattern?
The pattern calls for plush yarn in a bulky or chunky weight, which gives the rat its signature soft, velvety texture. Any brand works, so feel free to use your favorite plush yarn as long as it matches bulky weight.
Do I need to join or turn at the end of each round?
No, this pattern is worked entirely in continuous spiral rounds, so you don't join or turn unless a specific step tells you to. Just keep working around and around, using your stitch marker to track the start of each round.
What is the bobble stitch used in this pattern?
The bobble referred to throughout this pattern is a 4-double-crochet bobble worked into a single stitch, creating a raised textured bump. It's used for small decorative details and isn't difficult once you've practiced it once or twice.
Can I make this rat without the optional variations?
Absolutely — the longer muzzle and front leg repositioning sections are entirely optional. You can complete the standard head, body, ears, and tail for the classic look and skip both variations entirely.
What size safety eyes work best for this pattern?
The pattern recommends either 8mm or 10mm safety eyes, and your choice comes down to personal preference for how big or small you want the rat's expression to look. Larger 10mm eyes tend to read as cuter and more cartoonish, while 8mm gives a slightly more realistic feel.