
Free Pattern
Step-by-Step
Crochet
AmigurumiCrochet raccoon amigurumi pattern in chenille yarn
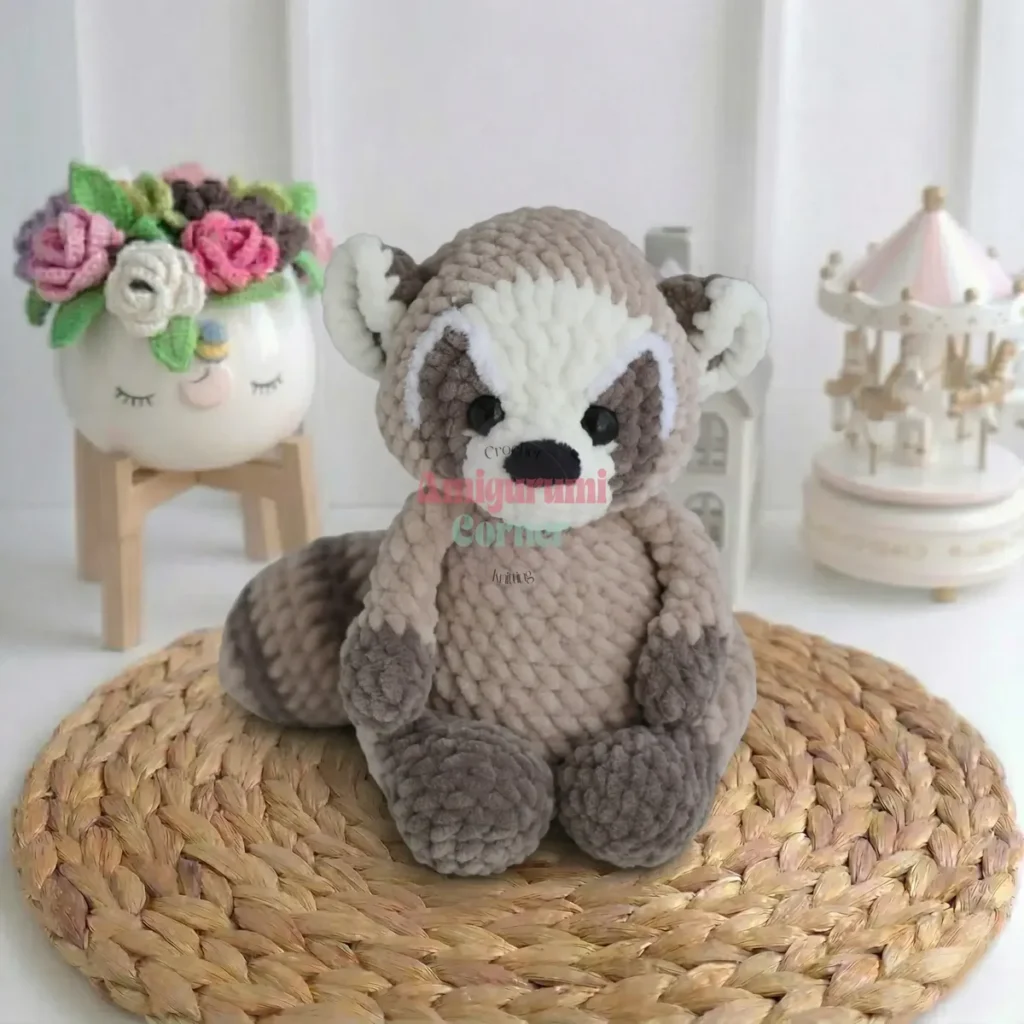
A chenille raccoon amigurumi worked in spiral rounds, with flat-row ears and a lightly stuffed tail.
- Level
- Intermediate
- Time
- 4-6 hours
- Hook
- 4 mm
- Yarn
- Bulky
Pattern highlights
- Start the arms and legs first, working each in continuous rounds and leaving the arms unstuffed as directed.
- Work the tail next, changing color partway through and stuffing only the lower section lightly.
- Build the body in one continuous spiral, stuffing gradually as the rounds close toward the neck.
- Shape the head separately, leaving space to insert the safety eyes before closing it fully.
- Work both ears flat in rows, then sew them onto the head and cinch them in place.
- Finish by embroidering the nose near the top of the head and attaching the limbs and tail.
About This Pattern
A raccoon earns its spot next to the foxes and bears already crowding my shelf of finished amigurumi. This one sits at a true toy scale, worked solidly in chenille rather than a thin cotton. I keep it near my other stuffed-as-you-work pieces, the ones built in one continuous spiral with no final seam to hide. The limbs join plain, no wire, so it leans more soft toy than collector figurine. Still, the dark beige markings do enough to read as raccoon from across a room.
The build leans on a handful of techniques done well rather than anything flashy. Everything works in continuous spiral rounds except the ears, which go flat in rows so they can cup rather than tube. Color changes happen mid-round on the arms, legs, and tail, carried or cut per preference, which keeps the raccoon's two-tone look without extra seams. Screw-in safety eyes anchor the face, and a separate nose gets embroidered afterward in black Alize Softy yarn over a couple of rounds near the head's start.
Finished, this raccoon stands at 21 cm, a solid handful rather than a desk trinket. The chenille gives it a soft, slightly fuzzy coat without any extra fur texture work, and the beige-to-dark-beige shift down the limbs does the coloring for me. Ears sewn onto the head rounds and a tail with its own lightly stuffed shaping give it real dimension. It holds its pose on a shelf without a stand, which matters more than it should once stuffing starts settling.
This pattern uses US crochet terminology throughout. Gauge runs approximately 4 sc = 2 cm when worked in YarnArt Dolce with a 4 mm hook — check this before starting if the 21 cm finished size matters to you.
Worth knowing
What I like here is the restraint. Three colors, one hook size, no jointed limbs to fuss over — just sc worked tight and even in a bulky chenille that hides minor tension wobbles. The arms and legs build on simple increase rounds before leveling off, so the shaping does its job quickly and then gets out of the way. The tail is the fun part: a longer color-changed cylinder, stuffed only partway, that gets to flop a little instead of standing stiff. Sewing the ears onto specific head rounds and cinching them with a doubled thread pass is the one bit of hand-finishing that actually changes the raccoon's expression. It is a small, satisfying puzzle of stuffing order and color timing, not a marathon of fiddly rounds.
Common mistakes
- Overstuffing the tail The tail only needs light stuffing through its lower rounds; packing it fully makes it stand stiff instead of curving.
- Stuffing the arms The pattern asks for arms left unstuffed so they stay soft and bendable; add filling only if you want a firmer pose.
- Losing the spiral Continuous rounds have no joining slip stitch, so mark the first stitch of each round or the spiral will drift out of place.
- Treating ears like tubes Ears are worked flat in rows, not in the round; trying to join them into a tube will throw off the shape before sewing.
- Fighting chenille yarn tension Chenille yarn shows gaps more than smooth cotton; keep stitches snug and consistent, especially through the color changes. If you tend to crochet loosely, drop to a 3.5 mm hook to keep the fabric dense enough to hide the stuffing.


Intermediate
Progress Tracker
0 of 0 rounds
Tap a round to tick it off — your place is saved on this device.
The kit
- YarnArt Dolce (or similar bulky chenille yarn), 100g/120m per skein:
- Beige (color 771)
- Dark Beige (color 754)
- Cream/Milk White (color 745)
- Less than one skein of each color required
- Alize Softy yarn (black and white) — for nose and face details
- Size 4 mm crochet hook
- 12 mm screw-in safety eyes (1 pair)
- Polyfill stuffing
- Tapestry/yarn needle for sewing and weaving ends
- Strong thin thread for cinching ears and joining legs
Arms (Make 2 — Do Not Stuff)
Begin with Dark Beige .
Round 1Starting in the 2nd ch from hook, work 6 sc. (6)
Round 2(1 sc, inc) × 3. (9)
Rounds 3–49 sc. Change to Beige at end of Rnd 4. (9)
Round 59 sc. (9)
Round 6(1 sc, dec) × 3. (6)
Rounds 7–116 sc. (6)Flatten the arm and close with 3 sc worked through both layers.
Legs (Make 2 — Stuff Bottom Only)
Begin with Dark Beige .
Round 1Starting in the 2nd ch from hook, work 6 sc. (6)
Round 26 inc. (12)
Round 3(1 sc, inc) × 6. (18)
Rounds 4–518 sc. (18)
Round 6(1 sc, dec) × 6. (12)
Rounds 7–812 sc. Change to Beige at end of Rnd 8. (12)
Rounds 9–1512 sc. (12)Flatten the leg and close with 6 sc worked through both layers.
Tail (Stuff Lightly Through Rnd 13 Only)
Begin with Beige .
Round 1Starting in the 2nd ch from hook, work 5 sc. (5)
Round 25 inc. (10)
Round 3(1 sc, inc) × 5. Change to Dark Beige. (15)
Round 4(2 sc, inc) × 5. (20)
Round 5(3 sc, inc) × 5. Change to Beige. (25)
Rounds 6–825 sc. Change to Dark Beige at end of Rnd 8. (25)
Round 925 sc. (25)
Round 10(3 sc, dec) × 5. Change to Beige. (20)
Rounds 11–1220 sc. (20)
Round 13(2 sc, dec) × 5. Change to Dark Beige. (15)
Rounds 14–1515 sc. Change to Beige at end of Rnd 15. (15)
Round 1615 sc. (15)
Round 17(1 sc, dec) × 5. (10)
Rounds 18–1910 sc. (10)Flatten and close with 5 sc worked through both layers.
Body (Stuff as You Work)
Begin with Beige .
Round 1Starting in the 2nd ch from hook, work 6 sc. (6)
Round 26 inc. (12)
Round 3(1 sc, inc) × 6. (18)
Round 4(2 sc, inc) × 6. (24)
Round 5(3 sc, inc) × 6. (30)
Round 6(4 sc, inc) × 6. (36)
Rounds 7–1036 sc. (36)Place a stitch marker at the center back — this marks the beginning of rounds.
Round 115 sc, then work 6 sc joining the first leg, 14 sc, then work 6 sc joining the second leg, 2 sc, then work 3 sc joining the tail. (36)Begin attaching the tail over the last 3 stitches of Rnd 11 and the first 2 stitches of Rnd 12.
Round 122 sc joining the tail, 34 sc. (36)
Round 13(4 sc, dec) × 6. (30)
Round 1430 sc. (30)
Round 15(3 sc, dec) × 6. (24)
Round 1624 sc. (24)
Round 17(2 sc, dec) × 6, then work shifting stitches to align the round start directly above the start of Rnd 11. (18)
Round 183 sc, then work 3 sc joining the first arm, 6 sc, then work 3 sc joining the second arm, 3 sc, sl st to close. (18)
After assembly, use a strong thin thread to join the inner sides of the legs together.
Ears (Make 2 — Worked in Flat Rows)
Begin with Dark Beige . Work in turning rows; chain 1 at the end of each row to turn.
Round 1Starting in the 2nd ch from hook, work 3 sc. Turn. (3)
Round 23 inc. Turn. (6)
Round 3(1 sc, inc) × 3. Change to Cream/Milk White. Turn. (9)
Round 4(2 sc, inc) × 3. (12)Fold the ear in half and join Row 4 to Row 3 using slip stitches, mirroring the two ears so they are symmetrical. The right side of Row 4 faces outward. Leave yarn tails as indicated for sewing.
Head
Safety eyes are inserted between Rnds 5 and 6, below the hdc increase stitches. The nose is embroidered between Rnds 1 and 2 using 6–7 stitches of black Alize Softy yarn.
Begin with Cream/Milk White .
Round 1Starting in the 2nd ch from hook, work 5 sc. (5)
Round 25 inc. (10)
Round 3(1 sc, inc) × 5. (15)
Round 415 sc. (15)
Round 52 sc, 3 inc, 10 sc. (18)Change to Dark Beige.
Round 61 sc, inc in sc, inc in hdc, inc in dc. Change to Beige , work 3 inc in dc. Change to Dark Beige , work inc in dc, inc in hdc, inc in sc, 1 sc. Change to Cream/Milk White , work 7 sc. (27)Change to Dark Beige.
Round 75 sc, 2 inc in sc, 1 hdc. Change to Beige , work 1 hdc in the same stitch, then 4 inc in hdc, 1 hdc. Change to Dark Beige , work 1 hdc in the same stitch, then 2 inc in sc, 5 sc. Change to Cream/Milk White , work 7 sc. (37)Change to Beige.
Round 8(5 sc, inc) × 5. Change to Cream/Milk White , work 7 sc. (42)Change to Beige.
Round 942 sc. (42)After completing Rnd 9: insert safety eyes between Rnds 5–6, below the inc stitches. Crochet white accent stripes onto the face using white Alize Softy yarn, starting 4 sc away from the cream-colored section.
Rounds 10–1442 sc. (42)
Round 15(5 sc, dec) × 6. (36)
Round 16(4 sc, dec) × 6. (30)
Round 17(3 sc, dec) × 6. (24)Begin stuffing the head now and continue adding stuffing as you work.
Round 18(2 sc, dec) × 6. (18)
Round 19(1 sc, dec) × 6. (12)
Round 206 dec. (6)Close the opening and weave the yarn tail inside the head.
Assembly
Step 1Ears: Sew the ears to the head along Rnds 11–12, leaving approximately 8 stitches between the ears. Weave all yarn tails inside the head.
Step 2Nose: Embroider the nose between Rnds 1–2 of the head using 6–7 stitches of black Alize Softy yarn.
Step 3Ear cinching: Insert a needle from the bottom of the head between Rnds 10–11, one stitch from center. Bring it out between Rnds 11–12 on the outer side of the ear, then re-enter between Rnds 12–13 on the inner side (thread passes behind the ear). Bring the needle back out at the bottom between Rnds 10–11, one stitch to the other side of center. Repeat this process but thread passing in front of the ear. Pull both threads to the desired depth, knot securely, and hide the ends inside the head. Repeat for the second ear.
Step 4Head to body: Sew the head onto the body, lightly stuffing the neck area as you join to create a natural shape.
Step 5Legs: Use a strong thin thread to tack the inner sides of the legs together so they hold a standing position.
Finishing
- Weave in every yarn tail as each color change happens, rather than leaving them for the end.
- Keep stuffing firm in the body and head but light in the tail, matching the instructions for each part.
- Attach the safety eyes before the head closes, then sew the ears and limbs on last, checking placement against the head rounds.
Why it works
The arms and legs both begin as a tight six-stitch ring before increasing, giving the paws a narrow base that widens gradually.
The ears work in flat rows instead of the spiral used everywhere else, since a flat panel curls more naturally into a cupped ear shape when sewn down.
Color changes on the arms and tail fall mid-piece rather than at a seam, so the join sits inside a round instead of along an edge.
What it becomes
- A shelf piece for a nature-themed collection, sitting well beside a fox or owl amigurumi.
- A soft toy for a child who likes animals more than characters, sturdy enough for regular handling once stuffed firmly.
- A desk companion for a woodland-loving crocheter, paired with other chenille animals in the same beige palette.
Original pattern: https://amigurumicorner.com/crochet-raccoon-amigurumi-21-cm-stuffed-toy/
FAQ
How big is the finished raccoon?
Worked as written, it comes out at 21 cm. Swapping hook size or yarn weight will change that measurement, since gauge drives the finished size here.
Can I use a different yarn instead of chenille?
You can, but chenille gives the raccoon its soft, slightly fuzzy coat without extra texture stitches. A smooth worsted yarn will work but the surface will look flatter.
Why are the arms left unstuffed?
Unstuffed arms stay soft and bendable, which suits a small toy meant for handling. It also keeps the limb thin enough to match the leg proportions.
What size safety eyes does this use?
The pattern calls for 12 mm screw-in safety eyes, one pair. Insert them before the head closes, since they can't go in afterward.