
Free Pattern
Step-by-Step
Crochet
AmigurumiCrochet a realistic largemouth bass amigurumi
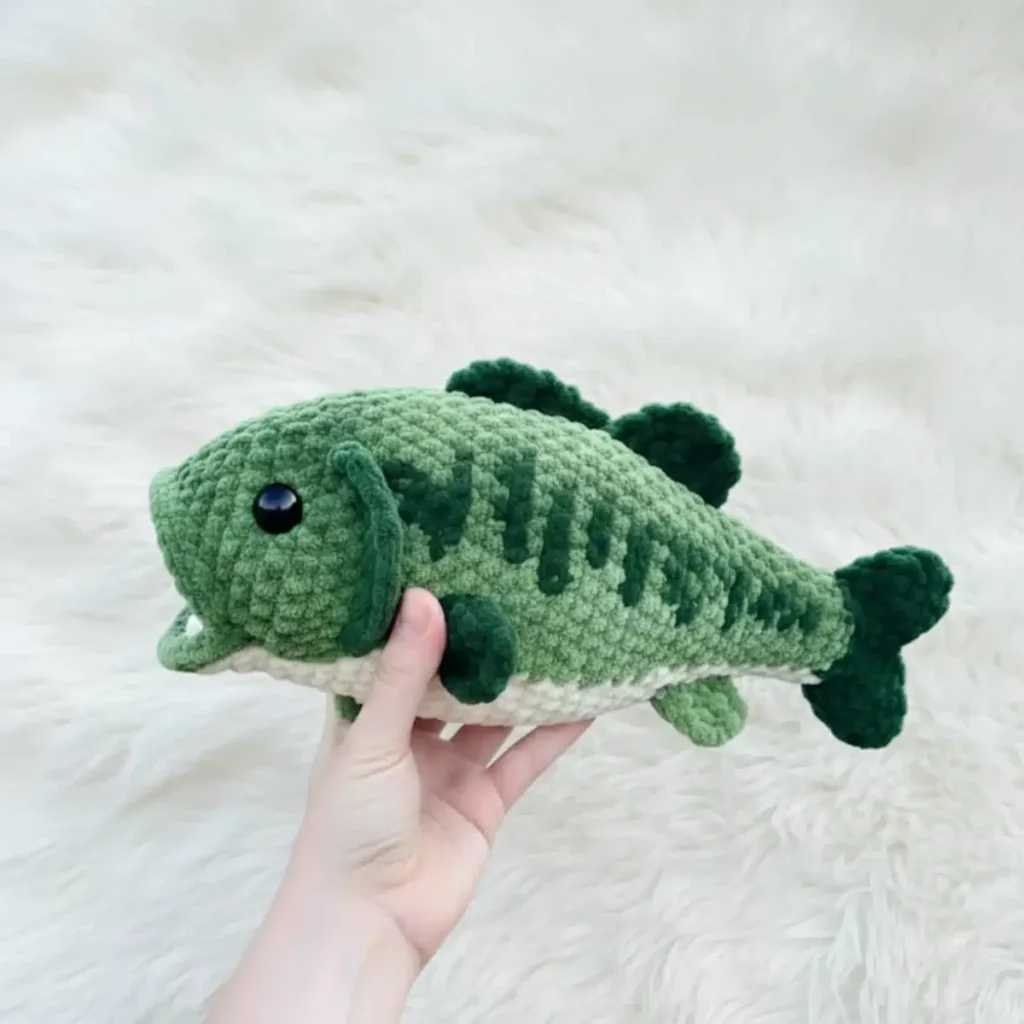
A shaped crochet pattern for a plush largemouth bass with fins, gills, and a pink mouth interior.
- Level
- Easy-Intermediate
- Time
- 6-9 hours
- Hook
- 4 mm
- Yarn
- Worsted
Pattern highlights
- Start the body at the mouth with a magic ring, then shape rounds outward through the belly toward the tail fin.
- Work the mouth interior accent flat in turned rows using pink yarn, ready to tuck inside later.
- Crochet the pectoral fins, dorsal fin, and anal fin as separate pieces before joining them to the body.
- Insert the safety eyes securely from inside the body before you stuff and close anything.
- Add the pelvic fins and gills by working stitches directly onto the finished body surface.
- Stuff the body firmly with polyester fiberfill so the shape holds its fish-like contour.
- Sew or hot-glue the fins and mouth interior into place to finish the assembly.
About This Pattern
A bass earns a spot next to my other amigurumi fish. But it sits apart from the round, friendly ones. This shape follows an actual fish silhouette — mouth, belly, tail fin, dorsal ridge. It's not a stylized blob with fins glued on. I reach for this pattern when I want a project that photographs like a specimen, not a toy. A shelf of these would read as a small tackle box of soft catches.
The body works in continuous rounds from a magic ring at the mouth. It shapes outward into the belly, then narrows before fanning back out into the tail fin. That's one long shaping journey worked in a single piece. The dorsal, anal, and mouth interior pieces work flat in turned rows, joined on afterward. Pelvic fins and gills are worked directly onto the finished body, with no separate seaming. Safety eyes go in before the body closes, so there's no fishing them back out later.
What comes off the hook is a bass about 18 cm long. It's cream-bellied, with a pink mouth accent and dark green fins. It stands up to handling — fiberfill under tight single crochet keeps the shape crisp, not floppy. Set it on a shelf, a desk, or in a tackle-themed pile. It reads instantly as a largemouth, not a generic fish.
Difficulty: Easy–Intermediate. Finished Size: approximately 7 inches (18 cm) long, worked with a 4 mm hook.
Worth knowing
What I like about this pattern is the shaping packed into one body piece. It starts at a magic ring at the mouth, then increases into the belly. It narrows, then fans wide again for the tail fin. That's four shaping moves without ever picking up the yarn twice. The pink mouth interior, worked flat and sewn or glued inside, is a nice touch. You could skip it, but it's what makes an open mouth look wet, not hollow. Pelvic fins and gills worked straight onto the body skip a fussy seaming step. The pectoral fin also splits partway through, single crocheted across one side only. So it gets a real folded edge instead of a flat oval sewn flush.
Common mistakes
- Eyes placed after stuffing Insert safety eyes early while the mouth opening is wide, and check them from inside before adding fins.
- Mouth interior pressed in flat Shape the pink piece to the curve of the mouth before gluing it in. A flat press looks pasted on.
- Fins attached before body is stuffed Attach the pectoral, dorsal, and anal fins after stuffing. You'll judge placement better against the finished shape.
- Gills and pelvic fins stitched loosely Keep even tension when stitching gills and pelvic fins onto the body. Loose stitches show more here than on a seamed piece.
- Pectoral fin sides mixed up Remember the fin's last round works single crochet across one side only. Track which side faces out before seaming.


Easy-Intermediate
Progress Tracker
0 of 0 rounds
Tap a round to tick it off — your place is saved on this device.
The kit
Yarn — Medium Weight (Size 4)
- Medium Green — body (approx. 60 yards)
- Dark Green — fins and tail (approx. 20 yards)
- Cream / Off-White — mouth opening and belly (approx. 20 yards)
- Pink — mouth interior accent (approx. 5 yards)
Tools & Notions
- 4 mm crochet hook
- 8 mm black safety eyes (1 pair)
- Tapestry / yarn needle
- Polyester fiberfill stuffing
- Scissors
- Stitch markers (2–3)
Body
Begin with Cream / Off-White yarn
We start at the mouth opening, which expands outward into the body and then narrows before fanning back out into the tail fin.
Round 16 sc into a Magic Ring. Pull ring closed. (6)
Round 2Inc all around. (12)
Round 3(Sc 7, inc) × 2. (18)
Round 4(Sc 5, inc) × 3. (21)
Round 5(Sc 6, inc) × 3. (24)
Round 6(Sc 3, inc) × 6. (30)
Round 7Sl st 1, sc 29. (30)📌 Place a stitch marker in the slip stitch of Round 7. This marks the bottom of the fish and is your reference point for placing the eyes and fins later.Switch to Medium Green yarn
Round 8(Sc 14, inc) × 2. (32)
Round 9Sc all around. (32)
Round 10(Sc 15, inc) × 2. (34)
Rounds 11–13Sc all around. (34) × 3 rounds
Round 14Inc in first st, sc 33. (35)
Round 15Sc all around. (35)
Round 16Inc in first st, sc 34. (36)💡 Insert the 8 mm safety eyes now. Orient the fish so the bottom marker (from Round 7) faces downward. Insert both eyes 3 rounds back from the front ridge of Round 10, placing them 10–11 stitches apart across the top of the fish. Flatten the fish gently to confirm both eyes sit level before snapping the backs on.
Rounds 17–22Sc all around. (36) × 6 rounds
Round 23(Sc 10, dec) × 3. (33)
Round 24Sc all around. (33)
Round 25(Sc 9, dec) × 3. (30)
Round 26Sc all around. (30)
Round 27(Sc 8, dec) × 3. (27)
Round 28Sc all around. (27)
Round 29(Sc 7, dec) × 3. (24)
📌 The next two rounds are worked in Back Loops Only (BLO) . This creates the clean lip ridge around the mouth opening — do not skip this step!
Round 30(BLO): Sc all around. (24)
Round 31(BLO): (Sc 6, dec) × 3. (21)💡 Form the mouth now: Gently push the cream-colored front section (Rounds 1–7) inward so it cups inside the body like a real bass mouth. The two BLO rounds form a neat ridge around the rim. Hold it in position — it will be locked in place once you stuff the body.
📌 Begin stuffing lightly from here. Add enough fiberfill that the body holds its shape but stays somewhat flat like a real fish. The mouth indent must remain indented — do not overstuff.
Round 32Sc all around. (21)
Round 33(Sc 5, dec) × 3. (18)
Round 34Sc all around. (18)
Round 35(Sc 4, dec) × 3. (15)
Round 36Sc all around. (15)
Round 37(Sc 3, dec) × 3. (12)
Round 38(Sc 2, dec) × 3. (9)
📌 Finish stuffing the body evenly here. Do NOT stuff the tail section that follows — it must lie flat.
Round 39(Sc 2, inc) × 3. (12)
Round 40(Sc 3, inc) × 3. (15)
Round 41(Sc 4, inc) × 3. (18)
Round 42(Sc 5, inc) × 3. (21)
Round 43(Sc 6, inc) × 3. (24)
Round 44Sc all around. (24)Switch to Dark Green yarn — Tail Fin begins
Round 45Ch 1, (2 dc in next st) × 2, hdc 2, sl st 3, hdc 2, (2 dc in next st) × 2, sl st 1. (~16 sts)
📌 Add a small amount of extra stuffing to the very end of the body before the color change if needed. Do not stuff the tail fin itself.
Now sc up the side of the opening until you reach the top edge of the tail. Then crochet through both layers to close the back of the tail fin:
Tail Close: Sc 8 sts straight across the top, then sc the last 2 sts at a slight angle toward the front of the fish. (10 sts total)
Fasten off, leaving a 6-inch tail. Thread onto your tapestry needle and weave the end deep inside the fish body to hide it. The body is now finished!
Mouth Interior Accent
In Pink
This small flat piece is sewn or hot-glued inside the open mouth to give the classic bass its pink interior. Alternatively, embroider a few long stitches of pink yarn directly inside the mouth for the same effect.
Round 1Ch 7. Sc in 2nd ch from hook, sc across. (6)
Round 2Ch 1 and turn. Inc, sc 4, inc. (8)
Rounds 3–4Ch 1 and turn. Sc all across. (8) × 2 rows
Round 5Ch 1 and turn. Dec, sc 4, dec. (6)Fasten off, leaving a long tail. Shape into an oval and hot-glue or sew it inside the mouth opening so it sits cupped within the cream lip area.
Pectoral Fins(Make 2)
In Dark Green
Round 1MR, 4 sc into ring. (4)
Round 2(Sc 1, inc) × 2. (6)
Round 3(Sc 2, inc) × 2. (8)
Round 4Ch 1, sc 4 across one side only. (4)
Do not stuff. Close by crocheting through both layers across the opening:
Close: Sc 2 sts at a slight angle away from the front of the fin, then sc 8 sts straight down. (10 sts)
Fasten off, leaving a tail for sewing. Thread the tail through to the pointed tip — this is the side that attaches to the body. Sew each fin 5–6 rounds back from the eyes, with the top of the fin level with the bottom of the eye. Use 4–5 stitches per fin.
Dorsal Fin(Top Fin)
In Dark Green
Round 1Ch 3. Starting in 2nd ch from hook: sc 1, inc in next st. (3)
Round 2Ch 1 and turn. Sc all. (3)
Round 3Ch 1 and turn. Sc 2, inc. (4)
Round 4Ch 1 and turn. Inc, sc 3. (5)
Round 5Ch 1 and turn. Sc 4, inc. (6)
Round 6Ch 1 and turn. Sc all. (6)
Round 7Ch 1 and turn. Dec, sc 2, dec. (4)
Round 8Ch 1 and turn. Dec, dec. (2)Fasten off, leaving a tail for sewing. Place the straight base along the top center spine of the fish, with the front edge of the fin sitting 12–13 rounds back from the mouth ridge. Pin in place before sewing to keep it straight. Sew or hot-glue on and weave in all ends.
Anal Fin(Bottom Fin)
In Dark Green
Round 1Ch 3. Starting in 2nd ch from hook: sc 1, inc. (3)
Rounds 2–3Ch 1 and turn. Sc all. (3) × 2 rows
Round 4Do not ch 1. Turn. Sc 2. (2)Fasten off, leaving a tail for sewing. Position the straight base along the bottom center of the fish, back edge aligned with the back edge of the dorsal fin. Sew or hot-glue in place. Weave all ends inside the body.
Pelvic Fins(Make 2 — worked directly onto the body)
In Medium Green
These tiny fins are attached directly to the body rather than sewn on separately. Insert your hook into the body 5 stitches below each pectoral fin.
Round 1Sl st to join yarn to body. Ch 3, turn, sl st back down both chain stitches to the body. Sl st into the same base stitch to anchor. (small tab)Fasten off and weave in ends inside the body. Repeat for the second pelvic fin, 3–4 stitches over, 5 stitches below the other pectoral fin.
Gills(worked directly on body)
In Medium Green Left side: Insert your hook into the body 2 rounds back and 5 stitches below the eye.
Round 1Ch 3, turn. Starting in 2nd ch: 2 sc in next st, sc 1. (3)
Round 2Ch 1 and turn. Sc 2, inc. (4)
Rounds 3–4Ch 1 and turn. Sc all. (4) × 2 rows
Round 5Do not ch 1. Turn. Sc 3. (3)
Round 6Ch 1 and turn. Sc 3. (3)
Round 7Do not ch 1. Turn. Sc 2. (2)Fasten off and weave in ends. Repeat on the right side, inserting your hook 5 stitches over from the top of the left gill and 3 stitches up from the eye line, working Rows 1–7 in mirror.
Assembly
Step 1Confirm all safety eyes are securely fastened from inside the body before proceeding.
Step 2Sew or hot-glue the pink mouth interior piece inside the open mouth, shaping it to follow the curved cream interior.
Step 3Sew one pectoral fin to each side of the body, 5–6 rounds back from the eyes, top of fin level with the bottom of the eye.
Step 4Sew or hot-glue the dorsal fin along the top center spine, front edge 12–13 rounds back from the mouth ridge.
Step 5Sew or hot-glue the anal fin to the bottom center, its back edge aligned with the dorsal fin's back edge.
Step 6Attach the two pelvic fins directly to the body (worked on, see Pelvic Fins section).
Step 7Weave in all remaining yarn tails securely and trim any excess.
Step 8💡 Display idea: Mount your finished bass on a small wooden plaque using adhesive hook-and-loop tape for a fun fishing trophy wall display — a perfect gift for any angler!
Finishing
- Stuff the body firmly with fiberfill as you work the final tail rounds.
- Close the tail opening once the last round is complete, cinching it flat rather than leaving it open.
- Weave in every yarn end — body, fins, gills, mouth interior — so nothing shows through the belly.
Why it works
The first three rounds double the stitch count: 6, then 12, then 18. That's the standard amigurumi curve for building a rounded shape at the mouth.
The mouth interior, dorsal fin, and anal fin are worked flat in turned rows, not in the round. That gives each one a straight edge to sew onto the body.
The pectoral fin's last round works single crochet across one side only. That leaves the piece open, not closed into a tube, giving it two distinct faces to fold.
What it becomes
- A desk companion for anyone who fishes, paired with a small tackle box or a framed catch photo.
- A soft toy for a kid's nature-themed shelf, next to other amigurumi pond creatures.
- A photo prop for a cabin shelf, alongside other outdoor-hobby crochet pieces.
Original pattern: https://amigurumiarts.com/plush-bass-crochet-pattern-make-a-realistic-largemouth-bass/
FAQ
Can I skip the pink mouth interior piece?
Yes. Embroider a few long pink stitches directly inside the mouth instead of sewing in a piece. The pattern lists this as an alternative.
Why are the pelvic fins and gills worked directly onto the body?
It skips a separate seaming step for two small details. Working straight onto the body keeps them flat against the curve.
What yarn weight does this bass use?
The materials list a 4 mm hook, which points to worsted weight yarn. Medium green, dark green, cream, and pink cover the body, fins, and mouth.
How do I get the fins to sit at the right angle?
Follow the placement guidance in the assembly steps, measuring back in rounds from the eyes and mouth ridge. Pin each fin before stitching to check the silhouette.