Free Pattern
Step-by-Step
Crochet
WearablesCrochet Ribbon Tie-Front Cardigan Pattern For Beginners
Make a cozy crochet ribbon tie-front cardigan with this beginner-friendly pattern featuring easy panels, sleeves, and a charming velvet ribbon closure.
Level BeginnerTime 6-8 HoursHook 6 mmYarn Worsted
Pattern highlights
- Work the main pattern rows first to establish the foundation for the cardigan's construction.
- Crochet the back panel using the 3-row repeat pattern for a total of 38 rows to form the center back piece.
- Make two matching front panels, each worked over 38 rows for the longer front sections.
- Crochet two sleeves, working 37 rows each (the 3-row repeat pattern plus a 2-row cuff decrease) to keep them soft and lightly shaped.
- Lay all five finished pieces flat and check their fit and orientation before joining.
- Seam the front panels to the back panel to build the main body of the cardigan.
- Attach the sleeves to the joined body at the shoulder openings to complete the shape.
- Thread the velvet ribbon through the front panels and tie it into a bow to finish.
About This Pattern
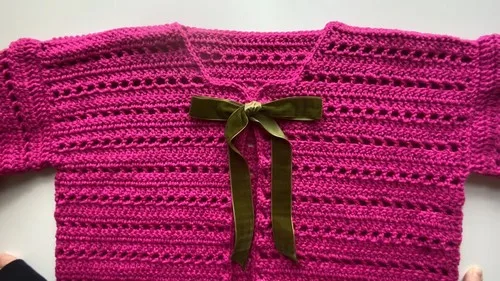
This crochet ribbon tie-front cardigan is a wonderfully wearable project that comes together from simple, clearly defined panels — a back piece, two front panels, and two sleeves — all joined into one flattering silhouette. What sets it apart is the sweet velvet ribbon that laces through the front, letting you cinch the cardigan closed with a bow instead of fumbling with buttons. It's perfect for crocheters who want a garment that feels special but doesn't require complicated shaping, and for anyone building a handmade wardrobe piece they'll actually reach for.
The techniques here are approachable: straightforward rows worked in worsted-weight yarn using two hook sizes for structure and drape, plus basic seaming to join the back, front panels, and sleeves. Because each panel follows the same simple 3-row repeat pattern, beginners can follow along without losing track even though some panels are worked over many rows, while the ribbon-lacing finishing touch adds just enough detail to keep things interesting. Expect to spend a relaxed weekend on this project, working the panels over a few sittings and finishing with assembly and ribbon threading.
Once assembled, you'll have an open-front cardigan with soft draping sleeves and a customizable ribbon closure that can be tied loose and flowy or snug at the waist. The acrylic yarn keeps it lightweight and easy to care for, making it a practical everyday layer rather than a special-occasion-only piece. It also makes a thoughtful handmade gift — the kind of cardigan a friend will wear on repeat, knowing exactly who made it for them.
Variations
This cardigan is incredibly easy to customize once you've got the basic panels down. For color, try a rich burgundy or forest green ribbon against a cream or oatmeal cardigan for a cozy autumn look, or go bold with a black cardigan and a red velvet ribbon for a dramatic contrast. Pastel yarn paired with a white satin ribbon gives it a softer, spring-ready feel — perfect for layering over a sundress. For sizing, work additional rows onto the back panel and front panels evenly (adding rows in sets, like +2 rows per size increment) to grow the body width, and lengthen the sleeves by adding a row or two before finishing if you prefer three-quarter or full-length sleeves. If you want a cropped version, simply stop the front panels a row or two earlier than written, keeping the same ribbon-tie construction. Yarn-wise, this pattern calls for four-weight acrylic, but a wool-acrylic blend like Vanna's Choice or With Love will give you similar stitch definition with a bit more warmth for colder climates. If you want extra drape, try a cotton-acrylic blend for a lighter, more fluid cardigan that's ideal for warmer months. For themed variations, swap the standard velvet ribbon for a plaid ribbon in fall, a pastel grosgrain for spring, or a metallic gold ribbon for a festive evening look. You could even add a small crochet flower or button embellishment at the base of the ribbon tie for extra charm. Mixing yarn colors between the back panel, front panels, and sleeves also creates a fun color-blocked effect without changing the construction at all.
I designed this cardigan for crocheters who want a real, wearable garment without the intimidation factor — and the ribbon tie is honestly my favorite part. Instead of fussing with buttonholes or a zipper, you simply thread a length of velvet ribbon through the front panels and tie it into a bow, which means the fit is totally adjustable and forgiving. Working up the back panel, two front panels, and two sleeves using the same simple 3-row repeat pattern keeps the momentum going; you always know exactly what stitch comes next, so it feels like constant progress. I also love how the two hook sizes work together to give the fabric enough structure through the body while keeping the sleeves soft and drapey. There's something so satisfying about laying out all five finished panels before assembly — it really starts to look like a garment right before your eyes. And that final step of lacing the ribbon through and tying the bow? It's the moment this project transforms from 'homemade' to genuinely chic. This is a pattern I keep coming back to myself.
Common mistakes
- Losing track of row counts on the front
- Use a stitch marker at the start of every row on the front panels specifically, and jot down a tally after each row so you don't accidentally work extra or too few rows.
- Seaming the front panels to the back
- Lay all five pieces out flat before seaming to confirm orientation, and dry-pin the panels together first to check the fit before committing to a permanent seam.
- Threading the ribbon
- Thread the ribbon loosely at first and try the cardigan on before tying the final bow, adjusting the tension evenly through each lacing point for a smooth, flattering front.
- Cutting the 40-inch ribbon shorter
- Leave the ribbon at its full length until after you've laced it through the front panels and tied a test bow — you can always trim excess afterward, but you can't add length back.
- Skipping blocking or steaming
- Lightly steam or wet-block each panel to even out the stitches and match sizing before you seam the back, front panels, and sleeves together.
Beginner
Progress Tracker
0 of 0 rounds
Tap a round to tick it off — your place is saved on this device.
Materials
Yarn
- Four-weight yarn (100% acrylic recommended)
Hooks
- 6 mm crochet hook and 5.5 mm crochet hook
Ribbon
- Velvet ribbon, approximately 40 inches long
Notions
- Stitch markers, scissors, darning needle, measuring tape
Row Repeat Pattern
- Row 1Double Crochet (DC)
- Row 2Double Crochet (DC)
- Row 3Mesh/Filet Stitch (DC, Chain 1, Skip 1)When working a DC row after a mesh row (Row 3), work 1 DC into the stitch and 1 DC into the chain space to maintain the stitch count.
Note on Stitching after Mesh Row:
Back Panel
Hook: 6 mm Foundation: Chain 73
- Row 1(DC): Skip 2 chains, 1 DC in the 3rd chain and in each chain across (71 stitches total).(71)
- Row 2(DC): Chain 2 (does not count as a stitch), turn. 1 DC in the first stitch and in each stitch across (71 stitches total).(71)
- Row 3(Mesh): Chain 2, turn. 1 DC in the first stitch, then repeat * *Chain 1, skip 1 stitch, 1 DC* across (71 stitches total).Repeat: Continue repeating the 3-row sequence for a total of 38 rows .Finish: Fasten off and leave a long tail for sewing.(71)
Front Panels (Make 2)
Hook: 6 mm Foundation: Chain 35
- Rows 1-31Work the same 3-row repeat pattern (DC, DC, Mesh). At the end of Row 1, you should have 33 stitches. Repeat until the end of Row 31.
- Row 32(DC): Chain 2, turn. DC Decrease (DC Dec) over the first 2 stitches, then DC across.
- Row 33(Mesh): Chain 2, turn. Work Mesh pattern, stopping with 4 stitches remaining . Chain 2, turn.
- Row 34(DC): Chain 2, turn. DC Dec over the first stitch and the next chain space, then DC across.
- Row 35(DC): Chain 2, turn. DC across until the last 2 stitches. DC Dec over the last 2 stitches.
- Row 36(Mesh): Chain 2, turn. Work Mesh pattern across with no decrease .
- Row 37(DC): Chain 2, turn. DC across until the last chain space/stitch. DC Dec over the last chain space and last stitch.
- Row 38(DC): Chain 2, turn. DC Dec over the first 2 stitches, then DC across. Finish: Fasten off and leave a long tail for sewing. Repeat for the second front panel.
Sleeves (Make 2)
Hook: 6 mm Foundation: Chain 53
- Row 1(DC): Skip 2 chains, 1 DC in the 3rd chain and in each chain across ( 51 stitches total).Rows 2-35: Continue repeating the 3-row sequence for a total of 35 rows .(51)
- Row 36(Cuff): Chain 1, turn. Work Single Crochet Decrease (SC Dec) across the entire row, ending with 1 SC in the very last stitch.
- Row 37(Cuff): Chain 1, turn. Work SC Dec across the entire row. Finish: Fasten off and leave a long tail for sewing.
Assembly
- Step 1Assembly: Seam Sleeves: Fold each sleeve in half lengthwise and use the long tail and darning needle to sew the seam closed.
- Step 2Seam Shoulders/Sides: Place the panels with wrong sides facing out (right sides facing in).
- Step 3Shoulders: Sew the top edges of the two Front Panels to the top edge of the Back Panel.
- Step 4Side Seams: Sew the Front and Back Panels together from the bottom hem up, leaving a 7-inch opening at the top for the armhole.
- Step 5Attach Sleeves: Use stitch markers to clip the sleeve around the 7-inch armhole opening. Use the sleeve's tail to sew the sleeve to the body.
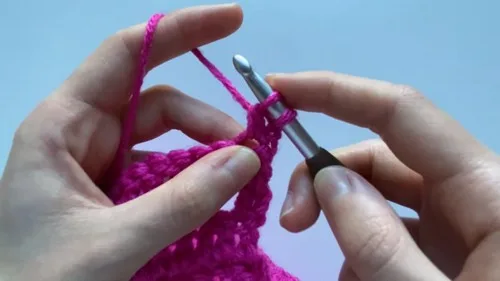
- Step 6Trim (Edging): Hook: Switch to the 5.5 mm hook.
- Step 7Row 1 (SC): With the right side facing you, attach the yarn at one of the bottom front corners. Chain 1, and work 3 Single Crochets (SC) into that corner space.
- Step 8Continue to work SC evenly around the entire perimeter of the cardigan.
- Step 9Finish: Slip stitch to the first SC and fasten off.
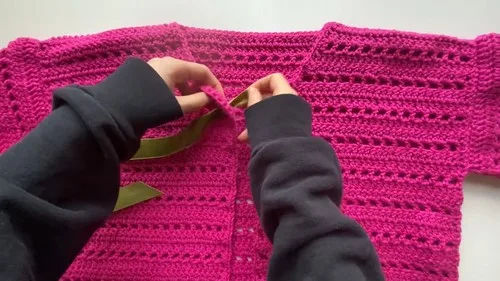
- Step 10Ribbon Tie: Thread the velvet ribbon through the space closest to the top edge of the collar, making sure the ribbon is even on both sides.
- Step 11Tie a simple knot, followed by a decorative bow to finish the look.
Important notes
💡 Place a stitch marker at the beginning of every row, especially on the 38-row front panels, so you always know exactly where you are.
💡 Measure your gauge swatch with the 6mm hook first since the main pattern and back panel set the foundation size for the whole cardigan.
💡 Save the velvet ribbon for last — thread it only after all seaming is complete so you can adjust panel placement without unpicking ribbon lacing.
💡 Weave in yarn tails as you finish each panel rather than waiting until the end, since five separate pieces can quickly become a tangle of loose ends.
💡 Try the cardigan on before your final ribbon tie to check the fit through the shoulders and sleeves, since acrylic yarn has minimal stretch to adjust after wearing.
More photos
Original pattern: https://crocheteverything.com/crochet-ribbon-tie-front-cardigan-pattern-for-beginners/
FAQ
What yarn weight works best for this cardigan?
Four-weight (worsted) acrylic yarn is recommended for the ideal balance of structure and softness. A wool or cotton blend in the same weight also works well if you want a different drape or warmth level.
Do I really need two different hook sizes?
Yes — the 6mm and 5.5mm hooks are used for different pieces to create the right structure and drape. Using only one size throughout can make the fabric too stiff or too loose.
How long does this cardigan take to make?
Most beginner crocheters can complete all five panels and assembly in about 6-8 hours, spread over a weekend. The front panels take the longest since they combine a 31-row repeat section with 7 extra shaping rows (38 rows total).
Can I substitute the velvet ribbon with something else?
Absolutely — grosgrain, satin, or even a wide crochet chain tie can replace the velvet ribbon. Just make sure your substitute is around 40 inches to comfortably lace through the front panels and tie a bow.
Is this pattern really beginner-friendly?
Yes, this pattern relies on just a simple 3-row repeat (DC, DC, Mesh) worked with basic stitches, so even though the panels are worked over many rows, the stitch pattern itself stays easy to follow. The main techniques are straightforward rows and simple seaming, so it's a great first-garment project.