
Free Pattern
Step-by-Step
Crochet
AmigurumiCrochet Snake Amigurumi Pattern: 70cm Coiling Toy
Make a squishy 70cm crochet snake amigurumi with chenille yarn! Continuous spiral pattern, optional stripes, and a soft tongue detail. Beginner-friendly fu
Level IntermediateTime 4-6 HoursHook 3.5 mmYarn Bulky
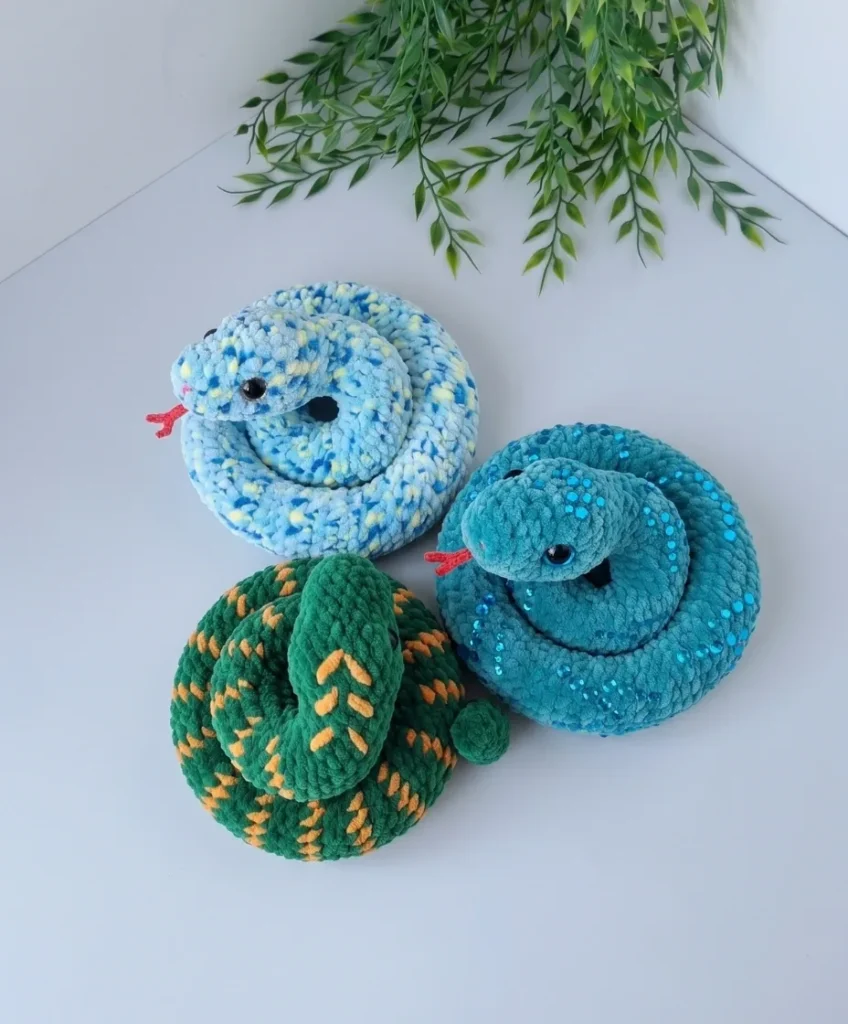
Pattern highlights
- Start the head at one end and work continuous spiral rounds, increasing gradually to shape the rounded snout and jaw.
- Stuff firmly as you go, adding fiberfill every several rounds so the long tube keeps an even, huggable shape.
- Taper the rounds gradually near the end to shape a narrowing tail tip, then close it off securely.
- Attach the tongue neatly into the mouth area so it peeks out just below the snout.
- Weave in all loose ends from color changes and closures for a clean, finished look.
- Pose and coil your finished snake into gentle curves to show off its natural, lifelike drape.
About This Pattern
This pattern turns a few skeins of irresistibly soft chenille yarn into a friendly, 70cm-long coiling snake that begs to be squeezed. Worked as one continuous piece from nose to tail tip, it's the kind of project that grows before your eyes, round after round, until you're holding a genuinely impressive amigurumi. It's perfect for crocheters who love long, meditative projects and for anyone shopping for a unique handmade gift for a reptile-loving kid — or kid at heart.
The whole body is crocheted in a continuous spiral, so you'll rely on a stitch marker to track your rounds rather than joining and turning. Expect to practice steady increases and decreases as the head, jaw, and tapering tail take shape, plus a tiny fingering-weight tongue worked separately with a fine steel hook. This is a comfortable intermediate project — nothing tricky stitch-wise, but the sheer round count (54!) rewards patience and consistency more than fancy technique.
When the last round is stuffed and closed, you'll have a plush, tactile 70cm snake with a soft chenille body that has real weight and drape, letting it coil and pose like a living creature. The bulky yarn gives it a plush, huggable texture, while the optional contrast-color stripes add playful personality. Whether curled on a shelf or draped around small shoulders, it's a showstopping handmade piece with serious gift potential.
Variations
This snake is endlessly customizable once you understand the basic construction! For a classic look, try a rich green main color (like Himalaya Dolphin Baby in a forest green) with black or cream contrast stripes for a corn snake or garter snake vibe. Want something bolder? Go with a solid black main color and add hot pink or neon yellow stripes for a fantasy-creature feel, or use ombré-effect chenille yarns to get a gradient color shift down the body without any stripe-counting at all. For a baby-safe, softer palette, pastel chenille in lavender or blush pink with a white contrast makes an adorable nursery decoration. If you want a smaller version, you can crochet fewer rounds in the body-tapering section before starting the tail decreases — just watch your stitch counts stay even and stop stuffing/adding rounds once you reach your desired length, keeping the head and tail shaping rounds intact for the recognizable snake shape. Alternatively, work extra straight rounds (without increasing or decreasing) in the mid-body section to make a longer, more dramatic coiling snake — great for photo props or door draft stoppers. Yarn substitutions work well too: any bulky-weight chenille (like Bernat Baby Velvet or Comfy) will give a similar plush texture, though you may need to adjust your hook size to keep the fabric firm. For themed variations, try patchwork-style random stripes for a 'patchwork python,' or add small felt or embroidered scale details along the back for extra texture. You could even embroider a face with safety eyes replaced by simple satin-stitch eyes for a baby-safe version suitable for very young children.
I adore this pattern because it turns something as simple as a continuous spiral into a genuinely dramatic finished object — you crochet round after round and suddenly this long, sinuous body is coiling in your lap. There's something so satisfying about chenille yarn here; Himalaya Dolphin Baby feels like velvet under your hook, and the firm gauge means the fabric holds its shape beautifully with no gaps. I love that the head and body are worked as one continuous piece, so there's no separate sewing-together of body segments — just steady, meditative rounds with your contrast-color marker riding along. The tiny fingering-weight tongue, worked with a fine steel hook, is such a fun contrast to the chunky body and adds a surprisingly realistic detail. And if you add the optional contrast-color stripes, watching the color pattern emerge round by round is genuinely addictive. By the time you're stuffing and closing up 70cm of snake, it feels like a real accomplishment — not just another amigurumi, but a statement piece.
Common mistakes
- Losing track of the round count
- Always use a contrast-color yarn length as your beginning-of-round marker and physically move it up into the new round's first stitch every single time before you continue — don't rely on memory alone.
- Working the fabric too loosely
- Test your gauge swatch first and size down your hook (try the E-4/3.5mm before F-5/4mm) until the stitches sit close together with no visible gaps, especially around the head and tail tapering sections.
- Struggling to see stitch definition in
- Work in bright, even lighting and count stitches out loud after every round; chenille's fuzzy texture hides stitch tops, so slow down deliberately on shaping rounds rather than rushing through.
- Under-stuffing the long body
- Stuff firmly and consistently as you go rather than waiting until the end — add fiberfill in small amounts every several rounds so it's evenly distributed and the snake can hold gentle curves and poses.
- Forgetting to plan contrast-color
- Before starting, jot down which rounds will use the contrast color so you're not deciding on the fly — carry the unused yarn loosely up the inside of the tube as you work to avoid cutting and rejoining constantly.


Intermediate
Progress Tracker
0 of 0 rounds
Tap a round to tick it off — your place is saved on this device.
Materials
- Yarn (Main Color): Himalaya Dolphin Baby, color 80354 — approximately 60–70 g (Bulky weight, polyester chenille)
- Yarn (Contrast Color, optional for stripes): Himalaya Dolphin Baby, color 80316 — approximately 15 g
- Yarn (Tongue): Iris crochet thread (Fingering weight) — small amount
- Hook (Main): E-4 / 3.5 mm or F-5 / 4 mm — use whichever gives you a firm, tight fabric
- Hook (Tongue): Steel hook 1.25 mm
- Safety Eyes: Trapezoid-shaped with colored iris, 14 mm — 2 pieces
Stuffing
- Polyester fiberfill / hollofibe
Stitch markers
- Multiple — a contrast-color yarn marker is strongly recommended for the beginning-of-round marker
- Yarn needle / tapestry needle: Long, blunt-tipped
- Scissors
Head & Body (worked as one continuous piece)
Begin with a foundation chain of 4 ch. Work from the 2nd ch from the hook.
- Round 1inc, 1 sc, 4 sc in the last ch; continuing along the opposite side of the foundation chain: 1 sc, inc. (10) Place your beginning-of-round marker here.
- Round 2(1 sc, inc) × 2, 2 sc, (inc, 1 sc) × 2. (14)
- Round 3sc in each st around. (14)
- Round 41 sc, inc, 3 sc, inc, 2 sc, inc, 3 sc, inc, 1 sc. (18)
- Round 5sc in each st around. (18)Shift stitch: This pattern uses a "shift stitch" to correct the natural rightward lean of spiral crochet and keep the marker centered on the back spine. A shift stitch is one extra sc worked at the end of a round to move the marker one stitch over. It does not increase the stitch count.
- Round 6sc in each st around, work 1 shift stitch. (18)
- Round 71 sc, (eye bump: 3 hdc in 1 st, 3 hdc, 3 hdc in 1 st) , 1 sc, (eye bump repeat) , (3 sc, inc) × 2, 2 sc. (24)
- Round 8sc in each st around. (24)
- Round 9sc in each st around. (24)
- Round 10(1 hdc, hdc-dec) × 2, 2 sc, (hdc-dec, 1 hdc) × 2, 1 sc, dec, 4 sc, dec, 1 sc. (18)
Install safety eyes now. Add fiberfill.
- Round 11sc in each st around. (18)
- Round 12(dec, 1 sc) × 4, 6 sc. (14)
- Round 13sc in each st around, work 3 shift stitches. (14)Short-Row Technique — Read carefully before working Rnd 14:
After Rnd 13, your beginning-of-round marker should sit at the top center of the back spine — and it will remain there for the rest of the pattern. Add shift stitches as needed to keep it there.
From Rnd 14 onward, you will regularly work an embedded short row to build the body’s coil. The method is always the same:
Work partway through the main round, leaving the last stitches unworked. Place a marker in the open/live loop so it doesn’t unravel. Count back the required number of stitches in the opposite direction, insert the hook through the fabric from the right side into that stitch (the last stitch of the previous round), and pull up a loop of the main yarn — make sure the yarn runs along the wrong side loosely, not pulled tight. Work the short-row sc stitches back toward the open loop, catching the float strand from the wrong side as you go. When you reach the open loop: without removing the hook from the working loop, insert it into the open loop (2 loops on hook), then into the next stitch of the main round (3 loops on hook), and draw through all — this closes the short row and counts as 1 sc. Continue the main round.
- Round 147 sc (do not finish the round — place a marker in the live loop) . Work 1 short row of 7 sc back to the open loop, close as described above. Continue Rnd 14: 4 sc in BLO (place markers on the front loops of the 1st and last of these 4 sts for later reference) , 2 sc in both loops. (14)
- Round 157 sc + (1 embedded short row of 7 sc), 1 sc in BLO together with open loop (place a marker on the front loop) , 4 sc in both loops, 1 sc in BLO (place a marker on the front loop) , 1 sc in both loops. (14)
- Round 167 sc + (1 embedded short row of 7 sc), 1 sc together with open loop through the front loop of the stitch one row below, 4 sc through the front loops of stitches two rows below, 1 sc through the front loop one row below, 1 sc. (14)The table below summarizes the short-row color and stitch pattern for each round. All rounds marked with a short row follow the format: [first half] sc, + (1 short row of [same count] sc), [second half] sc = (14) unless a stitch count change is noted.
From Rnd 17 onward, the coil is shaped by the short rows alone. For a striped snake, short rows can be worked in alternating contrast and main color from this point forward. Contrast-color short rows are worked the same way — finish the main-color half of the round, place the marker, join contrast for the short row, complete the short row, then continue in main color.
- Round 177 sc + (short row 7 sc, contrast color), 7 sc. (14)
- Round 187 sc + (short row 7 sc, main color), 7 sc. (14)
- Round 197 sc + (short row 7 sc, contrast), 7 sc. (14)
- Round 207 sc + (short row 7 sc, main), 7 sc. (14)
- Round 217 sc + (short row 7 sc, contrast), 7 sc. (14)
- Round 227 sc + (short row 7 sc, main), 7 sc. (14)
- Round 237 sc + (short row 7 sc, contrast), 7 sc, work 1 shift stitch. (14)
- Round 247 sc + (short row 7 sc, main), 7 sc. (14)
- Round 257 sc + (short row 7 sc, contrast), 7 sc. (14)
- Round 267 sc + (short row 7 sc, main), 7 sc. (14)
- Round 277 sc + (short row 7 sc, contrast), 7 sc, work 1 shift stitch. (14)
- Round 287 sc + (short row 7 sc, main), 7 sc. (14)
- Round 297 sc + (short row 7 sc, contrast), 7 sc. (14)
- Round 307 sc + (short row 7 sc, main), 7 sc. (14)
- Round 317 sc + (short row 7 sc, contrast), 7 sc. (14)
- Round 32sc in each st around — no short row. (14)
- Round 33sc in each st around — no short row. (14)
- Round 347 sc + (short row 7 sc, contrast), 7 sc. (14)
- Round 357 sc + (short row 7 sc, main), 7 sc, work 1 shift stitch. (14)
- Round 363 sc, inc, 3 sc + (short row 8 sc, contrast), 7 sc. (15)
- Round 378 sc + (short row 8 sc, main), 7 sc. (15)
- Round 388 sc + (short row 8 sc, contrast), 7 sc. (15)
- Round 398 sc + (short row 8 sc, main), 7 sc. (15)
- Round 408 sc + (short row 8 sc, contrast), 7 sc, work 1 shift stitch. (15)
- Round 418 sc + (short row 8 sc, main), 7 sc. (15)
- Round 428 sc + (short row 8 sc, contrast), 7 sc. (15)
- Round 438 sc + (short row 8 sc, main), 7 sc. (15)
- Round 448 sc + (short row 8 sc, contrast), 7 sc. (15)
- Round 45sc in each st around — no short row, work 1 shift stitch. (15)
- Round 46sc in each st around — no short row. (15)
- Round 478 sc + (short row 8 sc, contrast), 7 sc. (15)
- Round 488 sc + (short row 8 sc, main), 7 sc. (15)
- Round 498 sc + (short row 8 sc, contrast), 7 sc. (15)
- Round 508 sc + (short row 8 sc, main), 7 sc, work 1 shift stitch. (15)
- Round 518 sc + (short row 8 sc, contrast), 7 sc. (15)
- Round 528 sc + (short row 8 sc, main), 7 sc. (15)
- Round 538 sc + (short row 8 sc, contrast), 7 sc. (15)
- Round 548 sc + (short row 8 sc, main), 7 sc. (15)Continue stuffing firmly as you work, packing fiberfill especially into each curve. Do not close the tail end until the snake is fully stuffed; then dec down to close or use a yarn needle to cinch and secure.
Tongue (make 1)
Worked with Iris thread and 1.25 mm hook.
- Round 16 sc in MR. (6)
- Round 2sc in each st around. (6)Work a foundation chain of approximately 10–12 ch for the tongue stem, then split into two forked tips by chaining and working back. Finish off, leaving a long tail for sewing.
Assembly
- Step 1Weave in all yarn ends on the body except the tail end used for closing.
- Step 2Stuff the snake fully and firmly, paying extra attention to the neck curve and each body bend. The coil shape depends on consistent stuffing density throughout.
- Step 3Cinch the tail tip closed: thread the yarn tail onto a tapestry needle and weave through the remaining front loops, pull tight, and secure with a knot. Weave in the end.
- Step 4Position the tongue at the center front of the snout, centered below the safety eyes. Using the long yarn tail, sew the tongue securely in place with a whipstitch, passing through the base of the tongue stem several times.
- Step 5Weave in all remaining ends.
Important notes
💡 Because this pattern is worked in one continuous piece with no joining, use a contrast-color scrap of yarn as your round marker and move it every single round — this small habit will save you from unraveling rounds later to recount stitches.
💡 When carrying the contrast color yarn for stripes, don't cut it between stripe sections — simply carry it loosely up inside the tube of the snake body so it's ready for the next color-change round without extra ends to weave in.
💡 Stuff as you go, not all at once at the end — with 54 rounds forming a long tube shape, add fiberfill in small handfuls every 5-10 rounds so the stuffing stays even and doesn't clump toward one end.
💡 Save the tiny steel 1.25mm hook and fine Iris thread exclusively for the two-round tongue piece — trying to use your main hook will make the tongue too bulky and mismatched in scale to the rest of the snake.
💡 Weigh out your yarn before starting if you're using leftover chenille scraps — you'll need roughly 60-70g of main color and about 15g of contrast color, so it's worth checking your stash quantities early to avoid running short mid-project.
📏 Gauge is not critical for this pattern, but the fabric should be firm with no gaps so the stuffing does not show through.
🇺🇸 This pattern is written in US crochet terminology.
🎨 Alternate colorways: try Himalaya Dolphin Baby color 80403 (about 65g, single color) for a solid snake, or pair color 80331 as the main color with 80316 as the contrast for a different stripe combination.
📐 Fully coiled, the finished snake settles into a soft, sculptural ball roughly 12–15 cm across.
FAQ
Do I need to join each round when making this snake?
No — this pattern works entirely in a continuous spiral, so you never join or turn. Just use a contrast-color yarn marker to track your beginning-of-round and move it up each time.
Can I skip the contrast-color stripes and make a solid-color snake?
Absolutely! The contrast color is optional, so you can simply work all 54 rounds in your main color chenille yarn for a solid, sleek snake — just make sure you still have your full 60-70g of main color yarn on hand.
Why does the pattern call for two totally different hook sizes?
The bulky chenille body needs a larger E-4/3.5mm or F-5/4mm hook for a firm, gap-free fabric, while the delicate fingering-weight tongue thread needs the much smaller 1.25mm steel hook to keep its scale realistic and dainty.
How long does this snake end up when finished?
The finished snake measures approximately 70cm long once fully assembled and stuffed, making it a genuinely substantial amigurumi piece rather than a small toy.
Is this pattern beginner-friendly, or do I need prior amigurumi experience?
It's best suited to confident beginners or intermediate crocheters who are already comfortable with magic rings, increases, and decreases, since the 54-round body relies on consistent, accurate shaping throughout rather than any single difficult technique.