Free Pattern
Step-by-Step
Crochet
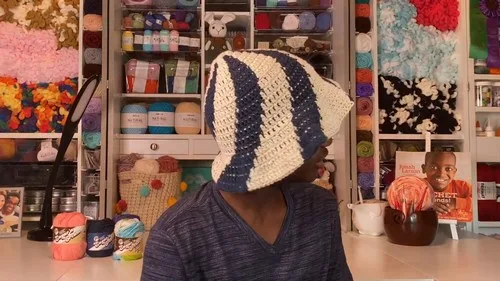
HatsCrochet swirl sun hat with a tapestry-color brim
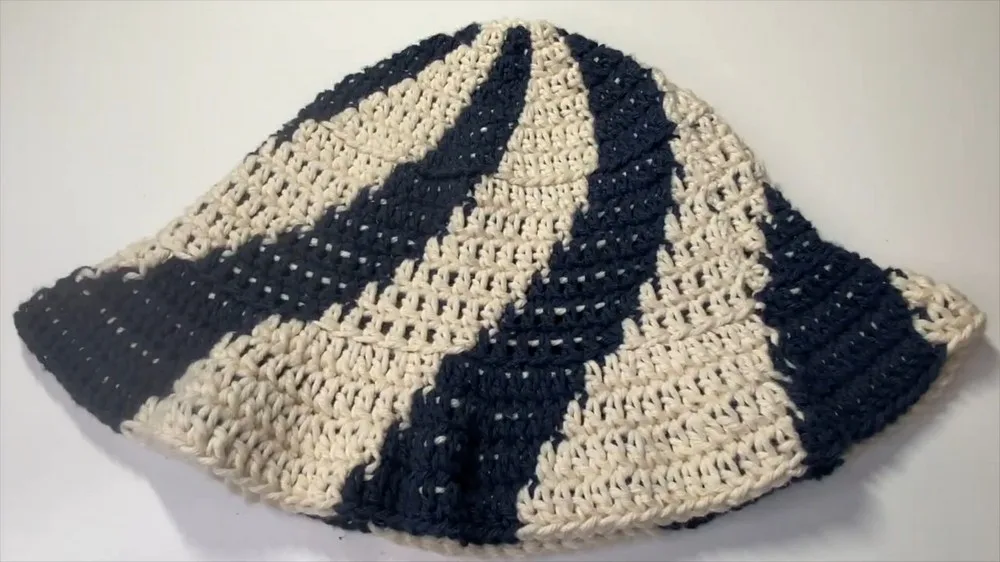
A two-color crochet sun hat built with tapestry increases and a flared back-loop brim.
- Level
- Intermediate
- Time
- 4-6 hours
- Hook
- 5 mm
- Yarn
- Worsted
Pattern highlights
- Start the crown with a small ring, either chained or a magic ring, then build the first round of double crochets.
- Begin the increase round by introducing a second color right before the last yarn-over of the previous stitch.
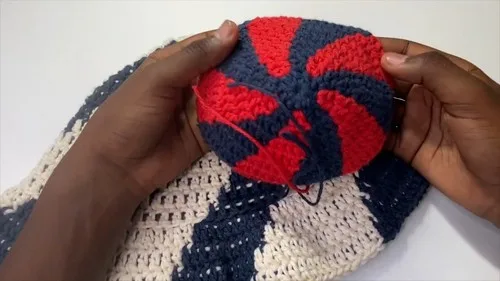
- Work two double crochets in every stitch around, alternating the two colors to start the swirl.
- Shift your starting point slightly at the top of later rounds so the swirl keeps moving rather than stacking.
- Alternate two double crochets in one stitch with a single double crochet in the next to flare the brim gradually.
- Keep swapping colors as needed through the brim so the swirl carries all the way to the edge.
About This Pattern
I keep a folder for hats that start small and spiral outward. This one belongs there, filed under swirl work. It is the kind of pattern that looks complicated from across the room and turns out to be one good trick repeated with discipline. I like those. They reward patience more than skill.
What comes out the other end is a sun hat with a visible spiral climbing from center to brim. The crown stays snug from the ring start. The brim does the work of width. Cotton yarn holds the shape instead of softening it, which matters more than it sounds like it should.
Common mistakes
- Brim worked in both loops Round 3 calls for back loops only. Working both loops erases the ridge that defines the brim.
- Starting point never shifts If every round begins at the same spot, the swirl stacks into a straight line instead of spiraling. Nudge the start each round.
- Floats pulled too tight Carried yarn across the back can pucker the fabric. Check tension on floats before moving to the next round.
- Skipping the join at round's end Each round closes with a slip stitch to the top of the beginning chain-3. Miss it and the stitch count drifts.
Intermediate
Progress Tracker
0 of 0 rounds
Tap a round to tick it off — your place is saved on this device.
The kit
- 5 mm crochet hook
- Lily Sugar and Cream Yarn (cotton, in two colors)
- Tapestry needle (for weaving in ends)
Main Pattern
Alternative start method (Chain Loop Start): make a slip knot, chain 4, join to first chain with a slip stitch to form a ring, chain 3 (counts as first dc), work 9 more dc into the ring, join with a slip stitch to top of beginning chain-3.
Alternative start method (Magic Ring): create a magic ring, chain 3 (counts as first dc), work 9 more dc into the ring, pull the ring closed, join with a slip stitch to top of beginning chain-3.
Round 1Make a slip knot and chain 4; join to form a ring with a slip stitch into the first chain; chain 3 (counts as first double crochet); work 9 double crochets into the center of the ring; join with a slip stitch to top of the beginning chain-3. (10 dc)
Round 2Tapestry Crochet - Increase Round Chain 3; introduce a second color before the final yarn-over of the last stitch of the round; work 2 double crochets in each stitch around, switching colors at intervals to create a swirl pattern, increasing the total number of stitches each round by double crocheting twice in each stitch around using two colors alternately.For the middle section, begin each new round by shifting the starting point slightly to maintain the swirl pattern, continuing to increase regularly so the stitch count aligns with the swirl's movement. Upon reaching the desired hat depth, transition to the brim.
Round 3Brim Double crochet in back loops only, alternating between 2 double crochets in one stitch and 1 double crochet in the next stitch, to gradually widen the brim; intermix color changes as needed to continue the swirl pattern.
Assembly
Step 1Ensure transitions between colors are tight and the patterns align correctly to maintain the swirl effect.
Step 2Weave in all ends securely with a tapestry needle.
Step 3Check the hat for any uneven areas or loose stitches.
Step 4Adjust tightness and fix any floats (carried yarn across the back of the work) to ensure a consistent appearance without gaps or snags.
From the collection
Finishing
- Weave in every end with a tapestry needle, including each color-change tail from the tapestry rounds.
- Check the finished hat for uneven stitches or loose spots before calling it done.
- Hand wash and dry the hat flat so the cotton keeps its shape and the colors don't bleed.
Why it works
The increase happens twice: once evenly across round two, then unevenly in round three, which is what shifts a flat crown into a brim.
Working in back loops only for the brim leaves the front loops as a ridge, marking where crown ends and brim begins.
The slip stitch join at the end of each round keeps the spiral readable as rounds instead of an unbroken coil.
What it becomes
- Garden work, paired with a plain cotton sundress and bare arms.
- Beach days, worn over damp hair with the brim turned down.
- Porch sitting with iced tea, matched to whatever two colors you have left over.
Original pattern: https://crocheteverything.com/promote-your-summer-style-with-a-handmade-crochet-swirl-sun-hat-pattern-perfect-for-chill-in-sunny-days/
FAQ
Can I use the magic ring instead of the chain loop start?
Yes, both are given as alternative starts for round one. Pick whichever you find tidier; the stitch count comes out the same.
Does the brim need to be worked flat?
No, it stays in the round like the crown. The back-loop-only technique creates the flare, not a change to flat rows.
Why cotton yarn instead of wool?
Cotton holds its shape in a structured piece like a brim and handles hand washing well. Wool would relax and lose the flare over time.