
Free Pattern
Step-by-Step
Crochet
AmigurumiCrochet Tiny Baby Animals in a Cradle Pattern
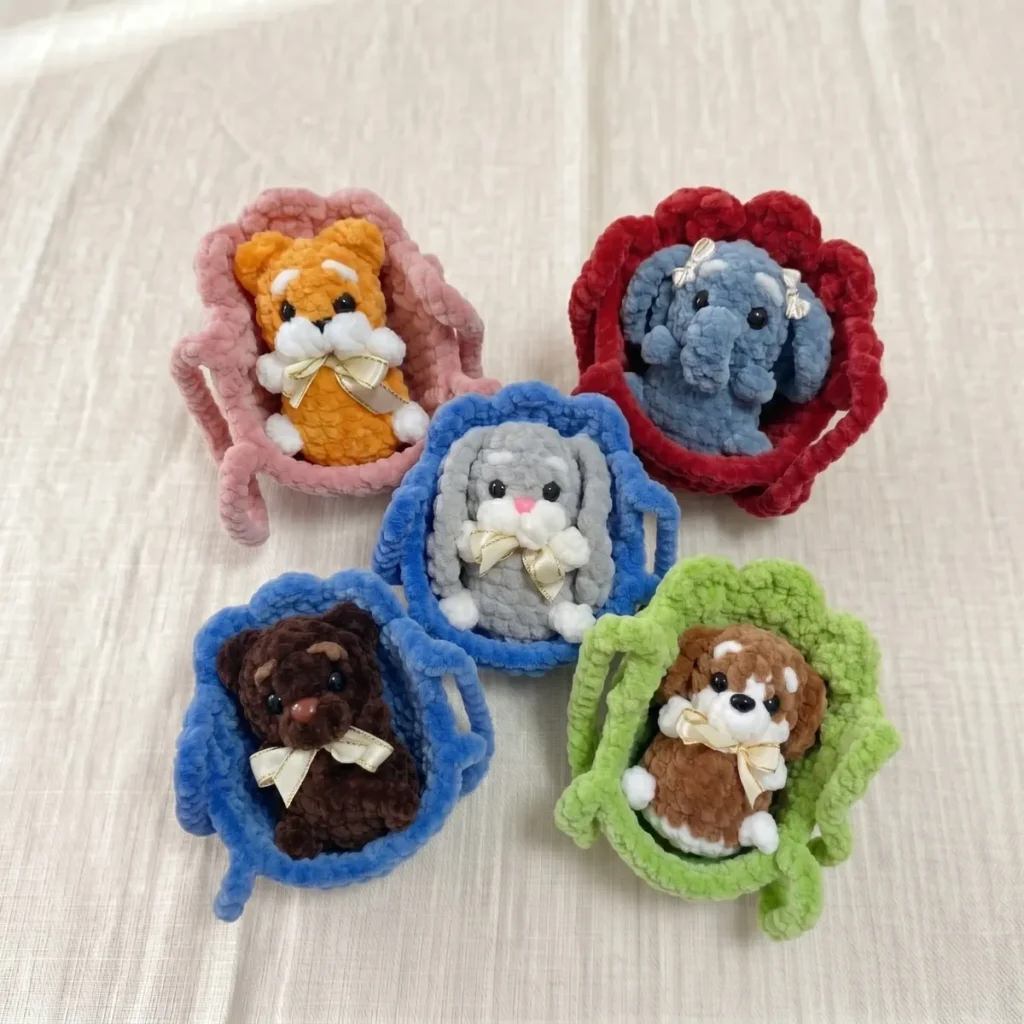
Crochet a tiny bunny, puppy, kitten, and bear snuggled in a cradle with this amigurumi pattern featuring safety eyes, fiberfill, and cozy spiral rounds.
Level IntermediateTime 4-6 HoursHook 4 mmYarn Worsted
Pattern highlights
- Start each animal's ears first, working them as small separate pieces or directly onto the head as directed.
- Build the body and head in one continuous spiral, increasing and decreasing to shape the rounded form.
- Stuff the body and head firmly with fiberfill as you go, rather than waiting until each piece is closed.
- Attach the safety eyes and nose, checking placement for symmetry before securing them permanently.
- Embroider eyebrows and other facial details with embroidery thread or plush yarn to give each animal personality.
- Sew on any separately worked ears, matching their placement evenly on both sides of the head.
- Crochet the cradle in rounds to form the base and sides, then work the smaller pillow to fit inside.
- Nestle your finished animal into the cradle atop its pillow to complete the sweet little scene.
About This Pattern
This pattern lets you crochet an entire nursery scene in miniature — a bunny, puppy, kitten, and bear, each tucked snugly into their own tiny cradle with a matching pillow. What makes this project so special is the sheer charm of scale: every animal is worked in soft plush yarn and finished with sleepy safety-eye faces, so the end result feels like a treasured keepsake rather than a typical toy. It's perfect for crocheters who love amigurumi but want something quicker and more giftable than a full-size stuffed animal.
You'll work each animal's body, head, and ears in continuous spiral rounds, shaping them with increases and decreases as you go, then stuff firmly before closing. The cradle and pillow are worked separately using simple round shaping, so you're really building a small set of coordinated pieces rather than one long project. This is a great pattern for confident beginners ready to level up, or intermediate crocheters who enjoy small-scale amigurumi shaping and finishing details like embroidered facial features.
The finished set is delightfully tiny — each animal fits neatly into its own cradle, small enough to cup in your hand, with a soft plush texture that begs to be squeezed. Because you choose the yarn colors, every version can look totally different: a grey bunny, brown puppy, white kitten, or rust-colored bear, all equally sweet. These little sleepers make wonderful nursery decor, baby shower gifts, or a thoughtful handmade present that feels far more personal than anything store-bought.
Variations
I designed this pattern because I couldn't resist the idea of a whole tiny nursery you could hold in your palm. Working each animal's body and head in one continuous spiral is so satisfying — no seams, no turning, just steady rounds building a rounded little form right before your eyes. I love how the ears differ animal to animal: some are worked flat and sewn on, while the kitten and bear ears are stitched directly onto the head, which keeps things quick and seamless. Stuffing firmly as you go (not waiting until the end) is one of those small techniques that makes a huge difference in how professional the finished piece looks. And then there's the cradle itself — watching a simple round base grow into a little bed with a pillow to match genuinely delighted me. Adding the embroidered eyebrows and facial details at the end is my favorite part; it's where each animal gets its own personality. This is a project I keep coming back to because it's fast enough to finish in a weekend but detailed enough to feel like a real accomplishment.
Common mistakes
- Losing track of the beginning of the round in continuous spiral rounds, which throws off stitch counts on the head and body.
- Place a stitch marker in the first stitch of every round and move it up as you go — never skip this step, especially during increase and decrease rounds.
- Waiting until the piece is fully worked to stuff it, resulting in lumpy or under-filled heads and bodies.
- Stuff firmly in stages as you work, adding fiberfill a little at a time so it settles evenly and the shape stays rounded rather than lopsided.
- Working decreases as regular single crochet decreases, which leaves visible bumps on visible parts like the head and ears.
- Use the invisible decrease technique (working through only the front loops of the next two stitches) for a smoother, more professional-looking decrease on all visible rounds.
- Gluing or attaching safety eyes and nose before double-checking placement, resulting in an off-center or uneven face.
- Insert eyes and nose loosely first, then step back and compare left-to-right symmetry before securing permanently with the washer backing or craft glue.
- Using a hook that's too large for the plush yarn, leaving visible gaps between stitches where fiberfill peeks through.
- Size down to the smaller recommended hook (F/5 or G/6) as noted in the pattern — a tighter gauge keeps the stuffing fully contained and the fabric dense.
- Forgetting that ears worked directly onto the head (for the kitten and bear) need careful stitch placement to look symmetrical.
- Count stitches from the marked center point on both sides before starting each ear so they land in mirrored positions on the head.


Intermediate
Progress Tracker
0 of 0 rounds
Tap a round to tick it off — your place is saved on this device.
Materials
Yarn
- Plush yarn, worsted weight (approx. 120 m / 100 g) — suggested colors: grey, brown, white, orange/rust
Hook
- US size G/6 (4 mm) or F/5 (3.75 mm)
Safety eyes
- 8 mm (x2 per animal)
Safety nose
- 5 mm (or embroider with yarn)
Stuffing
- Polyester fiberfill
- Tapestry needle
- Stitch marker
- Embroidery thread or plush yarn for eyebrows and facial details
- Craft glue (optional, for securing nose/eyes)
- Scissors
Baby Bunny — Ears (Make 2)
this … Work with grey yarn.
Step by step: Work with white yarn.
Step by step: Work with rust/orange yarn.
Step by step: Work with grey yarn.
Step by step: Work with grey yarn.
- Round 1Ch 9. Starting in 2nd ch from hook: 2 sc, 2 hdc, 3 dc. In the last (corner) ch work 6 dc. Continue along opposite side of chain: 3 dc, 2 hdc, 2 sc. Sl st to join. Fasten off. Ears will be crocheted in during head construction.
Baby Bunny — Body + Head
Work with grey yarn.
- Round 1mr, 6 sc (6)
- Round 2(inc) × 6 (12)
- Round 3(1 sc, inc) × 6 (18)Tail: ch 4, starting in 2nd ch from hook, 3 sl st; 6 sc. Paw: ch 3, starting in 2nd ch from hook, 2 hdc. 6 sc. Paw: ch 3, starting in 2nd ch from hook, 2 hdc. 6 sc. (18)Step by step: Switch to brown yarn.Brown — Tail: ch 5, starting in 2nd ch from hook, 4 sc, sl st to base; 6 sc. White — Paw: ch 3, starting in 2nd ch from hook, 2 hdc. Brown 6 sc. White — Paw: ch 3, starting in 2nd ch from hook, 2 hdc. Brown 6 sc. (18)Step by step: Continue with brown; do not cut white.
- Round 4With grey — Tail: Bobble (4-dc) in first st; grey 6 sc. With white — Front paw: ch 3, starting in 2nd ch from hook, 2 hdc. Grey 5 sc. With white — Front paw: ch 3, starting in 2nd ch from hook, 2 hdc. Grey 6 sc. (18)Continue with grey yarn; do not cut white.
- Round 5-7(3 rounds) 18 sc (18)7 sc. White — Paw: ch 3, starting in 2nd ch from hook, 2 hdc. 5 sc. White — Paw: ch 3, starting in 2nd ch from hook, 2 hdc. 6 sc. (18)Brown 7 sc. White — Paw: ch 3, starting in 2nd ch from hook, 2 hdc. Brown 5 sc. White — Paw: ch 3, starting in 2nd ch from hook, 2 hdc. Brown 6 sc. (18)
- Round 8Grey 7 sc. White — Paw: ch 3, starting in 2nd ch from hook, 2 hdc. Grey 5 sc. White — Paw: ch 3, starting in 2nd ch from hook, 2 hdc. Grey 6 sc. (18)
- Round 9(1 sc, dec) × 6 (12)
- Round 10(1 sc, inc) × 6 (18)Step by step: 18 sc (18); Stuff body.10 sc. Trunk: ch 6. Starting in 2nd ch from hook: 5 sc, sl st into base of trunk chain. 8 sc. (18)Fold flat with wrong side inside. Join both edges together with 2 sc through both layers. Fasten off, leaving a tail for sewing.Tail: ch 6, starting in 2nd ch from hook, 5 sc, sl st to top of base stitch; 6 sc. White — Paw: ch 3, starting in 2nd ch from hook, 2 hdc. 6 sc. White — Paw: ch 3, starting in 2nd ch from hook, 2 hdc. 6 sc. (18)8 sc. White — Muzzle: Bobble (3-dc); orange 1 sc; white — Bobble (3-dc). Orange 7 sc. (18)Step by step: Brown 6 sc; white 7 sc; brown 5 sc. (18); Stuff body; Brown 6 sc; white: 3 sc, Bobble (4-dc), 3 sc; brown 5 sc. (18); (2 rounds) Brown 9 sc, white 1 sc, brown 8 sc. (18).Insert safety eyes between Rnds 12–13 with 3 sc spacing. Glue nose in place. Fasten off and secure white yarn. Stuff head.3 sc. Work with ear: 3 sc worked through both head stitch and ear edge. 7 sc. Work with second ear: 3 sc through both layers. (18) (Note: original pattern counts 18 here)Ensure the muzzle area is centered. If necessary, work one shift stitch to align.
Step by step: Body and tail in main color (orange); paws and muzzle in white.
Step by step: Stuff body.
- Round 118 sc. White — Muzzle: Bobble (3-dc); grey 1 sc; white — Bobble (3-dc). Grey 7 sc. (18)Begin stuffing. Fasten off and secure white yarn.
- Round 124 sc, dec, 7 sc, dec, 3 sc. (16)Insert safety nose between Rnds 11–12.
- Round 1316 sc (16)Insert safety eyes between Rnds 12–13 with 3 sc between them. Stuff head, shaping the cheeks as you fill.
- Round 14(2 sc, dec) × 4 (12)
- Round 152 sc. Work ear into next 2 sts: 2 sc worked through both the head stitch and the ear edge simultaneously. 6 sc. Work second ear into next 2 sts: 2 sc through both layers. (12)
- Round 16(dec) × 6 (6)Fasten off. Pull tail tight to close opening. Weave in end. Embroider eyebrows if desired.
Baby Puppy — Ears (Make 2)
Work with brown yarn.
- Round 1Ch 5. Starting in 2nd ch from hook: 2 hdc, 1 sc. In corner ch: 3 sc in one stitch. Along opposite side: 1 sc, 2 hdc. Fasten off, leaving a tail for sewing.
Baby Bear — Body + Head
Work with brown yarn.
- Round 1mr, 6 sc (6)
- Round 2(inc) × 6 (12)
- Round 32 sc, (inc) × 3, 3 sc, (inc) × 3, 1 sc (18)
- Round 4Tail: Bobble (4-dc) in first stitch; 6 sc. Paw: ch 3, starting in 2nd ch from hook, 2 hdc. 5 sc. Paw: ch 3, starting in 2nd ch from hook, 2 hdc. 6 sc. (18)
- Round 5-7(3 rounds) 18 sc (18)
- Round 87 sc. Paw: ch 3, starting in 2nd ch from hook, 2 hdc. 5 sc. Paw: ch 3, starting in 2nd ch from hook, 2 hdc. 6 sc. (18)
- Round 9(dec) × 9 (9)
- Round 10(inc) × 9 (18)Stuff body.
- Round 116 sc, inc, 6 sc, inc, 4 sc (20)
- Round 1210 sc. Muzzle Bobble: 3 dc in next st + 3 dc in following st, all joined at top (6 dc total, shared crown). 8 sc. (19)
- Round 13-15(3 rounds) 19 sc (19)Insert safety eyes between Rnds 12–13 with 3–4 sc spacing. Glue nose in place.
- Round 16(3 sc, dec) × 3, 2 sc, dec (16)
- Round 17(2 sc, dec) × 4 (12)
- Round 18(dec) × 6 (6)Step by step: Fasten off and close. Sew ears between Rnds 12–13. Embroider eyebrows.Step by step: Fasten off and close. Attach nose and eyes in preferred positions.Fasten off and close opening. Weave in ends. Add eye indentation and embroider brows if desired.Fasten off and close.
The Cradle
- Round 1Ch 7. Starting in 2nd ch from hook: inc, 4 sc. In last corner ch: 4 sc in one stitch. Along opposite side: 4 sc, inc. (16)
- Round 2(inc) × 2, 4 sc, (inc) × 4, 4 sc, (inc) × 2. (24)
- Round 3(1 sc, inc) × 2, 4 sc, (1 sc, inc) × 4, 4 sc, (1 sc, inc) × 2. (32)
- Round 4(2 sc, inc) × 2, 4 sc, (2 sc, inc) × 4, 4 sc, (2 sc, inc) × 2. (40)
- Round 58 sc, (inc, 2 sc, inc), 16 sc, (inc, 2 sc, inc), 8 sc. (44)
- Round 6BLO: 44 sc. (44)
- Round 7-9(3 rounds) 44 sc (44)Work one shift stitch to realign round start.
- Round 1012 sc. (Skip 1 st — Bobble (4-dc) in next st — skip 1 st — sl st + ch 1) × 4. Skip 1 st — Bobble (4-dc) in next st — skip 1 st. Handles: ch 30, skip 4 sc, sl st to 5th sc. Continue: 13 sl st. 14 sl st. Handles: ch 30, skip 4 sc, sl st to 5th sc. Ch 1.
Handles may be made separately and sewn on if preferred.
Cradle Pillow
Work with white yarn.
- Round 1mr, 8 hdc. (8)
- Round 2(inc in hdc) × 8. (16)1 sc, sl st. Fasten off, secure, and weave in ends.
Baby Kitten — Ears (worked directly onto head)
Join yarn to Rnd 14 at chosen ear position, leaving a short starting tail. Sl st into first stitch. In next stitch: 1 hdc, 1 dc, 1 hdc. In following stitch: 1 sc. Fasten off, leaving a tail. Thread both tails onto needle, draw to same point, knot together, and hide inside toy. Repeat for second ear.
Baby Bear — Ears (worked directly onto head)
Join yarn to head at desired ear position, count 3 sc from eye for placement. Sl st. In next stitch: 1 hdc. In following stitch: 2 dc. In next stitch: sl st. Fasten off, leaving a tail. Thread both ends, draw to same point, knot, and hide inside toy. Repeat for second ear.
Assembly
- Step 1Place the finished pillow flat inside the cradle base.
- Step 2Gently position one or more completed animals on top of the pillow.
- Step 3Animals sit inside without being sewn — they can be removed for play.
- Step 4If you worked the cradle handles separately, sew them to the long sides of the cradle at approximately Rnd 10 height, evenly spaced.
- Step 5For the puppy, sew the ears to the head between Rnds 13–14, one on each side, using the yarn tail left when fastening off.
- Step 6For the elephant, sew ears to the head between Rnds 12–13, positioned symmetrically.
- Step 7For the bunny, ears are crocheted into Rnd 15 during construction — no sewing needed.
Important notes
💡 Use a slightly smaller hook than you'd normally choose for worsted weight yarn — this tightens your gauge so fiberfill won't show through the stitches on these small pieces.
💡 Keep your stitch marker moving up every single round; because everything is worked in continuous spiral, it's easy to lose your place on the smaller pieces like ears.
💡 Stuff as you go, not at the end — add small amounts of fiberfill every few rounds so the body and head hold their round shape without lumps.
💡 If you're nervous about safety eye placement, insert them without the backing first and hold the piece up to check symmetry before locking them in place.
💡 Craft glue is optional but genuinely helpful for securing the 5 mm nose in place before final stitching, especially on such a small facial area.
💡 Weave in yarn tails from color changes or ear attachments as you finish each piece rather than saving them all for the end — it's much easier to manage on tiny amigurumi.
FAQ
What size are the finished animals in the cradle?
Each animal is quite small since it's worked with a smaller hook (F/5 or G/6) and worsted weight plush yarn, fitting neatly into its own tiny crocheted cradle. Exact size will vary slightly based on your tension and yarn choice.
Can I make just one animal without the cradle?
Absolutely — the bunny, puppy, kitten, and bear bodies, heads, and ears are worked as standalone pieces, so you can skip the cradle and pillow entirely. This is a great option if you want a quick single amigurumi gift.
Do I need safety eyes, or can I embroider the faces instead?
The pattern calls for 8 mm safety eyes per animal, but the notes confirm you can embroider or glue on a 5 mm nose instead if you prefer a no-hardware finish. This is especially handy if the toy is intended for a very young child.
Why are some ears worked separately and others worked directly onto the head?
The bunny and puppy ears are made as separate pieces and sewn on for a more defined shape, while the kitten and bear ears are worked directly into the head rounds for a quicker, seamless finish. Both methods are intentional design choices based on each animal's look.
What yarn works best for this pattern?
A plush worsted weight yarn (around 120 m per 100 g) gives the animals their soft, huggable texture and is specifically recommended in the materials list. Standard worsted acrylic will also work, though the finish will be slightly less velvety.